
What Is VBA Loops In Excel?
VBA Loops allow us to perform the same set of actions across multiple cells, worksheets, workbooks, etc. For example, if we want to insert a serial number from 1 to 10 in the first 10 rows, then we need not have to write 10 line of code. Rather, we can use loops to perform the actions across ten different cells.
Use this VBA Loops Template to follow along with the examples in this article.
Download Excel TemplateFollowing are some practical examples of using VBA loops in Excel.
- Loop through a range of cells and perform the same set of actions. For example, apply formatting or insert text.
- Loop through multiple worksheets and perform some actions or tasks. For example, hide or unhide sheets.
- Loop through multiple workbooks and do something. For example, save and close all the opened workbooks except the current workbook.
- Loop through all charts and do something. For example, change the font or style.
- Loop through arrays.
- Loop through all the characters in a cell and extract a specific portion of the text.
These are all the activities possible by using VBA loops and working efficiently with VBA.
Key Takeaways
- VBA Loops help us to perform the same tasks multiple times based on the number provided in the loop.
- There are four types of VBA loops in Excel, and those are, FOR NEXT VBA LOOP, FOR EACH VBA LOOP, DO WHILE VBA LOOP, and DO UNTIL VBA LOOP.
- The For Next VBA LOOP is used to loop through cells.
- Similarly, the For Each VBA Loop is used to loop through objects.
- Do While and Until works in a similar fashion. However, the logic given should be vice-versa.
#1 – For Next VBA Loop
The For…Next loop is used to repeat the same code as many numbers of times as specified in the code. Here, we must mention the starting and ending position of the loop. The For…Next LOOP is used to loop through cells and perform the same set of actions.
For instance, we must insert serial numbers from 1 to 10 in cells A1 to A10. The starting position of the loop is 1, and the ending position is 10. Here, the loop will run ten times and repeat the same set of actions across all 10 cells.
Syntax
The following is the syntax of the For…Next LOOP.

In the For…Next LOOP, we must assign the variable and give starting and ending numbers to insist on how many times the block of code must be executed. The code will keep executing until it reaches the end number.
Example #1 – Insert Serial Numbers
For instance, assume we must insert serial numbers from 1 to 10 in cells A1 to A10. For this, we can write the code as shown in the following image.

The above code will insert the number 1 to cell A1, 2 to cell A2, and so on.

However, the problem here is that for every cell, we have written different lines of code. Totally there are 10 lines of code written for this. To avoid these lengthy codes, we can use FOR NEXT LOOP.
Step 1: Enter the Sub-procedure name as shown in the following image.

Step 2: Define a variable to start the For…Next LOOP and assign a data type as an integer.

Step 3: Open the For…Next LOOP with the variable.

Step 4: Once the loop starts, we must give the starting and ending of values of the loop. In this example, our starting number is 1, and the ending one is 10.

Step 5: Before we write the block to repeat the execution, we must increment the FOR LOOP’s variable value by using the word NEXT [Variable name] format as shown in the box below.

Step 6: Inside the For…Next LOOP, we will write the code that is to be repeated. We reference cells by using the CELLS property.

Step 7: We must provide the row number for the CELLS property. Instead of providing the row number as a constant, we can provide the variable name.

Step 8: Next, provide the column index number as 1.

Step 9: Select the VALUE property and set the value to the variable k.

The coding part is complete. Now we will execute the code line by line by pressing the F8 key.
Step 10: Place the cursor inside the macro and press the shortcut key F8 to begin the macro.

Step 11: Place the cursor on the variable k to see the value.

Step 12: As of now, the value of k is zero. Press the F8 key one more time and see the value of variable k.

The value of k is 1 i.e., the loop is running for the first time, and starting position of the loop is 1.
Hence the value of k is 1 throughout this code for now.
Step 13: In the CELLS property, we have provided the variable k, which references the cell like CELLS(1,1) i.e., cell A1 and the value in the cell will be equal to the value of the variable k, i.e., 1.
Press the F8 key one more time, and we get the value 1 in cell A1.

Step 14: Press the F8 key one more time, and it will go back to the code inside, and the value of variable k now will be 2.

K value is equal to 2 i.e., the loop is running for the second time, and wherever k is there, the value will be 2.
Hence, CELL(K,1) will be CELLS(2,1) i.e., cell A2.
Step 15: Press the F8 key, and it will insert the value 2 in cell A2.

Step 16: Similarly, the loop runs 10 times and exits the loop once the value of k reaches 10.
Press the F5 key to complete the code in a single shot, and we should see serial numbers 1 to 10 in cells A1 to A10.

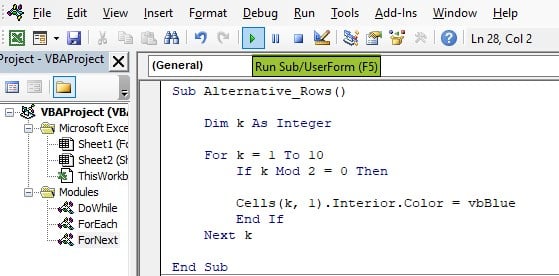
Example #2 – Format Alternative Cells
Assuming we must apply some color formatting for every alternative row. We can use the FOR NEXT LOOP to apply color formatting.
The following code will fill every alternative cell with blue color.

Copy the above code and paste it into the Visual Basic Editor.

Run the code by pressing the F5 key. It fills every even row cell with the blue color.
#2 – For Each VBA Loop
The For…Each LOOP is used to loop through objects. The following are the objects in Excel:
- All opened workbooks are objects.
- All worksheets are objects.
- All cells or a range of cells are objects.
- All shapes and charts are objects.
Syntax
The syntax of the FOR EACH LOOP is as follows.

Example #1 – Hide All Worksheets
If you are working with large worksheets, you may often need to hide worksheets. Using the FOR…EACH LOOP, we can loop through all the available worksheets and hide them.
For instance, look at the following worksheets.

We must hide all the worksheets except the worksheet named “Sheet1”. The following code will loop through all the worksheets and hide them.

This will hide all the worksheets except the worksheet named “Sheet1”.

Example #2 – Unhide All Worksheets
Once the worksheets are hidden, we may have to unhide them with a single click. The following code will unhide all the worksheets.

This will unhide all the hidden sheets in the workbook.
#3 – Do While VBA Loop
The Do…While Loop is used to run a loop while the applied condition is met or TRUE. There are two types of syntax available for the Do While Loop.
Syntax #1

Syntax #2

In syntax #1, the loop will begin, and test if the condition is TRUE. It will execute the code inside the loop while the condition is TRUE. Once it is FALSE, it will come out of the loop.
In syntax #2, the loop will begin and execute the code inside the loop, then test the condition in the end. If the condition is TRUE, only thenit will return back to the loop, or else it will exit the loop.
For example, look at the following code.

The above code will insert the values from 1 to 10.
- First, we must set the variable k value to 1.
- Then, we should apply the condition. While k value is less than 10, insert serial numbers in column A.
- Then, inside the loop, we increment the k value by 1 every time the loop runs. As long as the k value is less than 10, it keeps executing the code inside the loop, and once the k value is more than 10, it will exit the loop.
#4 – Do Until VBA Loop
Do…Until Loop is similar to the Do…While Loop. The Do…Until Loop runs until its condition is TRUE, and the Do…While loop runs while the condition is TRUE.
We can take the same code from the Do…While example.

The only change we did from the previous code is that we added the word Until instead of While and changed the condition to >10.
This loop will keep running until the variable k value reaches 11 and inserts values. Once the variable k value reaches >10, it exits the loop.
Important Things To Note
- It is necessary to put the Next word at the end of the loop for both FOR…NEXT and FOR…EACH VBA loops.
- The objects in Excel are Cell, Cells, Worksheets, Workbooks, Charts, and Shapes.
- If you put the condition at the bottom of the Do While and the Do…Until loop, the loop will first execute the code and then test the condition.
- CELLS is a property in VBA. Always supply a variable name for the row number of the cell’s property.
Frequently Asked Questions (FAQs)
If we want to exit the loop on certain conditions, we can use the EXIT FOR LOOP. If we want to stop it while it is running, we can use the shortcut key Ctrl + Break.
Loops are used to repeat the same set of code multiple times.
Between FOR NEXT and FOR EACH, the FOR EACH loop is faster. However, if we are using smaller datasets then we won’t see any difference at all.
In any programming, language loops are so crucial to working efficiently. Without using loops, we need to write lengthy codes, and it is not a good practice at all.
It helps the coder to reduce the number of coding lines drastically and work efficiently.
Use this VBA Loops Template to follow along with the examples in this article.
Download Excel Template