What Is Database In Excel?
A database is a system that collects data and stores it in a predefined format in an electronic mode. Storing the data in a database makes the maintenance of the data easy, and manipulation is also quite easy. Data can be facts related to any specific object, such as name, age, date of birth, height, weight, and many other things related to a person.
In the database, we have two terminologies i.e., record and field. A record is row-wise data of one object, and a field is a column containing the data of all the objects. For instance, sales billing software stores the data of the product, category, invoice number, invoice value, tax amount, discount, and many other things related to one particular bill.
Database Structure – Excel Table
Excel Table format is the commonly used table for designing the database structure. In Excel language, we call the records as rows and fields as columns. For instance, look at the following table in an Excel spreadsheet.
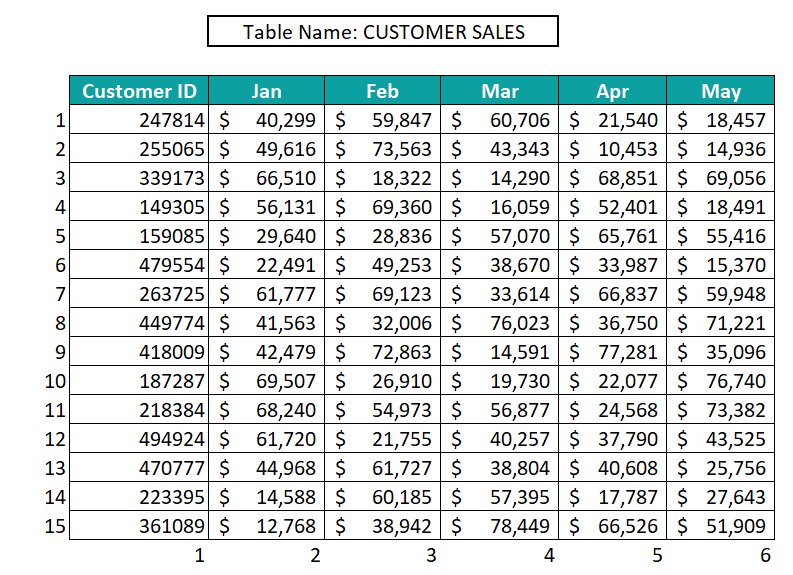
In the above database table Customer Sales, we have 15 records and 6 fields. For instance, record 1 customer id ‘247814’ contains the fields of sales of different months.
This is the typical structure of the database in Excel Table.
Table of contents
Key Takeaways
- The database collects data and stores it in a predefined format.
- Creating the database to extract the data based on various conditions and criteria is possible through Excel Table format.
- Database creation requires the table to be structured to be designed and requires what granularity-level data needs to be stored.
- Maintaining different tables for facts and dimensions.
- Creating an Excel Table format makes scrolling easy and also creates structured references.
- In the database, rows are called records, and columns are called fields
How To Create A Database In Excel?
Example #1 – Create Sales Transaction Table
Sales transactions are common in the business world, and maintaining a database for sales is very important to analyze them. The steps involved in designing the sales table are:
- Step 1: Enter the Sales Table Field Names
The first thing we need to do is identify what granularity level we need to store the data in the database table. Granularity is nothing but the level of information we need to store.
For instance, a single bill may contain multiple products, and each product will have its category. So, whether we need to store the data at the bill granularity level or if we want to store the data at the bill as well at each product level.
With granularity, we can identify the fields needed in the sales table database. The following are the sample fields for our reference.

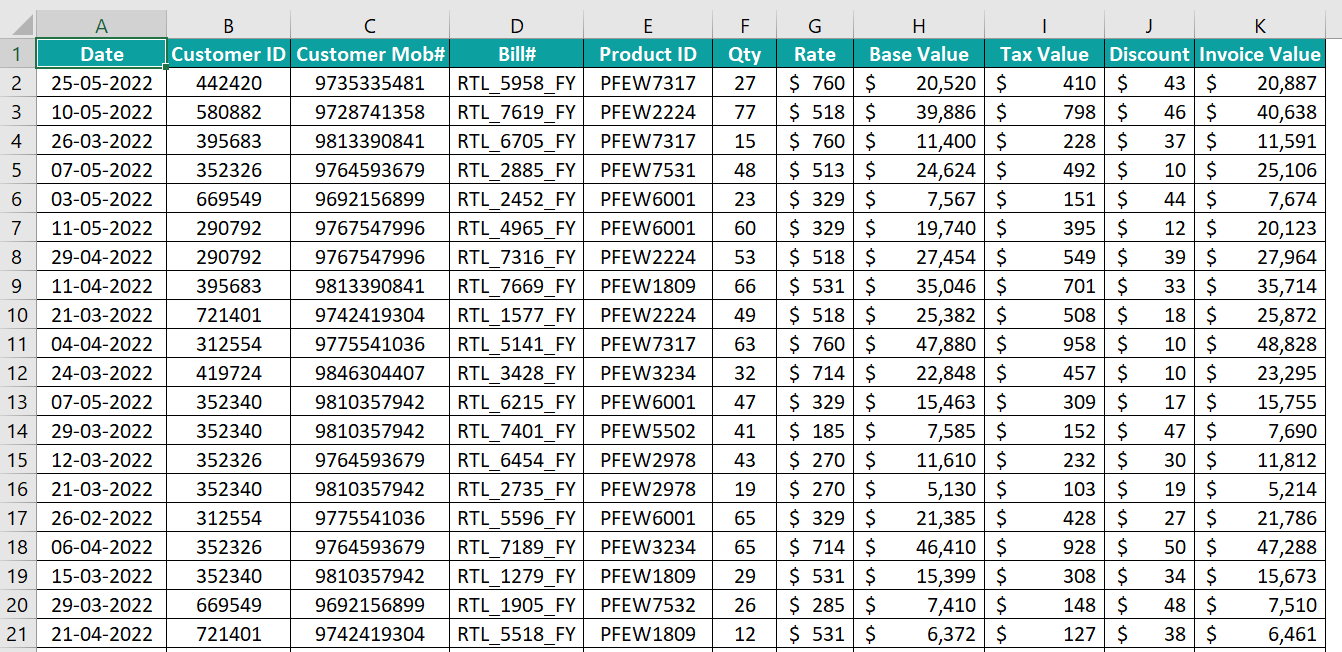
We have added the Date, Customer ID, Customer Mob#, Bill#, Product ID, Qty, Rate, Base Value, Tax Value, Discount, and Invoice Number.
- Step 2: Apply Necessary Formulas
Next, we should apply the necessary formula to arrive at the values dynamically. For instance, to arrive at ‘Base Value,’ we need to apply the formula ‘Qty * Rate.’

Similarly, to arrive at ‘Invoice Value’, we need to apply the formula ‘Base Value + Tax Value – Discount.’

- Step 3: Enter Data into Database Table
Next, we need to enter the data or records into all the fields. We can enter the data manually or automate the process using the software. The following image shows the sample table data.
Special Note: While entering the data, do not leave any rows empty. This is the beginning of the real problems in the future. For instance, take a look at the following example image.

After entering the bill number ‘RTL_1206_FY,’ there is an empty row and another entry in the list.
This is the real issue. However, there are possibilities that some of the fields are empty in the database but not the entire row.
For instance, look at the following image.

In cells C282 and C286 customer’s mobile numbers are empty. This is the possibility where the customer is not interested to give their mobile number.
On a similar line, strictly avoid having empty columns as well. For instance, take a look at the following image.

In column I, we have a blank column, and Excel won’t treat this as the continuation of the table, and the database will end its reading at column H.
The moment Excel finds an empty row or column, it is unable to include the rows or columns which come after the empty rows and columns. Hence, the two different tables and the calculation will not include the second table.
- Step 4: Convert the table into Excel Table format
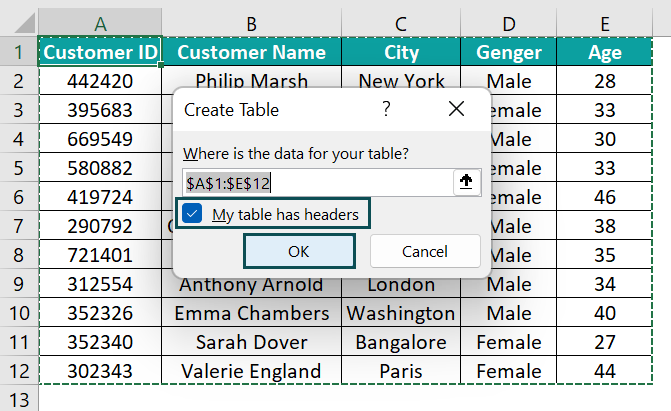
To work efficiently and dynamically, we need to convert the database table into Excel Table format. Select any of the cells in the table and press the shortcut key Ctrl + T to bring the following Create Table window.
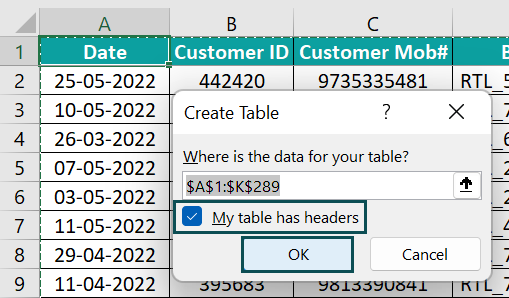
Make sure to select the check box My table has headers because our table has fields i.e., headers.
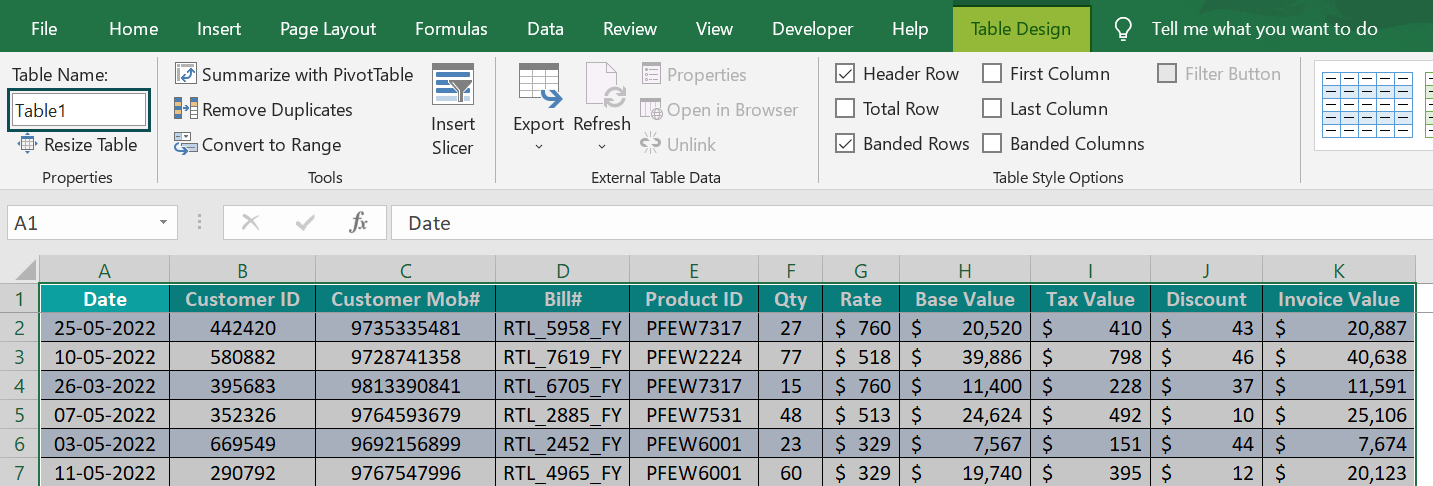
Click on OK. We can see that the table is converted into Excel Table format.
- Step 5: Give a Name to Excel Table
Next, we need to give a name to the Excel table to work with the database table easily.
Once the table is created, it will bring a new tab called Table Design. Under this tab, give a name as Sales_Table.
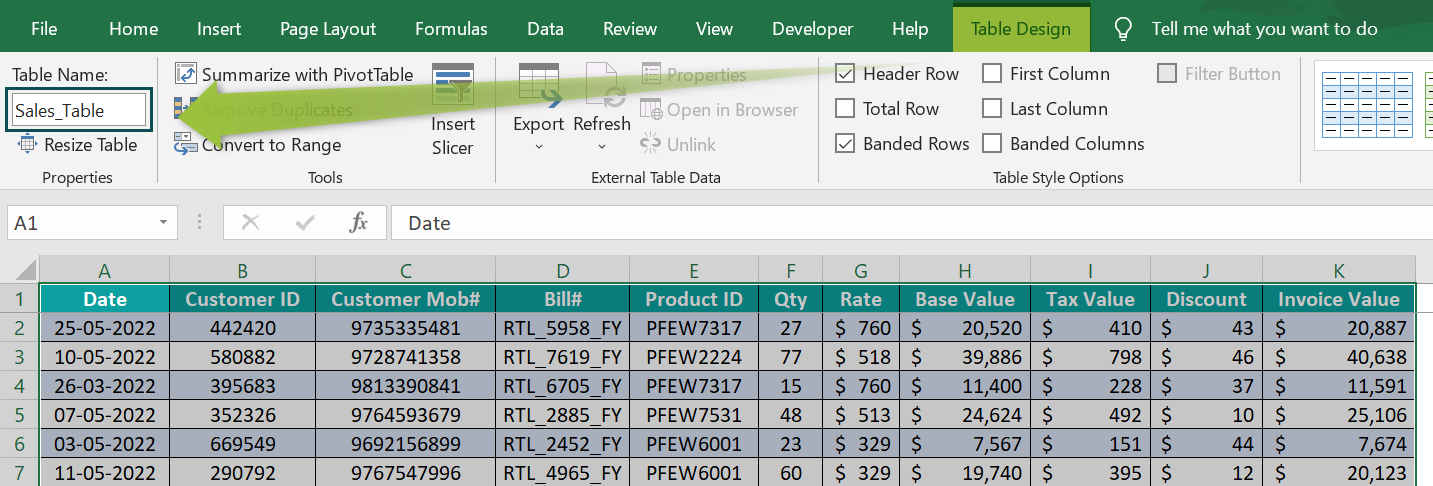
In this way, we can design a database in Excel.
Example #2 – Create Dimension Table
In Example #1, we have created a fact table i.e., numerical data of bills. Similarly, we need to design dimension tables. The dimension table is the attributes of products and customers.
For instance, in the fact table “Sales_Table” we have only Product ID, but we do not have information like the name of the product, category, sub-category, and many other attributes of the product.
Similarly, we have only the Customer ID and mobile number. Other information about the customer like the country they belong to, gender, age, etc.,
First, create a field for the product table.
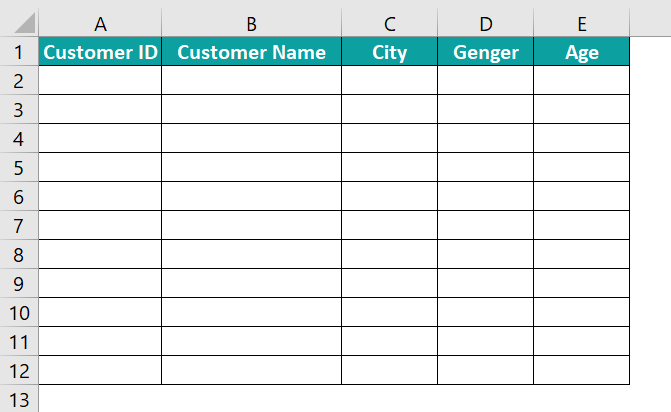
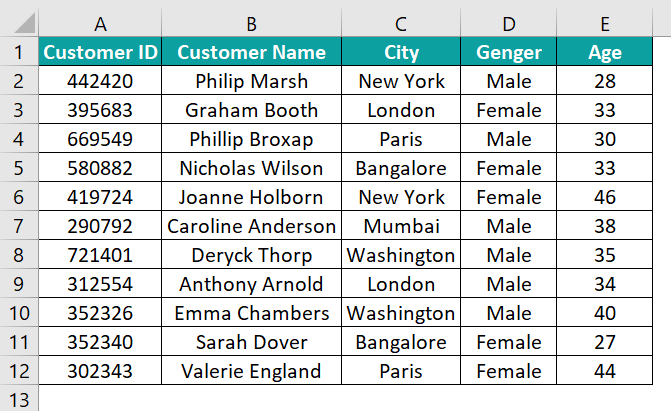
Enter the data related to the customers.
Note: In this customer dimension table, all the customer IDs should be unique.
Convert the above table into Excel Table format. Select the table and press the shortcut key Ctrl + T to convert it into Excel Table.
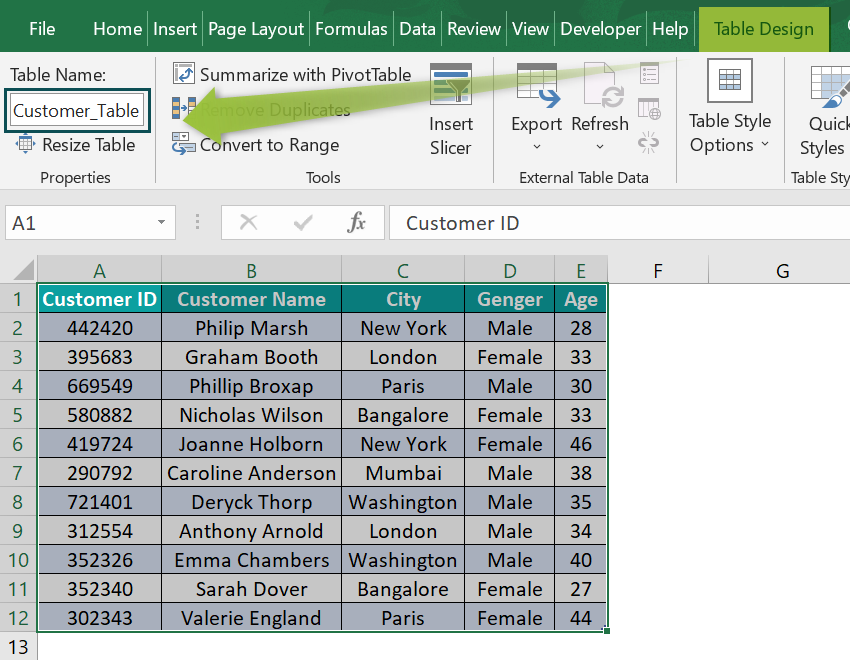
Once the table created, give a name to the table as Customer_Table.
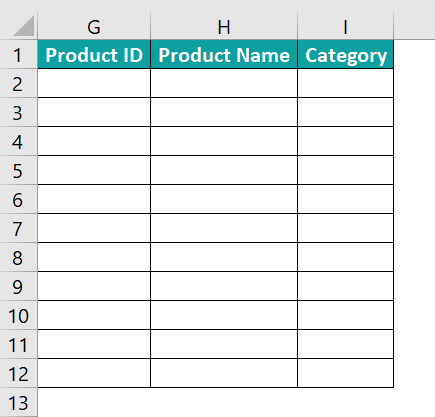
Similarly, create product table fields as follows.
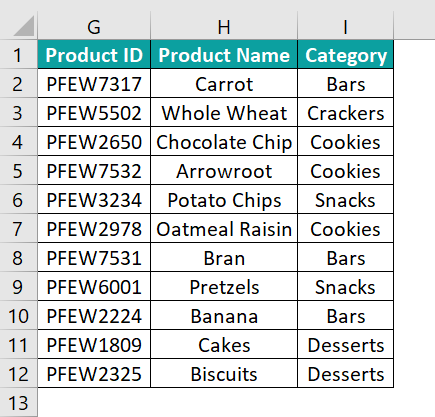
Enter the details about the product. In this dimension table also, product information should be unique.
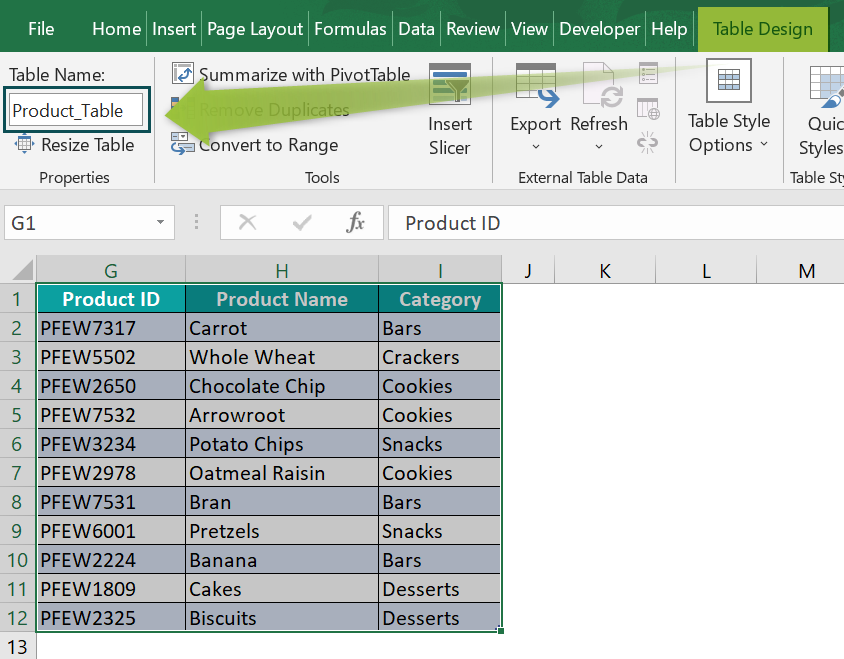
Convert the product table into Excel Table format and name it as Product_Table.
Whenever any information is needed from the customer table, we can pull the data based on the customer ID, and similarly, we can pull the product information based on product ID. These two columns are the common columns between the dimension table and the fact table.
How To Maintain Database In Excel?
After creating a Database in Excel through the table, we need to make some amendments to the database table to make searching for the data much easier.
The steps involved in maintaining the database in Excel are:
- Step 1: Data Sorting
First, we should sort the data based on date columns to store data in chronological order. Select the data table and press the sorting shortcut keys ALT + D + S to open the following sort window.
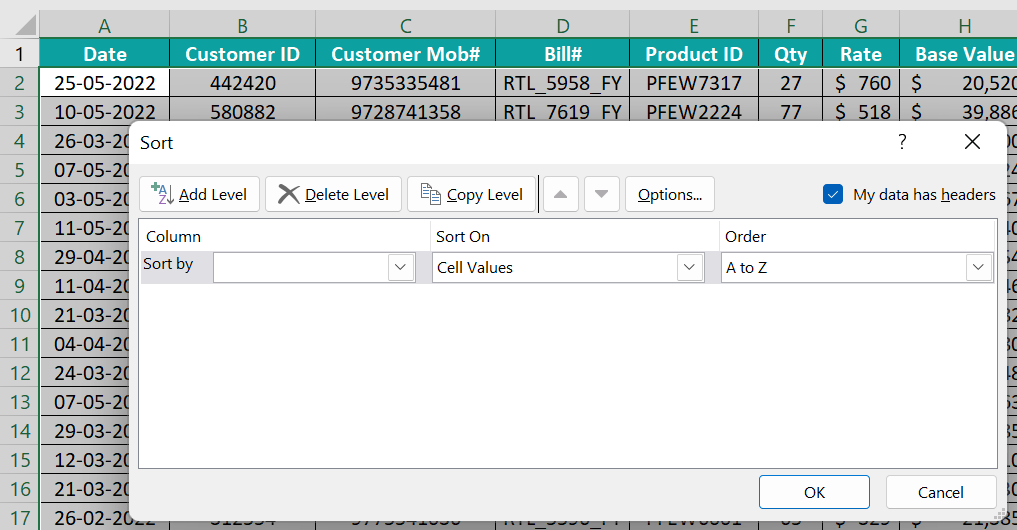
Choose the date column from the sort by the drop-down window and choose oldest to newest under Order drop-down.
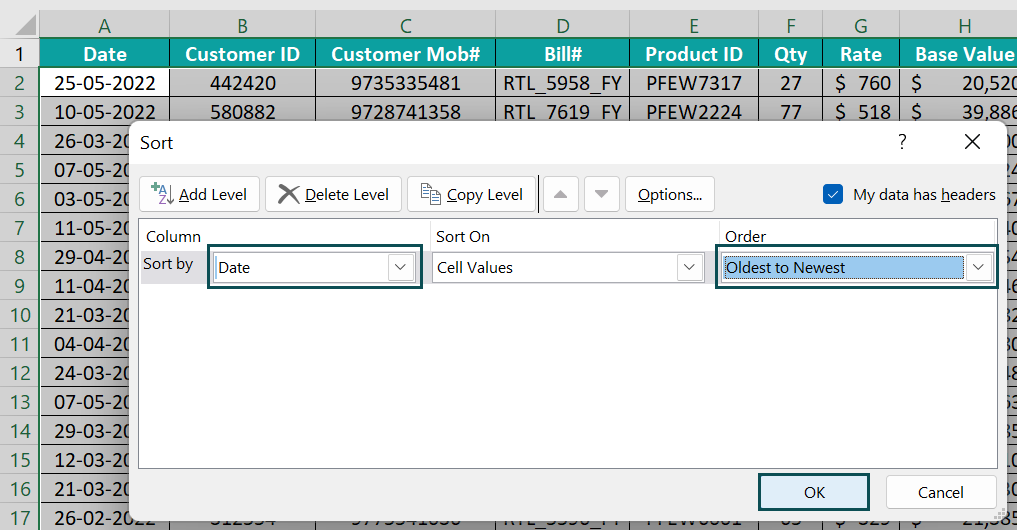
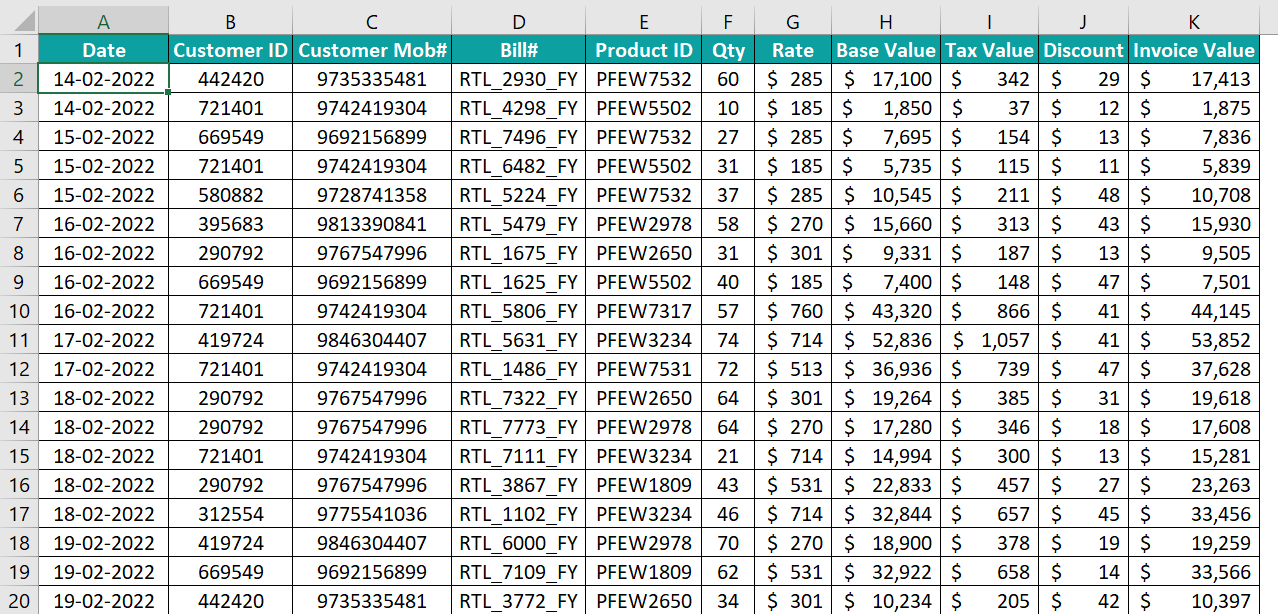
Click on OK. Clearly, we can see that the data is sorted based on date.
- Step 2: Playing Around with the Data
Next, we can use the database in Excel. For instance, if we want to filter the data between 14-02-2022 to 28-02-2022.
Select the database table and apply the filter shortcut keys Ctrl + Shift + L. This will activate auto filter mode.

Under the date field, click on the drop-down list, hover on the date filter, and choose Between option.
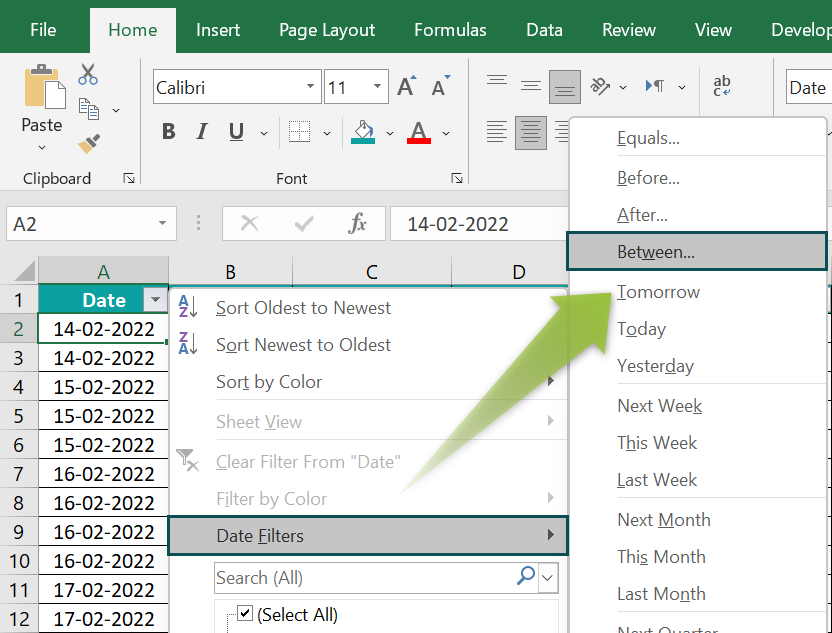
This will bring the Custom Auto Filter window.
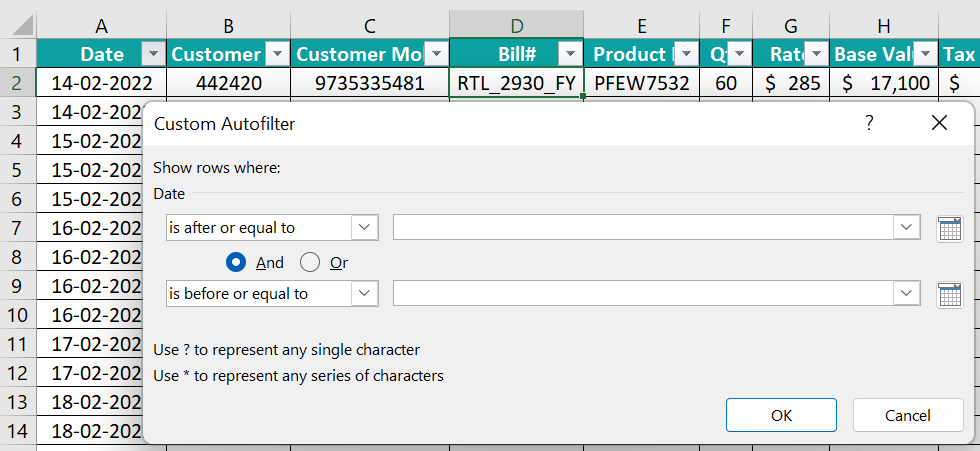
In the first ‘is after or equal to’ filter, choose the date 14-02-2022, and in the second filter, ‘is before or equal to’ choose the date 28-02-2022.
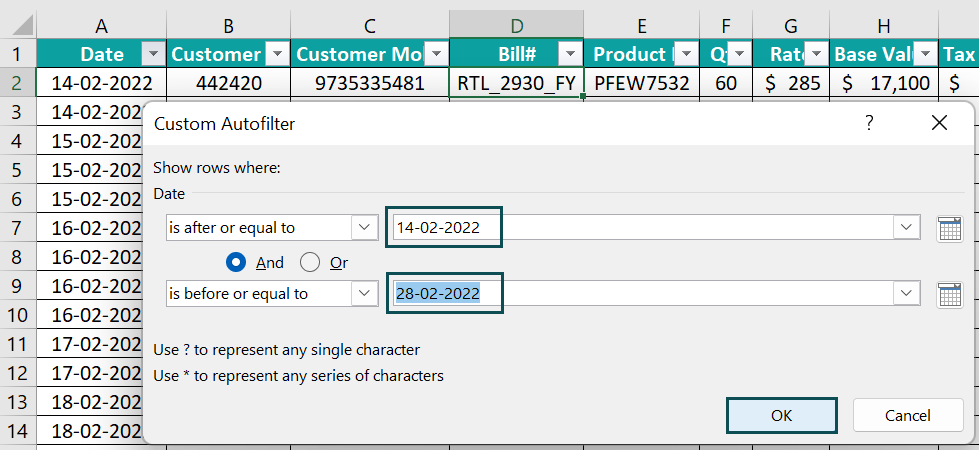
Click on OK. We can see that the data is filtered between the given dates.

In this way, we can apply various filters and play around with the data.
Important Things To Note
- The database is generally created in SQL servers, so Excel is not the recommended tool to maintain the database.
- Database size will be a big issue. When the data increases Excel workbook will slow down, and performance will be impacted.
- We cannot create a relationship between the fact table and the dimension table in Excel. Hence, we need to use lookup functions to get the data from the dimension table.
- Databases tables should not contain any empty rows and empty columns. This will break the connection between records.

Frequently Asked Questions (FAQs)
We can import the data from the SQL server database using Get & Transform feature. Under the Data tab, go to Get Data, hover on From Database, and choose From SQL Database.
This will open the SQL Server database window. Mention the server details and database name.
After mentioning the SQL server details, click on OK to show up table list from SQL. Choose the table and write a query to pull data from SQL.
A relational table is nothing but separate tables for facts and dimensions. For instance, create a sales table that contains customer-level data, and this will be a fact table; similarly, create another table for customer data, which will be a dimension table.
The sales table will be a fact table, and the Customer table will be a dimension table.
Excel is the tool used to analyze the data which comes from database servers. In contrast, the database is an electronic data storage mode in a table with pre-defined parameters.
Excel is not the recommended source to maintain a database, and SQL is the best tool to maintain the database.
When the number of records is more, it is advised to use a database rather than Excel. If the number of records is less, maintain the data in Excel and do our analysis otherwise, go for database servers like SQL.
Download Template
This article must be helpful to understand Database in Excel, with its formula and examples. You can download the template here to use it instantly.
Recommended Articles
This has been a guide to Database in Excel. Here we learn how to create and maintain database with step-by-step examples and a downloadable excel template. You can learn more from the following articles –

Leave a Reply