
What is With Statement in Excel VBA?
In Excel VBA (Visual Basic for Applications), the With statement performs a series of actions on a specified object without repeating the object reference. This can make your code more concise and easier to read.
Consider the following example:
Use this VBA With Statement Template to follow along with the examples in this article.
Download Excel Template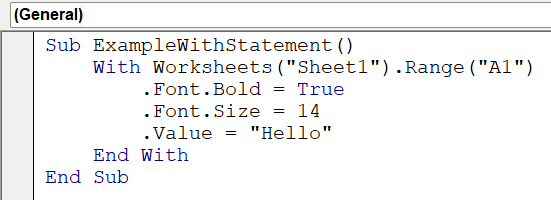
Then, after running the subroutine, go back to “Sheet1” and view the output.
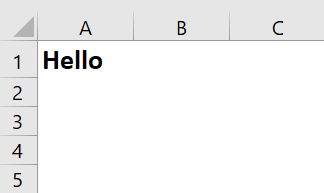
As you can see, the changes have been made. Without the “With” statement, all would have been in different lines and a lot more redundant, as shown below.

Key Takeaways
- The VBA With statement allows for concise and readable code by streamlining references to a specific object, especially when dealing with multiple properties or methods of the same object.
- By grouping related actions under the same object reference, the With statement improves code readability, making it easier to understand and maintain.
- The With statement is beneficial in nested concepts, enabling a hierarchical structure for working with objects within objects.
- Proper use of the With statement can contribute to better performance by avoiding redundant object references, especially when performing multiple operations on the same object.
Syntax of With Statement
You create a subroutine to use the “With” function and change the font size, start the condition, and after you’ve typed out the necessary conditions, end the VBA with End With, as shown in this syntax.
With object
     ' Code to be executed with the specified object.
     ' You can use the object reference implicitly within this block.
End WithHow to Use With Statement in Excel VBA?
You can see how to use VBA With selection by following the steps below.
- Start by opening the Excel Workbook. Then go to the “Developer” section in the Excel toolbar.

After you click the Developer icon, select “Visual Basic”. This opens the VBA editor, but it will be empty since you haven’t selected anything.
In the VBA Module, in the title bar, click the “Insert” button and select the “Module” option.
Consider the example below.
Here, you want to customize the font in this range. This can be done using VBA With application. - Name the subroutine while creating it to customize aspects of cells in Excel using the “With” function.

- Start the VBA “With” statement by specifying the range after typing it, as shown.
Here, you can specify what aspect you want to change using the “With” function as a blanket statement. For this example, the font has been chosen.

- Within the “With” function, select “Bold” as True.

- Change the font type of the Excel range in question.

- Change the color of the text using the “Font.Color” function in combination with the VBA With application.

- Select the strikethrough of the text as “True”.

- Finally, finish VBA With End with.

Code:
Sub ExampleWithStatement2()
With Worksheets(“Sheet2”).Range(“A1:A5”).Font
.Bold = True
.Name = “Verdana”
.Color = vbMagenta
.Strikethrough = True
End With
End Sub - Click “F5” or the “Run” icon on the activity bar in the Excel VBA Module.

After running the code, go back to the worksheet.


Now you have learned how to implement VBA With application in combination with other modules such as VBA With user form, and so much more.
Examples
Let us look at some different examples of how to implement the VBA With function.
Example #1
Consider a set of numbers in a worksheet given below.
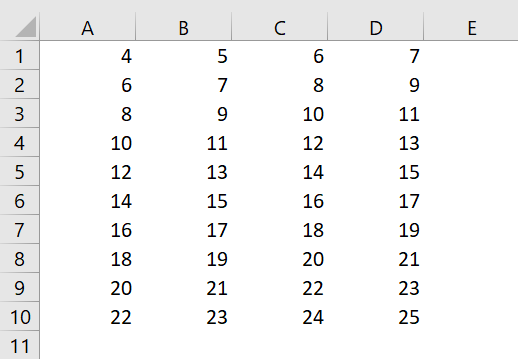
You need to customize the font through the range and display the numbers in decimal format.
- Step 1: Name the subroutine to customize the range given above using the VBA With function.

- Step 2: Implement a FOR-loop throughout the worksheet to customize the range.

VBA UsedRange function is used instead of declaring a range using the VBA Range function since this will be more dynamic and change appropriately according to the size instead of manually changing the Range all the time.
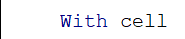
- Step 3: Start the VBA With a statement with the cell variable used to iterate through the available range.
This comes under a nested With where you can combine VBA with application in FOR-loops, and so on.
- Step 4: Customize the font size of the elements in the range.

- Step 5: Change the font of the given used range.

- Step 6: Customize the font color using the VBA Font color using the RGB function.

This changes the font color to a shade of blue color.
- Step 7: Set the font as bold across the range.

- Step 8: Change the format of numbers in the range into decimals with two places using the NumberFormat option and select the number of decimals, as shown below.

It ensures that all the numbers in the given range will have two places of decimals.
- Step 9: After all of that, end the With statement and continue the FOR-loop.

- Step 10: Continue the FOR-loop.

Code:
Sub FontChange()
For Each cell In ThisWorkbook.Worksheets(“Sheet3”).UsedRange
With cell
.Font.Size = 16
.Font.Name = “Times New Roman”
.Font.Color = RGB(128, 128, 256)
.Font.Bold = True
.NumberFormat = “0.00”
End With
Next cell
End Sub
- Step 11: Run the above subroutine by pressing “F5” or the run arrow button.
Go back to the worksheet to view the changes.
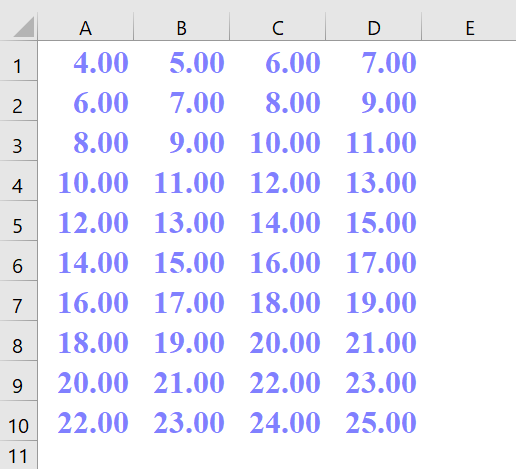
You’ve successfully customized the format of cells clearly and concisely with a smaller number of lines using the With function in VBA. Go through another interesting example below.
Example #2
Suppose you want to customize the looks of an entire worksheet, not just an entire range, what do you do? Follow the steps below to do so.
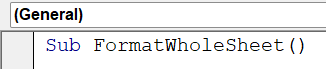
- Step 1: Start with creating a subroutine to customize the whole Worksheet.
- Step 2: Define the worksheet this subroutine will be working on.

- Step 3: Start a VBA With statement with the worksheet defined earlier.

There is no need to use variables, you can directly declare the range as shown in previous examples and skip the previous step.
- Step 4: Use the VBA Cells function to apply the customization to each cell in the worksheet. After that, use the VBA Font function to use “Bold” on all elements by setting it as True.

- Step 5: Similarly, set the font size of the text/numbers in the worksheet.

- Step 6: With a similar format, customize the font color of the elements of the Worksheet as Blue using the RGB function.

- Step 7: Change the background color of the cells in the worksheet. Here, using the VBA Color function and RGB function, the color is changed to Peach.

- Step 8: Declare another condition where, based on the size of the words, the columns will automatically resize themselves to fit in without any manual changes.

- Step 9: End it with an End With statement.
Code:
Sub FormatWholeSheet()
Dim ws As Worksheet
Set ws = ThisWorkbook.Sheets(“Sheet4”)
With ws
.Cells.Font.Bold = True
.Cells.Font.Size = 16
.Cells.Font.Color = RGB(0, 0, 255) ‘Blue
.Cells.Interior.Color = RGB(255, 255, 200) ‘Peach
.Columns.AutoFit
End With
End Sub
- Step 10: Run the subroutine by clicking on the green arrow button on the VBA toolbar.

Then go to the worksheet.
If you type anything, it gets typed as shown and customized in the VBA code.
Example #3
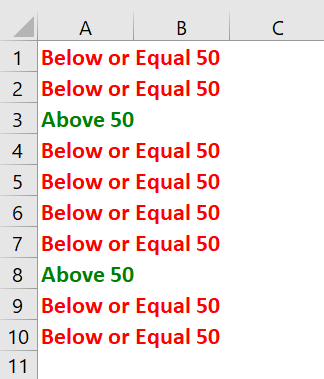
Given a set of values in a table, you want to replace it to show whether a value is greater than 50 or less than or equal to. The values are shown below.

You need to implement the VBA With function to replace the values with “Greater than 50” or “Less than or equal to 50”.
- Step 1: Start with initializing the subroutine to substitute values.

- Step 2: Define the worksheet this subroutine will work in.

- Step 3: Define the range in which the subroutine will work.

- Step 4: Start a for-loop running through all of the cells in the range.

- Step 5: Start a VBA “With” statement.

- Step 6: Nest the VBA With application along with an if-else statement.

Using the VBA Value function, check whether each cell value in the range is greater than 50. If it’s true, then change the font color to green and change the value in the cell to “Above 50”.
- Step 7: Declare an Else statement in case the If condition fails.

In this case, the font color is changed to red and the value of the cell is changed to “Below or Equal 50”.
- Step 8: Change all the fonts in the cell to bold and the size to 12.

- Step 9: End VBA With End With statement.

Code:
Sub ComplexExample()
Dim ws As Worksheet
Set ws = ThisWorkbook.Sheets(“Sheet5”)
Dim ran As Range
Set ran = ws.Range(“A1:A10”)
Dim cell As Range
For Each cell In ran
With cell
If .Value > 50 Then
.Font.Color = RGB(0, 128, 0)
.Value = “Above 50”
Else
.Font.Color = RGB(255, 0, 0)
.Value = “Below or Equal 50”
End If
.Font.Bold = True
.Font.Size = 12
End With
Next cell
End Sub
- Step 10: Run the above code by clicking on the green arrow button on the VBA Editor’s toolbar.

Then go back to the worksheet to view the changed table.
Important Things to Note
- Using With makes the code cleaner when working with multiple properties of the same object.
- Nested With statements can improve readability when working with multiple levels of object references.
- If you are performing similar actions on multiple objects, With can reduce redundancy.
- Using With can make the code more readable and manageable when dealing with complex object structures or hierarchies.
- Avoid using With if the properties or methods being manipulated are not directly related to the same object. It’s meant for grouping-related actions.
- If an object is used only briefly and isn’t referenced multiple times, using With might not provide significant benefits.
- In performance-critical scenarios, using With excessively within tight loops might have a negligible impact on execution speed.
Frequently Asked Questions (FAQs)
Yes, you can use the VBA With statement with multiple objects. Separate each object reference with a dot within the With block to streamline code and improve readability.
For example:
Yes, you can nest With statements in VBA. This allows you to work with multiple levels of object hierarchies more efficiently by implementing VBA With application library. See this example:With Worksheet1
.Range("A1:B10").Font.Bold = True
.Range("C1:D10").Interior.Color = RGB(255, 0, 0)
End With
Here you can set a nested VBA with application by including multiple ranges you want it to work in.
Yes, there are some limitations to using the VBA With End With statements. Some of them are:
• Object Reference: The With statement is suitable for simplifying code with a single object reference but may become less readable with multiple levels of nesting.
• No Variable Reuse: You cannot reuse the With variable for different objects within the same block.
• No Error Handling: The With statement does not introduce error handling on its own; additional error handling mechanisms should be used as needed.
• Limited Scope: The scope of the With block is limited to the procedure where it’s declared; it doesn’t persist beyond the procedure’s execution.
• Not a Loop: Despite its appearance, the With statement is not a loop; it’s a syntax feature for concise referencing of object properties and methods.
No, the With statement does not affect variable scope in VBA. Variables declared within a With block are still limited to the scope of the procedure where they are declared. The With block is a syntax feature that simplifies object property and method references but doesn’t alter variable scope.
Use this VBA With Statement Template to follow along with the examples in this article.
Download Excel Template