
What Is Worksheet Tab In Excel?
An Excel worksheet tab displays the active spreadsheet one is currently working on. The tabs are located at the bottom of the workspace, which we can click to access and move between worksheets of the workbook.
Users can use the sheet tabs to efficiently organize Excel data and manage the worksheets to ensure data handling is more straightforward.
Download FREE Excel Worksheet Tab Template and Follow Along!Use this Excel Worksheet Tab Template to follow along with the examples in this article.
Download Excel Template
For example, the following image shows a workbook containing one worksheet, indicated by the worksheet tab, Sheet1.

The aim is to rename the current sheet’s tab, Sheet1, as Jan Sales Report and insert a new worksheet in the workbook.
Then, here is how to edit the Sheet1 tab name and insert a new sheet with the same Excel worksheet tab size as the first one.

First, we double-click the Sheet1 tab name to select it. Next, enter Jan Sales Report as the required sheet tab name.
The next step is to click the New sheet icon (A plus inside a circle) on the right of the first sheet tab to add a new worksheet, Sheet2. Please note that the new Excel worksheet tab size will be the same as the first sheet tab size initially before the name change.
Key Takeaways
- An Excel worksheet tabis a rectangular tab showing the spreadsheet a user is currently using in a workbook. And we can find the remaining sheet tabs in a workbook at the bottom of the workspace.
- The worksheet tabs help users categorize the data across a workbook in a more organized manner. And hence, the sheet tabs enable the users to manage and manipulate the Excel data better.
- We can create, rename, replicate, hide, unhide, group, ungroup, move, sort and delete worksheet tabs in a workbook to manage the spreadsheets in the file.
How To Handle Worksheet Tab In Excel?
Let us see how to handle an Excel worksheet tab effectively.
#1 – Change No. Of Worksheets By Default Excel Creates
Typically, there is a default Excel worksheet tab limit on the number of sheet tabs we can view when opening a new workbook.
For example, the below image shows the default number of sheet tabs in the active workbook is one.

However, according to our requirements, we can change the default number of tabs visible when opening a new workbook.
So, the steps to change the default Excel worksheet tab limit are as follows:
- Step 1: Choose the File tab → Options option to access the Excel Options window.


The General tab in the Excel Options window opens.

- Step 2: Set the required number of sheet tabs we want to see by default when we open a new workbook in the Include this many sheets field. The field is in the When creating new workbooks section.

In this example, we set the field value as 3.
- Step 3: Click OK to exit the Excel Options window.

And now, if we open a new workbook, the file will open with three sheet tabs by default.

#2 – Create Replica Of Current Worksheet
We can copy the current worksheet in the same workbook, another open workbook on the computer, or a new Excel file.
For example, the following image shows a workbook containing a worksheet with the worksheet tab name Fruit_Category.

The task is to make a replica of the current sheet, Fruit_Category, and show the copied worksheet as the second tab in the workbook.
Then, the steps are as follows:
- Step 1: Right-click the sheet tab, Fruit_Category, to choose the Move or Copy option from the context menu.

The Move or Copy window will open.

[ Alternatively, click the required sheet tab and press Alt + E + M to open the Move or Copy window.]
- Step 2: The first field shows the current Excel file name. It allows us to select the workbook where we want to create the replica of the current sheet. We can use the field’s drop-down button to check the file options, which typically include a new file option, the current file and all the open workbooks.
However, since we want the replica worksheet in the current workbook, we shall not change the field value.
Furthermore, we want the replica sheet to be after the current sheet. So, we choose the (move to end) option in the Before sheet section.

Next, as we need a copy of the current sheet, we shall check the Create a copy checkbox.

Finally, clicking OK in the Move or Copy window will show the replica of the required sheet in the specified workbook as a new worksheet with the same data. Thus, the above setting options list Excel worksheet tab names in the chosen order.

Further, the new sheet tab name, Fruit_Category (2), contains the copied sheet tab name, and the number in the brackets indicates the count of the replica of the specific sheet. In this case, we replicated the required sheet once. So, the sheet name contains the number 2 in the brackets.
#3 – Create Replica Of Current Worksheet By Using Shortcut Key
We can use the shortcut to replicate the current worksheet in the active workbook.
Continuing with the example shown in the previous section, consider the requirement to replicate the Fruit_Category (2) sheet. Then, the steps are as follows:
- Step 1: Click the Fruit_Category (2) sheet tab to open the sheet.
- Step 2: Press Ctrl, and while holding the mouse’s left key, drag the mouse to the right of the Fruit_Category (2) sheet tab.
The cursor will show a sheet icon with a plus symbol. Also, we will see an upside-down triangle indicating where the replicated sheet will get inserted in the workbook.

Once we release Ctrl and the mouse key, a new sheet with the tab name Fruit_Category (3) displays on the right of the sheet, which we replicated with the same data.

Please note that this shortcut method does not allow us to insert the replica sheet on the immediate left of the current sheet we aim to replicate.
However, consider at least one worksheet tab is present to the left of the current sheet tab. In such a case, we can use the shortcut to insert the replica sheet before the sheet on the immediate left of the current sheet.
Thus, the above steps list Excel worksheet tab names at the bottom of the workspace in the order we insert the current sheet replicas.
#4 – Create New Excel Worksheet
The steps to create a new Excel spreadsheet are as follows:
- Step 1: Click the sheet tab to open the worksheet, after which we want to insert a new sheet.

- Step 2: Click the New sheet icon (A plus inside a circle) at the right end after all the sheet tabs in the workbook.

Once we click the specified icon, a new worksheet gets inserted after the current sheet.

#5 – Create New Excel Worksheet Tab Using Shortcut Key
The steps to create a new Excel sheet tab using the shortcut key are as follows:
- Step 1: Click the sheet tab to open the worksheet on the left of which we aim to insert or create a new worksheet.

- Step 2: Press Shift + F11 to create a new worksheet before the current one.

#6 – Go To The First Worksheet & Last Worksheet
Sometimes, a workbook might have several worksheets. And while working on data in the sheets in the middle of the workbook, we might find it challenging to go to the first or the last worksheet.
Thus, the easiest way to navigate to the first and the last worksheets from anywhere in the workbook is as follows.
For example, consider the Excel workbook we used in the previous sections contains several worksheets.
The current worksheet is in the middle of the workbook, well past the first sheet tab, with the first worksheet tab not visible in the current view.

Then, here is how to go to the first and last sheets in the workbook.
- Step 1: Hover the cursor over the Green left arrow in the space on the left corner of the workbook to view the hovering message box, shown below:

- Step 2: Press Ctrl and the mouse’s left key.

Excel will immediately show the sheet tabs from the first one in the workbook.
We can now click the first sheet tab to open the worksheet.
- Step 3: The current worksheet is in the middle of the workbook, and the first sheet tab is visible. However, the last sheet tab is not visible, indicating it will be time-consuming to go to the last worksheet.
So, now we can hover the cursor on the Green right arrow in the space on the left corner of the workbook to view the hovering message box shown below:

- Step 4: Press Ctrl and the mouse’s left key.

Excel will immediately show the last sheet tabs in the workbook.
We can now click the last sheet tab to open the worksheet.
#7 – Move Between Worksheets
The steps to move between worksheets are as follows:
Consider the active sheet is Sheet6 in the current workbook.

Then, here is how to move to the sheet tab, Sheet4, to the left of the current worksheet tab.
- Step 1: Press Ctrl + PgUp to move to the previous worksheet, Sheet4.

Further, assume the current worksheet is Sheet6.

Then, here is how to move to the sheet tab, Sheet7, to the right of the current worksheet tab.
- Step 1: Press Ctrl + PgDn to move to the next worksheet, Sheet7.

#8 – Delete Worksheets
Let us see the steps to delete worksheets with an example.
The following image shows a workbook with Sheet6 as the active worksheet.

The aim is to delete the Sheet6 worksheet.
- Step 1: Right-click the Sheet6 sheet tab to access the context menu and choose Delete.

The above action deletes the required worksheet, and the next sheet, Sheet7, becomes the new current sheet.

Furthermore, if we must delete multiple worksheets, say, Sheet6, Sheet7, and Sheet8 in one go, then the steps are as follows:
- Step 1: Click on the Sheet6 tab. Next, click the Sheet7 and Sheet8 tabs while pressing Ctrl to select the three worksheet tabs.
[ Alternatively, since we must select or group consecutive sheets, click the first sheet tab of the range, Sheet6. Next, while pressing Shift, click the last sheet tab of the range, Sheet8.]
After that, right-click over the chosen sheet tabs to open the contextual menu and select Delete.

The Sheet6, Sheet7, and Sheet8 worksheets get deleted from the workbook. And the next worksheet, Sheet9, becomes the new active sheet.

[ Alternatively, we can choose the required worksheet or worksheets, as explained earlier. And then we can use the keyboard excel shortcut Alt + E + L to delete the chosen sheet or sheets.]
However, consider we aim to delete all the worksheets in a workbook, whether one by one or in one go. In such a case, Excel will show a warning message stating that an Excel file must have at least one visible sheet. Also, to delete all the chosen sheets, we must first insert a new sheet in the workbook or unhide a hidden sheet in the file before proceeding with the deletion process.
#9 – View All The Worksheets
Sometimes, the workbook may contain many worksheets. So, searching and opening the required worksheet in such a scenario can be challenging, especially when we do not know its location in the workbook.
In such cases, we can use the Activate window to view all the active worksheets in one place and choose the required sheet name to open the corresponding tab.
For example, the image below shows a workbook, with Sheet8 as the active worksheet.

The steps to view all the active sheets in the workbook are as follows:
- Step 1: A hovering message box appears when we hover the cursor over the arrows in the bottom-left corner of the workbook. It states to right-click the mouse to view all the active sheets in the workbook.

So, when we right-click the mouse, the Activate window opens, listing all the active sheets in the workbook.

We can click the required sheet tab name to choose it and click OK to open the corresponding worksheet. However, we can open one sheet at a time.
Furthermore, we may find an Excel worksheet tab missing from the specific workbook.
It could be because it is deleted or hidden in the file.
However, we can view all the hidden worksheets in a workbook to avoid the scenario of any Excel worksheet tab missing due to hidden worksheets.
So, here is how to view the hidden sheets.
- Step 1: Right-click a sheet tab to access the context menu and choose Unhide.

The Unhide window opens, listing the hidden sheets in the workbook.

We can click the required sheet tab name to choose it and click OK to unhide the sheet. But again, we can unhide one sheet at a time.
Important Things To Note
- Excel does not allow us to delete all the sheets in the file. There must be one Excel worksheet tabvisible or unhidden in a workbook.
- The keyboard shortcut to create a worksheet tab is Shift + F11.
- The keyboard shortcut to open the Move or Copy window to replicate a sheet tab is Alt + E + M.
- The keyboard shortcut to delete sheet tabs is Alt + E + L.
Frequently Asked Questions (FAQs)
We can sort worksheet tabs in alphabetical order in Excel using VBA macro.
For example, the following image shows a workbook containing multiple sheets, with the sheet tabs named after the US states.
Then, here is how to sort the sheet tabs alphabetically.
• Step 1: Press Alt + F11 to access the VBA Editor.
• Step 2: Choose the current VBAProject and the Module option under the Insert tab to open a new module window.

• Step 3: Enter the VBA code in the module to sort the worksheet tabs in alphabetic order.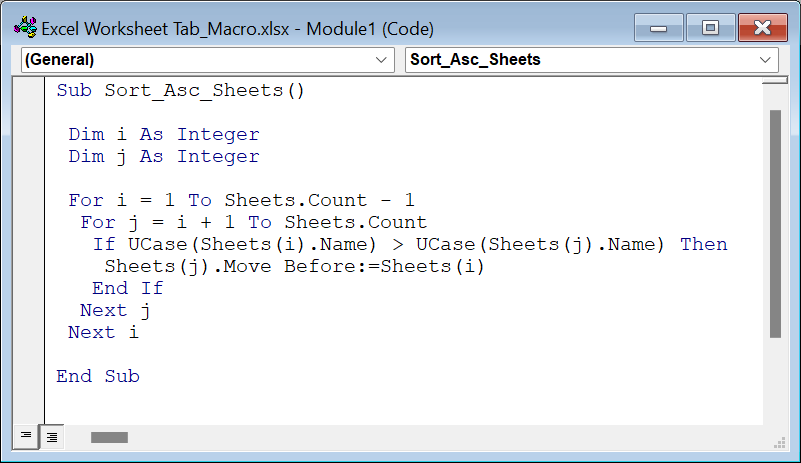
Next, save the file using Ctrl + S shortcut.
• Step 4: Open the active workbook and choose the View tab → The Macros drop-down arrow → The View Macros option.
• Step 5: The Macro window will open. Choose the macro we defined in the previous step in the VBA Editor. And click Run.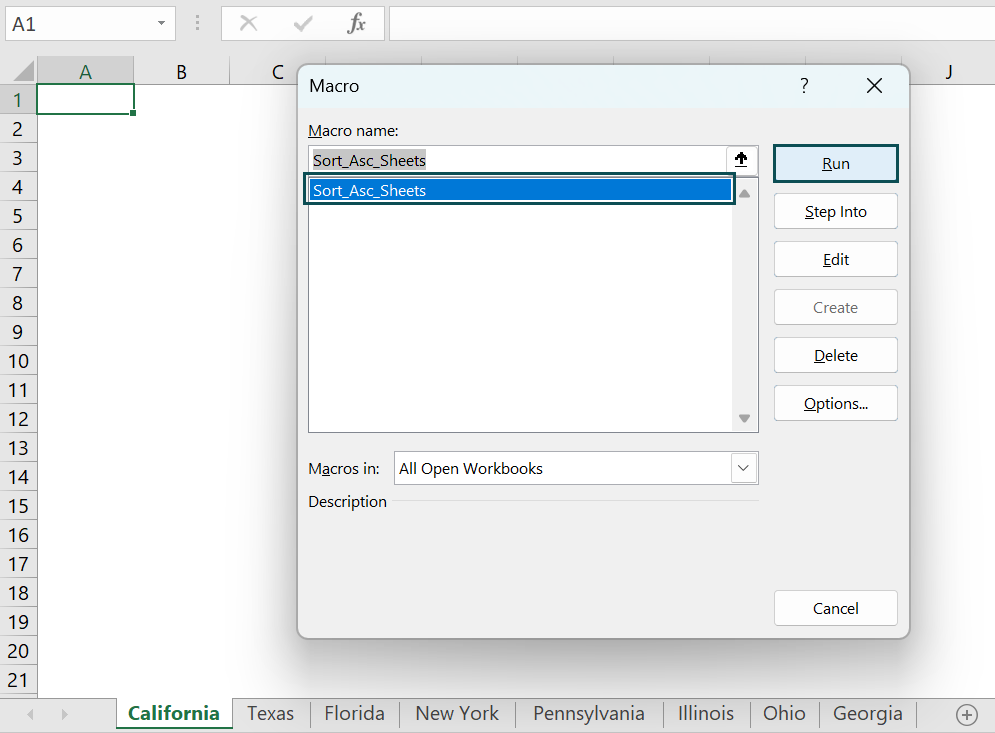
Once we click Run, the sheet tabs get sorted in the alphabetic order and repositioned in the workbook accordingly.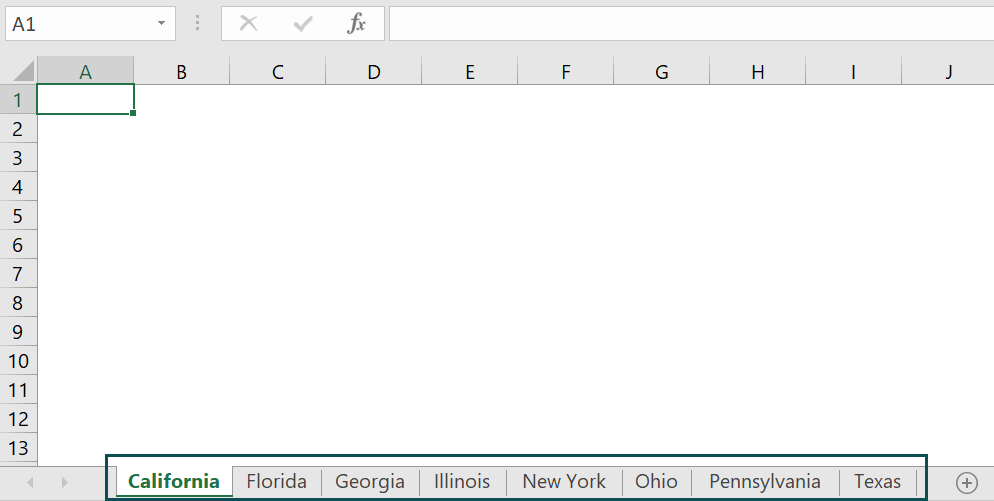
A workbook in Excel 2016 can have at least one unhidden worksheet and a maximum of 255 worksheets.
The steps to change worksheet tab color in Excel are as follows:
1) Right-click the required sheet tab to open the contextual menu.
2) Select the Tab Color right-arrow in the context menu. The option will enable us to choose the required color we want to set as the chosen sheet tab color.
Once we select the required color, the specific sheet tab will appear in the chosen color as depicted below: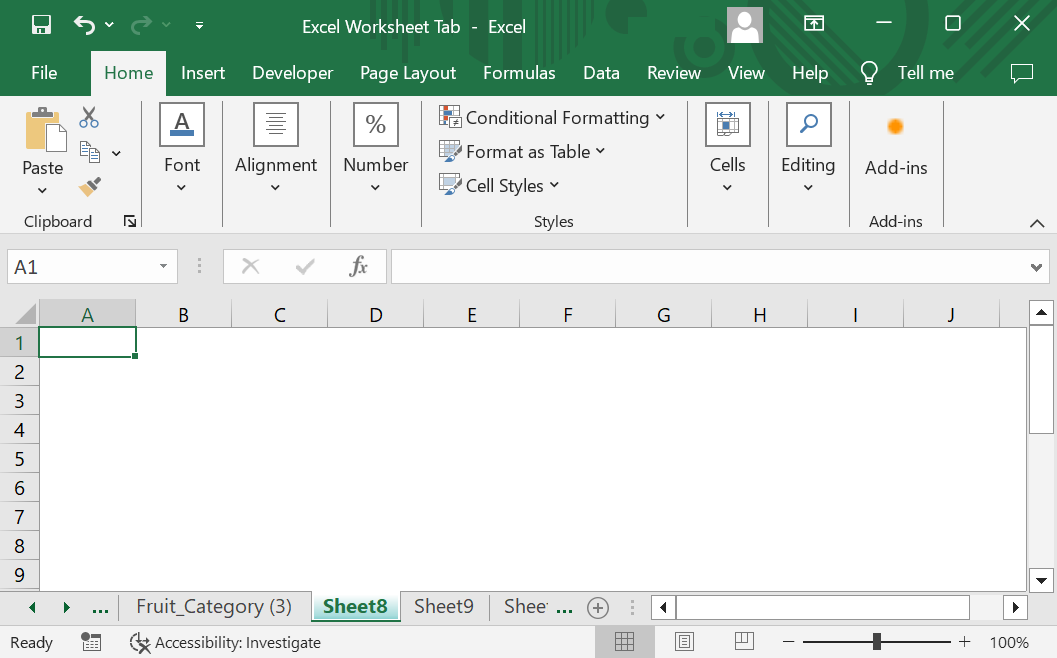
Furthermore, we can select multiple sheet tabs and use the abovementioned steps to show them in a specific color.
Use this Excel Worksheet Tab Template to follow along with the examples in this article.
Download Excel Template