What is Excel VBA Class?
VBA classes are a fundamental part of object-oriented programming in Excel VBA. A VBA class is a blueprint or template that defines a particular object’s properties, methods, and events. In Excel VBA, a class creates custom objects with unique characteristics and behaviors.
When you create a VBA class module, we define properties of the class by VBA Class Property, methods, and events, such as defining a VBA Class Function or VBA Class constructor. Properties represent the characteristics or data associated with an object, methods define the actions the object can perform, and events are actions or occurrences that can be detected and responded to by the object.
Consider the following example:
In Class1 module:

In Module1:

It will print the details in the Immediate tab.

Table of contents
Key Takeaways
- Classes in VBA are blueprints or templates that define objects’ structure, properties, methods, and events.
- Classes enable you to create multiple instances (objects) based on the same blueprint, allowing for code reusability.
- Objects are instances of classes that represent specific entities with unique properties and behavior. Using classes promotes encapsulation, modularity, and object-oriented programming (OOP) principles.
- Classes help organize code, enhance code readability, and improve code maintenance.
- Public and private access modifiers can be used to control the visibility and accessibility of class members.
Excel VBA 5-in-1 Course Bundle – (30+ Hours of Expert-Led Training)
If you want to learn Excel and VBA professionally, then the Excel VBA 5-in-1 Course Bundle (30+ hours) is the perfect solution. Whether you’re a beginner or an experienced user, this bundle covers it all – from Basic Excel VBA to Event Automation, Error Handling, Email Automation, and real-world applications with downloadable templates.
How to Create Custom Class and Objects in Excel VBA?
To implement VBA Class Property, we perform the following steps as shown below:
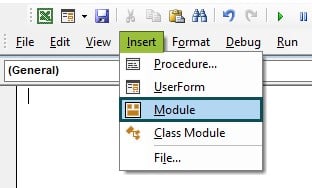
Step 1: Go to the “Developer” section in the toolbar and click the “Visual Basic” option. Now, the VBA Editor opens to add functions and Sub procedures. Then, click the “Insert” and “Module” buttons to create a new module or blank page.

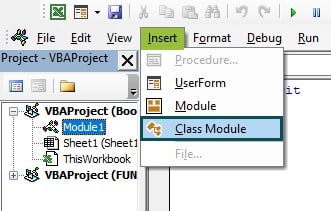
Step 2: Click the “Insert” button and click “Class Module.” A new class module will be formed to define VBA Class Property.
Step 3: In the class module, define the necessary variables to create a class that accepts Student Details.

Step 4: Create a Public subroutine to input the Student details from the user.

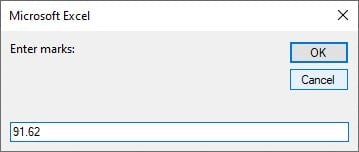
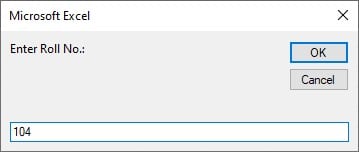
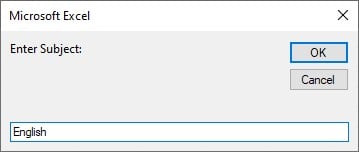
Step 5: Get all the details from the user using the VBA InputBox function.

Step 6: Initialize another Public subroutine to Print the student details input by the user.

Step 7: Using the MsgBox function, print all the student details.

To print all the details in a single MsgBox in VBA, we use the vbCrLf function paired with “& _” as a continue statement to the next line. This way, we can print multiple lines using a single MsgBox function.
Step 8: Go to the module to call the class.
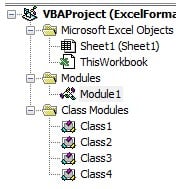
Step 9: Create a sub-procedure to call the VBA Class “Class2” for implementing Student Detail.

Step 10: Create a new object which is used to call the class.

Step 11: Using the newly defined object, call the Class functions.

Code:
In the Class Module:
Public Sname As String
Public marks As Double
Public rno As Integer
Public Subject As String
Public Sub GetDetails()
Sname = InputBox(“Enter Name: “)
marks = InputBox(“Enter marks: “)
rno = InputBox(“Enter Roll No.: “)
Subject = InputBox(“Enter Subject: “)
End Sub
Public Sub PrintDetail()
MsgBox “Name: ” & Sname & vbCrLf & _
“Marks: ” & marks & vbCrLf & _
“Roll No.: ” & rno & vbCrLf & _
“Subject: ” & Subject
End Sub
In the Normal Module:
Sub CreateStudentDetail()
Dim myStud As New Class2
myStud.GetDetails
myStud.PrintDetail
End Sub
Step 12: Print the Subroutine. The details will be displayed in a MsgBox.


Examples
Let us look at a few examples of implementing the VBA Class module in Excel VBA.
Example #1
Consider an example where we need to implement a Banking system where we declare the account number and perform transactions such as deposits or withdrawals of money.
Step 1: Click the “Insert” button and click “Class Module”. A new class module will be formed for us to define VBA Class Property.

Step 2: In the class module, declare two Private variables to accept the Account number and balance in an account.

Step 3: Declare a public subroutine to accept the account number provided.

Step 4: To return the account number value, we accept it as a string.

Step 5: To return the balance available in the account, we declare a subroutine to do as such.

Step 6: We initialize a subroutine to deposit an amount and increase our current balance.

Step 7: To withdraw and to reflect in the statement, we create another subroutine to perform this task.

Here, a specific condition must be met to approve the transaction. That is, the amount to be withdrawn should not exceed the current balance, or it will not perform the transaction.
Step 8: Go to the module to call the class.

Step 9: Initialize a subroutine in the module to call the class.

Step 10: Declare an object to call the class.

Step 11: Call the class functions and print the remaining balance.

This will print 300 in the Immediate tab.
Code:
In the Class module:
Private accountNumber As String
Private balance As Double
Public Sub SetAccountNumber(ByVal accNum As String)
accountNumber = accNum
End Sub
Public Function GetAccountNumber() As String
GetAccountNumber = accountNumber
End Function
Public Function GetBalance() As Double
GetBalance = balance
End Function
Public Sub Deposit(ByVal amount As Double)
balance = balance + amount
End Sub
Public Sub Withdraw(ByVal amount As Double)
If amount <= balance Then
balance = balance – amount
Else
MsgBox “Insufficient funds!”
End If
End Sub
In the main module:
Sub TestBankAccount()
Dim myAccount As New Class3
myAccount.SetAccountNumber “123456789”
myAccount.Deposit 500
myAccount.Withdraw 200
Debug.Print “Account Number: ” & myAccount.GetAccountNumber
Debug.Print “Balance: ” & myAccount.GetBalance
End Sub
Step 12: Run the above code. The output is shown below:

Example #2
Consider an example where you define a Class rectangle where you can find its Perimeter and Area and print it given length and height of the rectangle as arguments from the user.
Step 1: Click the “Insert” and “Class Module.” A new class module will be formed to define VBA Class Property.

Step 2: Declare the Width and Height of a rectangle as private variables.

Step 3: Define a subroutine to accept the width of a rectangle.

An If-Else statement is initialized to check whether the dimensions given are positive. If not, it prints an Error message.
Step 4: Similarly, a Subroutine is declared to accept the rectangle’s height.

Shapes need to have positive values so that calculations can be made accurately. There’s no way that the dimensions of a rectangle can be negative!
Step 5: Declare a function to return the area of the rectangle. The area of the rectangle is calculated by multiplying the width and height values.

Step 6: Similarly, create a function that calculates the perimeter of the rectangle. The perimeter is calculated by doubling the sum of values of width and height.

Step 7: Go to the module to call the class.
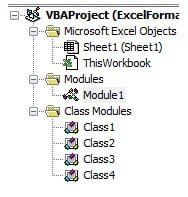
Step 8: Create a subroutine to call the class.

Step 9: Declare an object to call the class module.

Step 10: Using the functions, declare values for the width and height of the rectangle.

Step 11: Print the Area and Perimeter of the rectangle by calling the functions.

Code:
In the Class Module:
Private width As Double
Private height As Double
Public Sub SetWidth(ByVal w As Double)
If w > 0 Then
width = w
Else
MsgBox “Width must be greater than zero!”
End If
End Sub
Public Sub SetHeight(ByVal h As Double)
If h > 0 Then
height = h
Else
MsgBox “Height must be greater than zero!”
End If
End Sub
Public Function GetArea() As Double
GetArea = width * height
End Function
Public Function GetPerimeter() As Double
GetPerimeter = 2 * (width + height)
End Function
In the main module:
Sub TestRectangle()
Dim myRectangle As New Class4
myRectangle.SetWidth 5
myRectangle.SetHeight 3
Debug.Print “Area: ” & myRectangle.GetArea
Debug.Print “Perimeter: ” & myRectangle.GetPerimeter
End Sub
Step 12: Print the above code. The output is printed in the Immediate tab.

Pros And Cons of Classes in VBA
| Pros | Cons |
|---|---|
| Encapsulation: Allows organizing related data and behavior within a single entity. | Learning Curve: Understanding and effectively using class modules may have a learning curve for those unfamiliar with object-oriented programming. |
| Reusability: Enables code reusability by creating multiple instances based on a single class definition. | Overhead: Introducing class modules may add additional overhead regarding memory and performance compared to simple procedural code. |
| Modularity: Supports modular programming by breaking down code into separate components. | Limited Scope: Class modules are limited to the VBA project in which they are defined, making sharing between projects or applications more challenging. |
| Object-Oriented Programming (OOP): Allows implementation of OOP principles like VBA Class Inheritance, VBA Class polymorphism, and VBA Class encapsulation. | Project Complexity: Managing interactions between multiple classes can become challenging as the project grows more complex. |
| Data Integrity: Controls how data can be modified and accessed, ensuring data integrity. | Debugging: Debugging code involving class modules may be more complex than procedural code, requiring additional effort for issue identification and resolution. |
Important Things To Note
- Before creating classes, take the time to plan and design your class structure. Identify the properties, methods, and relationships you need for your objects.
- Follow consistent and descriptive naming conventions for your classes, properties, and methods.
- Use access modifiers (Public, Private, etc.) to control the visibility and accessibility of your class members (properties and methods). Encapsulate data appropriately to maintain data integrity and control access to internal implementation details.
- Avoid using excessive global variables within your class modules. Overusing global variables in VBA can lead to difficulty in maintaining and debugging code. Instead, operate properties and method parameters to manage and pass data within the class.
- Avoid exposing class fields (variables) as public. Instead, use properties to encapsulate the data and provide controlled access.

Frequently Asked Questions (FAQs)
A VBA class can be public or private, depending on the desired visibility and accessibility of the class and its members.


Recommended Articles
This has been a guide to What is VBA Class?. Here we learn to create custom class & objects in Excel VBA, along with pros & cons. You can learn more from the following articles –

Leave a Reply