
What Is Developer Tab In Excel?
The Developer tab in Excel offers a variety of options like automation of tasks using macros, interactive buttons, scroll bar, combo box, spin button, list box, option button, etc., Also, these features are very helpful when we create interactive dashboards and charts in Excel.
The Developer tab has four groups. They are Code, Add-ins, Controls, and XML, as highlighted in the image below.

Code: This section contains the automation of tasks in Excel using VBA. In this section, we can record a macro and write macros from scratch. Similarly, we can also edit the already written macro or recorded macros using Visual Basic.
Use this Developer Tab In Excel Template to follow along with the examples in this article.
Download Excel TemplateAdd-ins: In this section, we can quickly add excel add-ins like Analysis Toolpak, Analysis Toolpak – VBA, Solver Add-ins, etc.
Controls: In this section, we can insert interactive controls like buttons, combo boxes, list boxes, spin buttons, etc.
XML: In this section, we can map XML data from both files and web URLs.
Using the Developer tab in excel, we can automate tasks and go to the Visual Basic Editor window to edit the recorded code.
For example, click on the Record Macro option under the Developer tab to record the actions in the worksheet.

Now, excel will ask us to name the macro in the Record Macro window.
So, let us name it Test Macro in the Macro name: box.

Click on OK to start recording the macro. Now, we are in the Sheet1 worksheet. So, let’s insert a new sheet by clicking on the ‘+’ icon.

It will insert a new worksheet.

Now, click on Stop Recording under the Developer tab. Thus, we have to run this recorded macro whenever we need to insert a new sheet. Next, click on the Macros button under the Developer tab.

It will bring the list of macros available in the workbook. Choose the appropriate macro name and click on the Run button.

We will get the new worksheet once we click on the Run button.

Key Takeaways
- The Developer tab in excel is hidden by default. One should enable it under a customized ribbon to use it.
- The combo box is similar to the drop-down list in Excel. After choosing the input range of cells for the combo box, we need to choose the link cell to showcase which line item in the combo box has been selected.
- XML structured data can be mapped and inserted into Excel.
- After recording the macro, we can edit the code using the visual basic editor window.
- Repositioning the Developer tab is possible using the up and down arrows in Customize the Ribbon… option.
How To Add/Enable Developer Tab In Excel?
The Developer tab in Excel, by default, is hidden. However, we can enable Developer Tab in Excel ribbon using the below steps.
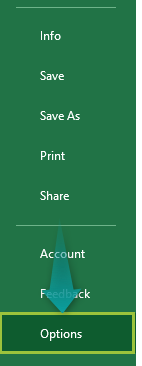
Step 1: First, go to the File tab.

Step 2: Next, click on Options.
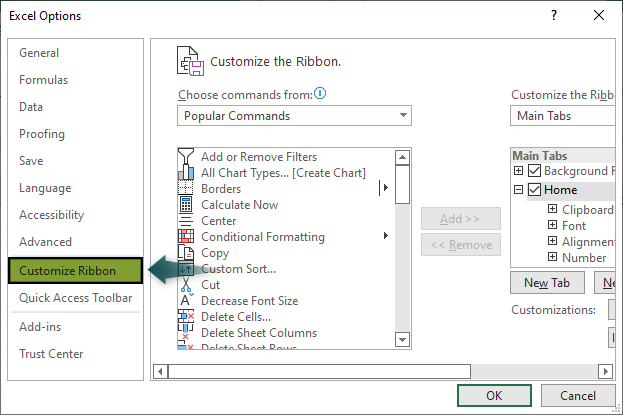
Step 3: The Excel Options window pops up. Click on Customize Ribbon.
Step 4: Then, check the Developer option under Main Tabs.
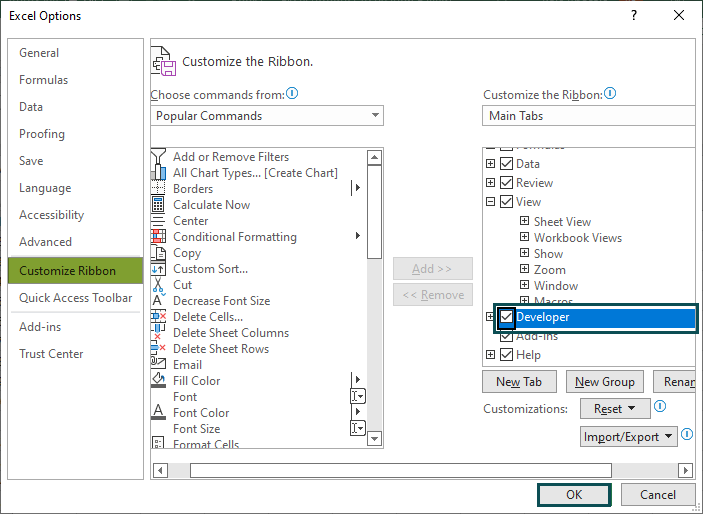
Step 5: Click on OK.
Now we will be able to see the Developer tab.

Likewise, we can add Developer Tab in Excel.
As soon as we display Developer Tab in Excel, we can use the four groups. But, first, we will look at a few examples to understand the features of the Developer tab in detail.
Record Macro: Using the record macro in Excel, we can record the tasks in an Excel workbook. We can use the recorded macro later if we want to do the same task regularly.
For instance, we have the following data table in an Excel spreadsheet.

Assume that we have the simple task of inserting borders on both tables. Inserting borders into two tables is easy, but what if we have 100 tables to insert the border? It makes the task very difficult and time-consuming.
We will insert the border for the first table, and by simply recording the macro, we can repeat the process in just a click. We need to use the following steps to record a macro in excel.
Step 1: To begin with, select the cell range from A1:B7.

Step 2: Go to the Developer tab and click the Use Relative References option.

Step 3: Under the same Developer tab in excel, click on Record Macro now.

Step 4: The Record Macro window opens up.
Here, we can give a name for the recorded macro. For this example, let us name it Formatting.

Step 5: After entering the name, click OK. Now, Excel will record all our activities in this workbook.
Then, go to the Home tab and click on the drop-down list of borders. Now, choose All Borders.

It will insert borders for the selected range of cells, i.e., A1:B7.

Step 6: Once again, go to the Developer tab and click on Stop Recording.

Initially, this button was ‘Record Macro,’ but after we start recording, it will turn to ‘Stop Recording.’
Step 7: When we stop recording, Excel will no longer record the activities we do in Excel. Now select another table range from D1:E7.

Step 8: Go to the Developer tab and click on the Macros option.

Step 9: We can see all the created macros in our workbook.
Next, choose the recorded macro Formatting and then click on Run.

When we click on the run, Excel will copy the formatting we have applied while recording the macro to the selected range of cells, i.e., D1:E7.

We can select any range of cells and click on the run button, and it will apply the formatting of inserting borders for the selected cells.
In this way, we can automate the tasks in Excel using the macros option under the Developer tab in excel.
To view the code of the recorded macro, click on the Visual Basic option under the Developer tab in excel.

It will open the visual basic editor window. Expand the Modules folder.

It will show the list of modules. Now, double-click on Module 1 to view the code for the recorded macro.

Note: Once the macro coding is used, we need to save the workbook as Macro-Enabled Workbook.
Add-Ins: Using add-ins, we can quickly add additional features to our Excel. Some of the additional built-in features like Analysis Toolpak, Analysis Toolpak VBA, and Solver Add-in can be activated quickly.
Under the Add-ins section, click on Excel Add-ins.

It will appear on the list of add-ins available in our version of Excel.
Next, choose Solver Add-in and then click OK.

Now, we can see the add-in under the Data tab.

In this way, we can quickly activate Excel add-ins.
Controls: It is the most commonly used feature under the Developer tab. We can also insert various controls under this tab.
For instance, we will create a combo box and learn how it works.
Go to the Developer tab and click on the drop-down list of the Insert option.

We have two sections here, i.e., Form Controls and Active X Controls. Now, let us learn about Form Controls.
Choose Combo Box from the Form Controls option.

Once we click on the combo box, we need to draw the combo box on the worksheet.

A combo box is similar to the drop-down list we create in an Excel spreadsheet. To configure the combo box, first right-click on the inserted combo box and choose Format Control.

The Format Control window opens up. By default, the Control tab is activated.

For the Input Range, choose the cell range A2:A7.

Likewise, for the Cell link, choose any of the empty cells.

Click OK, and the combo box will show a drop-down list of values in the range A2:A7.

Select any of the values from the combo box. We can see cell A9 displaying the number of items selected from the list.

We have selected the month of April, and the linked cell K1 shows the number as 4, indicating the 4th value in the range of cells from A2:A7.
By using these control buttons, we can create interactive charts and dashboards.
XML: Extensible Markup Language (XML) is one of the data structures used extensively. However, the XML data structure might be confusing for beginners.
But, by using the XML command under the Developer tab, we can easily convert the XML data into table format.
For instance, we have the following XML data in notepad.

We will import this data into Excel by using the XML feature under the Developer tab.
Step 1: To begin with, save the XML data in the system.
Step 2: Go to the Developer tab and click on the Source option.

Step 3: The XML Source window pops up on the right side of the Excel worksheet. Click on XML Maps.

Step 4: Now click the Add button in the XML Maps window.

Step 5: Next, choose the XML file we saved in step 1.

Step 6: Click on Open. It will open the first created XML map.

Step 7: Then, click on OK again, and it will add the data set to the XML source, as shown in the following image.

Step 8: Select all the columns in the above window.
Next, drag and drop them into the empty cells. It will create a table structure.

Step 9: Once the table structure is created, select any of the cells in the newly inserted table. Go to the Developer tab in excel and click on the Import option.

Step 10: It will ask us to choose the file again. So, choose the file again from the saved folder.
Step 11: Next, click Import, inserting the data into the mapped XML columns.

In this way, we can make use of the Developer tab.
Move Developer Tab On The Ribbon
The moment we view the Developer tab in Excel using the steps discussed earlier, it will default appear as the last tab in the ribbon.
However, we can still reposition the Developer tab to wherever we want on the ribbon. Right-click on the Developer tab and choose to Customize the Ribbon… option.

Then, the Excel Options window pops up. Choose the Developer tab and click on the up or down arrows to reposition the Developer tab.

Now, move the Developer tab to the position where we want.

Click on OK, and the Developer tab will be organized accordingly.

In this way, we can reposition the Developer tab with simple navigation.
Hide Developer Tab In Excel
If we want to remove the Developer tab from the ribbon at any point, we can do it with the following simple steps.
Right-click on the Developer tab and choose to Customize the Ribbon… option.
The Excel Options window opens. Uncheck the Developer tab in excel and click on OK.

After unchecking the Developer tab in excel, click on OK. The Developer tab will get hidden from the ribbon.
How To Ensure Macro Security Using Developer Tab?
When we create or record a macro, we need to save the workbook in the Macro-Enabled Workbook file extension. However, with the default setting of Excel, when we open the workbook with macros, we will get the yellow security warning, as shown in the image below.

Click on Enable Content, and Excel will ensure that the macros’ source file is protected.
The actual thing here is to enable security for Macros. We need to enable the macro in the background using the following steps.
Step 1: First, go to the File tab.
Step 2: Next, click on Options.
Step 3: Click Trust Center in the Excel Options window and Trust Center Settings.

Step 4: Now, the Trust Center window pops up. Now, choose Macro Settings in this window.

As we can see, by default, macros are disabled here.
Step 5: Next, choose the option Enable VBA macros (not recommended; potentially dangerous code can run).
Step 6: Click OK in the next windows, and macros will start working fine now.
Important Things To Note
- When we record a macro and we need to save the Excel workbook with the Macro-Enabled Workbook extension, it will give the file extension as ‘xlsm’ instead of the regular ‘xlsx.’
- Use Reference should be selected while recording the macro. The same reference will also be used for other selected cells to perform the same activity.
- ALT + F11 is the shortcut key to using the Visual Basic Editor.
- Macro security should be enabled to use Macros in Excel.
Frequently Asked Questions (FAQs)
The Developer tab is not enabled by default. We need to enable it by selecting File > Options > Customize the Ribbon…
Check the Developer option.
Click OK, and we can see the Developer tab in the ribbon.
The Developer tab offers a variety of features like macros recording for automation of tasks, enabling add-ins quickly, inserting interactive controls, and mapping XML file data.
The Developer tab might not be visible initially because the tab is not enabled by default. However, we need to enable it to use the features.
By using the Developer tab, we can insert various control buttons. For example, the following are the steps to insert and configure the check box.
Step 1: Go to the Developer tab and click on the Insert option’s drop-down arrow.
Step 2: Next, choose the Check Box under the Form Controls group.
Step 3: Draw this on the worksheet after choosing the check box.
Step 4: Right-click the check box and choose Format Control… option.
Step 5: In the Format Control window, choose the Checked option and give the cell reference as cell A9.
Click on OK.
Now, whenever we select the check box, it will show TRUE in cell A9, or else it will show FALSE in cell A9.
Use this Developer Tab In Excel Template to follow along with the examples in this article.
Download Excel Template