What Is Insert And Embed An Object In Excel?
The insert (embed) an object in Excel is a feature that enables one to embed an external file as an object in a worksheet. And we can use the Object option under the Text function in the Insert tab to insert and embed the specific object in the required spreadsheet.
Users can use the insert (embed) an object in Excel option when they must embed a file, such as a Word document, in a sheet. And while they can access the embedded file data directly from the specific sheet, the file content should not change with updates made in the source file.
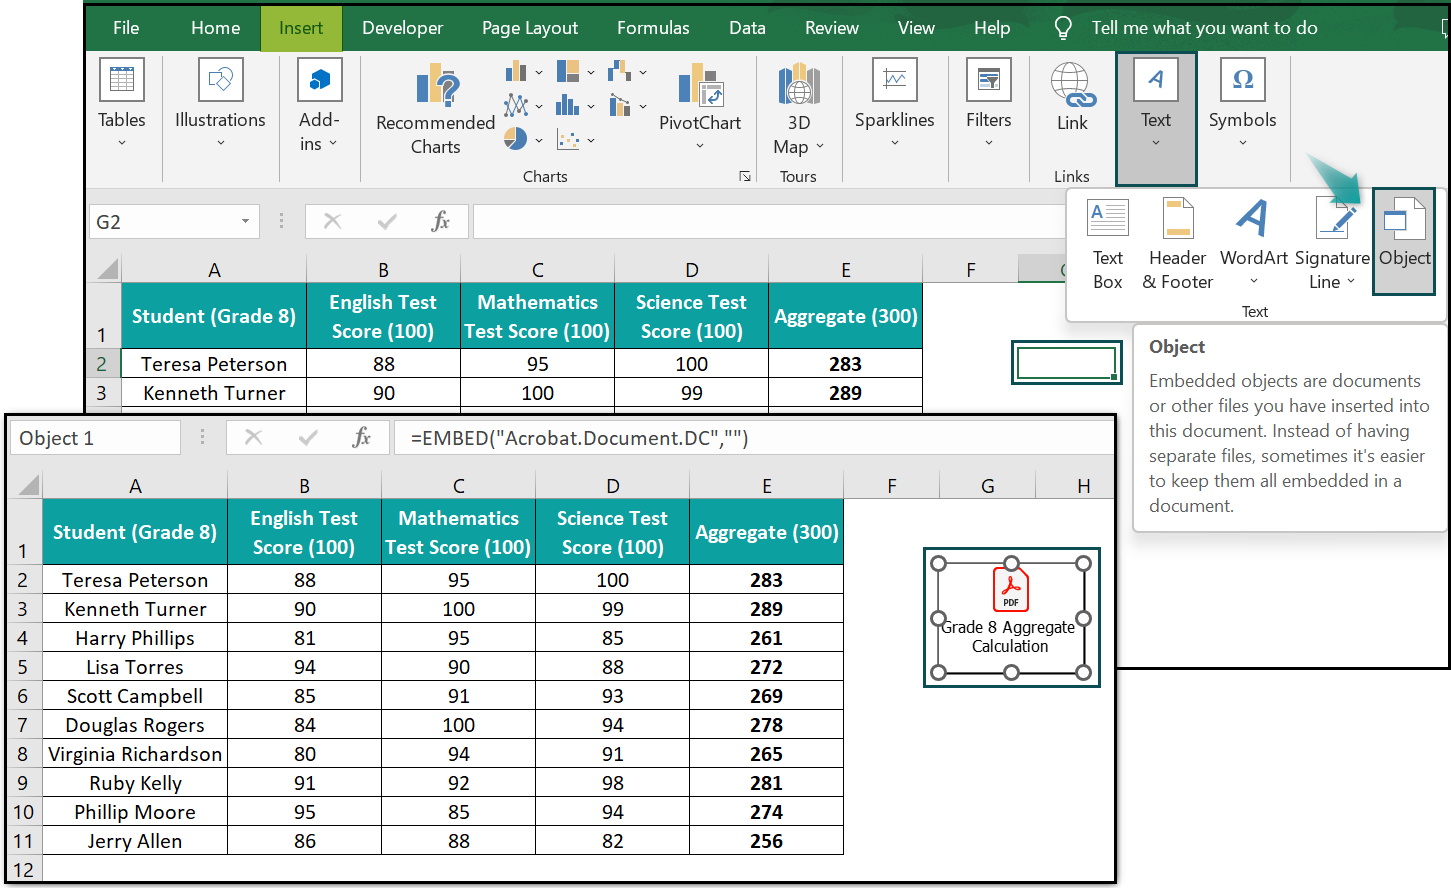
For example, the table below contains students’ test scores and aggregate data.

The task is to embed the PDF file explaining the aggregate calculation performed in column E in the above worksheet.
Then, we can use the Object option to perform the required insert (embed) an object in Excel action in the required sheet.

In the above insert (embed) an object in Excel example, we choose cell G2 as the location to embed and display the required PDF file as an object.
Next, select the Text function in the Insert tab and choose the Object option to access the Object window. The Object window will allow us to browse and choose the required PDF file from our computer.
Also, the window provides an option to display the chosen object as an icon, ensuring we do not face the issue of insert object in Excel icon missing. Next, we can change the icon and caption to insert the chosen file as an object in the current sheet, which will meet our needs.
And now, we can double-click the embedded PDF file in the specific worksheet to access and refer to the file content and use it according to our requirements in Excel.
Table of contents
Key Takeaways
- The insert (embed) an object in Excel is an option to add or insert an external file as an embedded object in a target cell in the active worksheet.
- Users can use an embedded object in a worksheet to enable other users to double-click the object to view additional information about the specific active worksheet data. The option helps reduce clutter and ensures the Excel data appears more professional.
- We can use the Object option under the Text function in the Insert tab to embed the required object in the active worksheet.
- We can embed a new object from scratch or an existing file on the computer as an object in Excel. Also, we can link an existing file as an object to the active worksheet.
How To Insert (Embed) An Object In Excel?
We shall see the steps to insert (embed) an object in Excel in different scenarios with practical examples.
#1 – Insert (Embed) A New Object In Excel
Whether it is the insert object in Excel Office 365 or an older version, Excel allows one to create a new object based on a different program that the specific version recognizes.
The steps to insert (embed) an object in Excel, which is new, are as follows:
- Click on a destination cell in the required worksheet, where we must embed the new object.
- Choose the Insert tab → Click the Text command → Select the Object option.

[ Alternatively, choose the required cell and use the insert object in Excel shortcut, Alt + N + ZT + J, one after the other.] - The Create New tab in the Object window opens.

- Choose the required program, based on which we want the object embedded in the active sheet, from the Object type section.

And then, select the Display as icon check box if we must show the object as an icon.
However, if the requirement is to show the object content in the worksheet directly, then keep the Display as icon option unselected. - If we must change the display icon, click the Change icon option.
The Change Icon window will open, where we can choose the required icon and update the appropriate icon caption in the Caption field and click OK to apply the changes.

- Click OK in the Object window.

We can now view the embedded object icon in the specified location, and the program, chosen in the Object type section in the Object window, opens in Excel.
- Enter the required data in the open embedded object file window.

- Next, click anywhere in the worksheet to close the embedded object file window.

- Use Ctrl + S to save the file with the embedded object.
- While we can now move the embedded object anywhere in the sheet, we can copy and paste the object any number of times in the workbook. And for that, we must click the object and use Ctrl + C to copy it. And then, choose a destination cell and use Ctrl + V to paste the object.
Thus now, we can double-click the embedded object to refer to and edit the specific file content to meet our requirements. Also, we can click the embedded object to select it and enable the Format tab in the ribbon. And then use the formatting options to modify the object format to meet our requirements.
On the other hand, when we do not select the Display as icon option in the Object window, Excel shows the embedded object content directly in the sheet.

And clicking in the active sheet will close the embedded object program window, and the embedded object will appear as shown below.

But the object content visible in the sheet is not editable. Instead, we can double-click the inserted object in the worksheet to open and edit the program file content to meet our requirements.
Basic Example
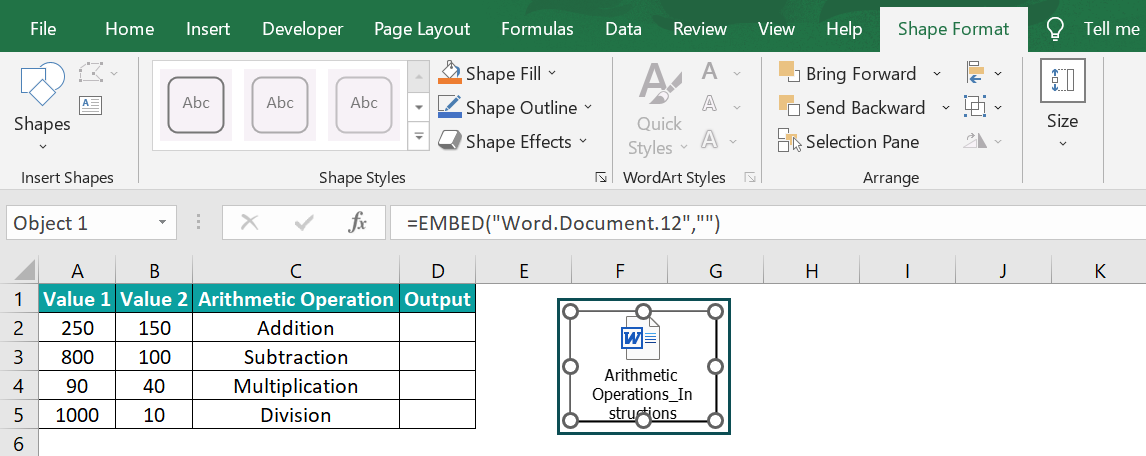
The image below shows a dataset.

The requirement is to embed a Microsoft Word Document as an object in cell F2 of the above sheet and update it with text explaining the arithmetic operations to perform in column D. And then update the required formulas in the target cells D2:D5, according to the instructions in the embedded file.
Then, the steps are as follows:
- Step 1: Choose cell F2 and select Insert → Text → Object or use the insert object in Excel shortcut, Alt + N + ZT + J, one after the other, to access the Object window.

- Step 2: The Create New tab in the Object window will open. Choose Microsoft Word Document as the Object type. And then, we shall check the Display as icon option.
Next, click the Change icon option to open the Change Icon window.

- Step 3: We shall update the Caption field and click OK in the Change Icon window.

- Step 4: Click OK in the Object window.

- Step 5: The object icon displays in the chosen destination cell F2. And a new Microsoft Word document opens in the active Excel file.

Enter the required arithmetic operations instructions in the Microsoft Word Document window.

Finally, once we update the Word document, we can click anywhere in the worksheet to exit from the Microsoft Word file window.
And now, we can double-click the object to refer to and edit the Microsoft Word file content.

Also, we can select the object and drag the mouse to any other location in the worksheet to change its position.

- Step 6: Next, we can use the embedded file for the required instructions to perform each arithmetic operation. And then, choose the specific target cell, enter the required formula, and press Enter to execute the formula and obtain the required output.


Furthermore, assume we do not select the Display as icon option in the Object window. Then, updating the required instructions in the Microsoft Word file window and then clicking anywhere in the Excel sheet will result in the embedded object appearing as shown below:

Remember, the text visible in the object cannot be changed directly, though the embedded file content is visible in Excel. Instead, we must double-click the object to edit the file content.
#2 – Embedding (Inserting) An Existing Object In Excel
The steps to insert (embed) an object in Excel, which is an existing one, are as follows:
- Choose a target cell in the required sheet, where we must embed an existing object.

- The Object window will open, where we must click the Create from File tab to open it.
And then, click the Browse option to choose the required file from the computer to embed as an object in the target cell.

- Next, check the Display as icon option to avoid the scenario of insert object in Excel icon missing and click the Change icon option.

- The Change Icon window opens. And we can change the object icon and caption to suit our requirements.

- Finally, click OK to view the embedded object as an icon.

Please note that not selecting the Display as icon option and proceeding with the object embedding process will display the file content as the embedded object.
Basic Example
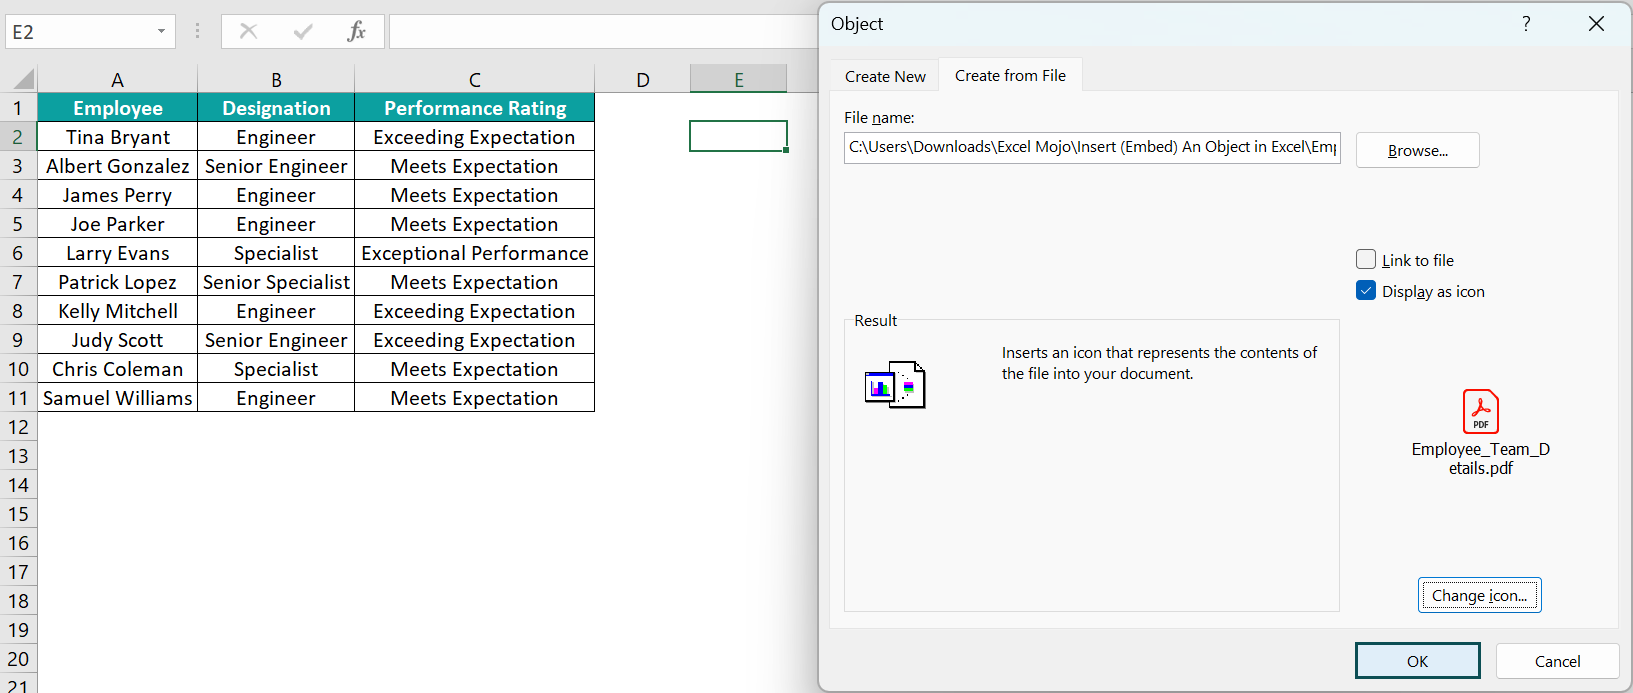
The first image shows a dataset containing employees and their designations and performance ratings.
And the second image shows a PDF file containing the specified employees’ team data.


The task is to embed the provided PDF file as an object in cell E2, adjacent to the given dataset in the active worksheet.
Then, the steps are as follows:
- Step 1: Choose cell E2. And then select Insert → Text → Object.

- Step 2: The Object window will open. Click the Create from File tab to open it in the Object window.
And then click Browse.

The Browse window opens, where we can browse the folders on our computer and choose the required PDF file from its saved location on our computer. And click Insert.

- Step 3: Check the Display as icon option.

- Step 4: Click the Change icon option.

The Change Icon window opens. And we shall update the object display name in the Caption field. And click OK.

- Step 5: Click OK in the Object window.

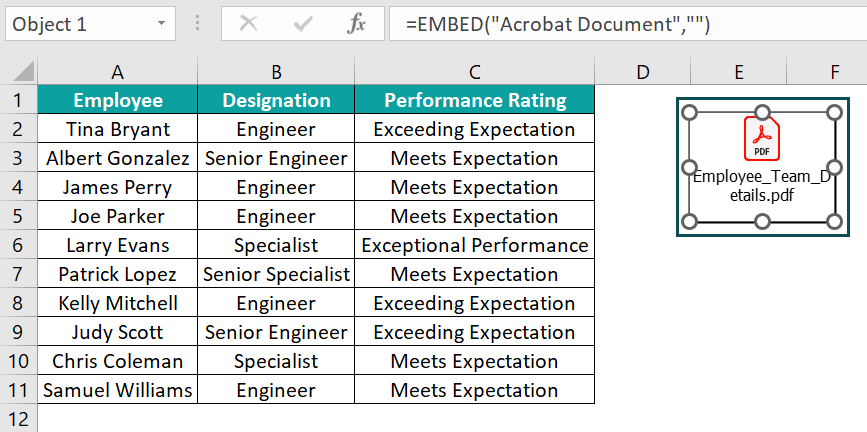
Finally, we can view the required existing PDF file embedded as an object in cell E2 of the active worksheet.

And double-clicking the inserted object will open the PDF file shown earlier.
#3 – Link To Object Vs. Embedded Object
Linking objects in a sheet instead of performing the insert (embed) an object in Excelaction ensures that any changes made to the source file reflect in the embedded object in Excel.
And the steps to link objects in Excel are as follows:
- Click on a destination cell in the required sheet, where we need to link an existing object.

- The Object window will open, where we must click the Create from File tab to open it.
And then, click the Browse option to choose the required file to link as an object in the target cell.

- Next, check the Link to file and Display as icon options and click the Change icon option.

- The Change Icon window opens. And we can change the object icon and caption to suit our requirements.

- Finally, click OK in the Object window to view the object linked as an icon to the target cell in the active worksheet.

Basic Example
The first image shows a table of grocery items and their quantities in the active worksheet of a workbook. And the second one shows the list of the same items as in the first table and their cost details in a Word file.


And the requirement is to link the Word file as an object in cell D2 of the active sheet in the first workbook.
Then, the steps are as follows:
- Step 1: Select cell D2 and click on Insert → Text → Object.

- Step 2: The Object window will open, where we must click the Create from File tab to open it.
And then click Browse.

The Browse window opens, where we must choose the required Word file to link as an object to the active worksheet.

And click Insert.
- Step 3: Select the Link to file and the Display as icon options and click the Change icon option.

- Step 4: The Change Icon window will open. We shall choose the required icon in the Icon field and update the object name in the Caption field to display it according to our requirements.

- Step 5: Click OK in the Object window to view the object linked to the target cell D2 in the active sheet.


Thus, we can now double-click the linked object to refer to and edit its content. Also, when we change the content in the source file and save it, the changes will reflect when we double-click the object to open the file from the active worksheet.
Why We Need Embedded Object In Excel?
We need to insert (embed) an object in Excel and use it for the following reasons:
- We can use the embedded object to add detailed information about the specified dataset in the active worksheet.
- The embedded object helps make the Excel data more presentable while keeping it user-friendly. It is because we can display the required data in the worksheet, with the embedded object enabling users to refer to additional information about the Excel data if required.
- The embedded object option helps keep the source file separate from the active worksheet. It is so because changes made to the source file will not reflect in the embedded object, provided the object is not linked to the Excel sheet.
Furthermore, whether it is the insert object in Excel Office 365 or the previous versions, the abovementioned reasons to use embedded objects hold in all the cases.
Important Things To Note
- The keyboard excel shortcut to use the Object option to insert (embed) an object in Excelis Alt + N + ZT + J.
- Select the Display as icon option in the Object window to view the embedded object as an icon in the active worksheet.
- Inserting a file as an object in a worksheet increases the workbook size. So, when other users need to access the workbook on the same system where the source file is stored, we can use the Link to file option to link the required object to Excel. This option will ensure the Excel file size does not increase.

Frequently Asked Questions (FAQs)
You can embed multiple objects in Excel using the following steps:
Embedding Different Objects In Excel
1) Choose a destination cell and select Insert → Text → Object to open the Object window.
2) Click on the first tab to choose the required program in the Object type section and select the Display as icon option to view the embedded object as an icon in the sheet. And click OK.
Next, update the information we want to save in the object, which other users can double-click and view.
But, to insert an existing file as an object in Excel, click the second tab in the Object window to open it. Browse and choose the required file and check the Display as icon option to view the chosen file embedded as an object icon in the required worksheet.
3) Repeat steps 1 and 2 to insert the required unique objects in the specific worksheet.
Embedding The Same Objects In Excel
1) Follow steps 1 and 2, explained above, to insert and embed an object in the required cell in the active sheet.
2) Click the embedded object to select it and use Ctrl + C to copy the object. Next, use Ctrl + V to paste the copied object into the required location in the workbook.
3) Repeat step 2 to copy and paste the embedded object as often as required in the workbook.
You can show embedded objects in Excel using the following steps, explained with an example.
The image below shows a worksheet.
And the task is to show the embedded objects in the active worksheet. Then, the steps are as follows:
• Step 1: Select Home → Find & Select → Go To Special to access the Go To Special window.
• Step 2: Choose Objects and click OK in the Go To Special window.
The above steps will select the embedded objects in the active worksheet.
And now, we can use the Tab key to cycle through the embedded objects and check them for reference.
Excel won’t allow you to insert an object, perhaps because of the following reasons:
• The worksheet or workbook is protected.
• You selected multiple sheets and then tried inserting an object in a cell.
• The file you tried inserting as an object in the active sheet is corrupted or not recognized by the MS Excel program.
Download Template
This article must be helpful to understand the Insert (Embed) An Object In Excel, with its formula and examples. You can download the template here to use it instantly.
Recommended Articles
This has been a guide to What Is Insert (Embed) An Object In Excel. We learn to embed new & existing objects, and linked vs. embedded objects with examples. You can learn more from the following articles –


Leave a Reply