
What is LET in Google Sheets?
The LET function in Google Sheets allows one to define named variables within a formula. This can then be reused multiple times within that same formula. This function improves the readability of the formula. It also enhances performance by evaluating expressions only once, even if they are referenced multiple times.
Using LET in Google Sheets, one can enhance clarity in their spreadsheets. LET helps assign names to calculation results. This can be reused within the same formula, reducing redundancy and improving efficiency. This helps simplify complex formulas, making them easier to read and maintain. Besides, it also helps in debugging and understanding formulas by breaking them down into manageable parts. In this example, the formula first calculates the average of cells B2:D2 and names it avg.
It then uses an IF statement and checks the average. If avg is greater than or equal to 4, it returns “Excellent”; if it’s at three or greater 3, it returns “Good”; else, it returns “Fair”
Use this LET in Google Sheets Template to follow along with the examples in this article.
Download Excel Template=LET(avg, AVERAGE(B2:D2), IF(avg>=4, “Great”, IF(avg>=3, “Good”, “Poor”)))

Syntax
Let us look at the LET Google Sheets formula for this function.
=LET(name1, value_expression1, [name2, value_expression2], …, formula_expression)
The arguments are as follows:
- name1: The name you assign to the first expression and it acts as a variable.
- value_expression1: The formula or value that name1 represents.
- [name2, value_expression2]: Optional values that are repeatable, with additional name-value pairs, allowing definition of multiple variables.
- formula_expression: The main formula that utilizes the defined names (variables) and returns the result of the LET function.
How To Use LET Function in Google Sheets?
The LET function in Google Sheets allows you to assign names to calculation results or values inside a formula, making complex formulas easier to read, manage, and optimize. It is especially useful when you want to reuse the same expression multiple times without typing it repeatedly.
There are two ways to use the LET function in Google Sheets:
- Enter LET manually
- From the Google Sheets menu
Enter LET Manually
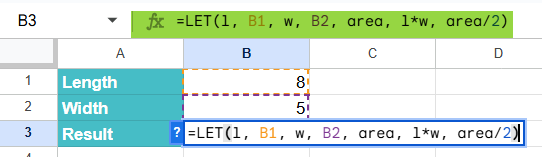
To use LET manually, let’s go through a simple example. We calculate the area of a rectangle and then divide the result by 2. The rectangle has a length of 8 and width of 5.
Step 1: Open a new Google Sheet and enter the values in the cells.

Step 2: Click on the cell where you want the result to appear. We choose cell C3 and type the following formula:
=LET(l, B1, w, B2, area, l*w, area/2)
Here:
- l – assigned name for length in B1
- w – assigned name for width in B2
- area – assigned name for the calculation l*w
- area/2 – final calculation using the defined names
Step 3: Press Enter. The cell B3 will display the result, which is 50, and then dividing by 2 gives 25.

Entering LET Through the Menu Bar
- Go to the Insert tab and choose Function → Logical → LET.
- A tooltip will appear asking for Name1, Name1_Value, Calculation, etc.
- Enter the cell references and names as required.
- Press Enter to get the result.
Examples
The primary purpose of the LET function is to simplify complex formulas by assigning names to calculations. This makes formulas easier to read, reduces errors, and improves performance when the same calculation is used multiple times.
Example #1
In this example, we must calculate the monthly salary of an employee after tax deductions. Instead of writing the tax calculation multiple times, it is easy to use LET in Google Sheets to assign names to the base salary, tax rate, and net salary.
Step 1: Enter the details in a Google Sheet, as shown below.

Step 2: Click on the cell B3, and we enter the following formula:
=LET(salary, B1, tax, B2, deduction, salary*tax, salary-deduction)
Here:
- salary – Base salary (B1)
- tax – Tax rate (B2)
- deduction – Intermediate calculation of salary * tax
- salary-deduction – Final result showing net salary after tax

Step 3: Press Enter. The cell B3 will display the result 4000, which is the employee’s salary after deducting 20% tax (5000 – 1000 = 4000).

By using LET in Google Sheets, we avoided repeating (B1*B2) in the formula, thus making the calculation easier. This approach is especially helpful in payroll sheets, budgeting, and so on.
Example #2 – Using LET Function with SUMIF function
The LET function in Google Sheets when combined with SUMIF, it can simplify the management of ranges. Let us look at an example where we use LET with SUMIF. IN this function, we use the LET function and calculate the total sales for Apples in column B. The LET function makes the formula easier to read by naming the ranges and condition instead of writing them repeatedly.
Step 1: Enter all the details in a Google Sheet.

Step 2: TO find the total sales of Apples, we enter the following function.
=LET(
data_range, A2:A10,
criteria_range, B2:B10,
sum_range, C2:C10,
target_criteria, “Apples”,
SUMIF(criteria_range, target_criteria, sum_range)
)
Explanation:
- data_range, A2:A10: It assigns the name data_range to the cell range A2:A10.
- criteria_range, B2:B10: It assigns the name criteria_range to the cell range B2:B10.
- sum_range, C2:C10: This assigns the name sum_range to the cell range C2:C10. The values in this range will be summed if the corresponding cells in criteria_range meet the target_criteria.
- target_criteria, “Apples”: This assigns the name target_criteria to the text string “Apples”.
- SUMIF(criteria_range, target_criteria, sum_range): This is the final calculation. The SUMIF function uses the named ranges and criteria defined previously to sum the values in sum_range where the corresponding cells in criteria_range equal “Apples”.

Step 3: Press Enter. The formula returns 700, which is the total sales for all rows where the fruit is “Apples”.

Example #3 – Using LET Function with AVERAGE function
The LET function in Google Sheets when combined with AVERAGE, can make complex conditional statements based on an average much better. In this example, We are categorizing the performance of students based on an average score
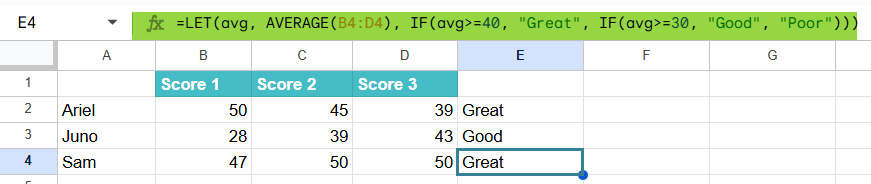
We have some student scores in columns B, C, and D, and you want to categorize their overall performance in column E as “Excellent”, “Good”, or “Poor” based on their average score.
Step 1: Let us enter the details in Google Sheet.

Step 2: Now let us use LET with AVERAGE.
In cell E2, enter the following formula:
=LET(avg, AVERAGE(B2:D2), IF(avg>=40, “Great”, IF(avg>=30, “Good”, “Poor”)))
LET(avg, AVERAGE(B2:D2), …): This part defines a variable named avg and assigns it the result of AVERAGE(B2:D2).
IF(avg>=4, “Great”, IF(avg>=30, “Good”, “Poor”)):
- It checks if the average ≥ 40, assigning “Great” if true.
- If the average ≥30, assigning “Good” if true.
- If neither condition is met, it assigns “Poor”.

Step 4: Drag the blue square at the bottom-right corner of cell E2 down to fill cells E3 and E4 with the same formula.
This approach calculates the average only once per row, making the formula more efficient and easier to understand.
Important Things to Note
- The value_expressions evaluates only once in the LET function, even if the next value_expressions or the formula_expression uses them multiple times.
- The LET function lets you name parts of your formula. Instead of using cell names or references, use meaningful words to understand what the formula does.
- You can define several names (Name1, Name2, etc.) before specifying the final calculation that uses them.
Frequently Asked Questions (FAQs)
When using LET, we have the following benefits.
Readability: Complex formulas become easier to understand as intermediate calculations can be assigned meaningful names> this reduces the need to repeat big expressions.
Enhanced Performance: Expressions assigned to names are calculated only once, leading to more efficient calculations, especially in large or resource-intensive spreadsheets.
Easier Maintenance: Changes to a any particular calculation only must be made in one place, where the value_expression where the name is defined.
Errors in LET usually occur if you we make the following mistakes:
1. Reusing variable names,
2. Assigning invalid values,
3. Miss the final calculation expression.
4. Another common mistake is referencing cell ranges incorrectly or using names that conflict with existing cell references.
In regular formulas, we must use repeated calculations that will be typed multiple times. However, LET in Google Sheets allows one to assign names to intermediate values. Thus, there is no repetition and improved performance.
Use this LET in Google Sheets Template to follow along with the examples in this article.
Download Excel Template