
What Are Excel Templates?
Templates in Excel are predesigned worksheets, which one can use to create new worksheets with the same preformatted styles, graphics, and other objects. While Excel offers standard templates, users can also customize the template elements.
Users can use Excel templates to create spreadsheets with the same layout without working on the design elements every time.
For example, assume that we have invoices and we require them in a standard template.
Use this Create Templates In Excel Template to follow along with the examples in this article.
Download Excel TemplateThen, we can use invoice templates in Excel to achieve the desired outcome. And for that, we must go to the New tab under File in the Ribbon.
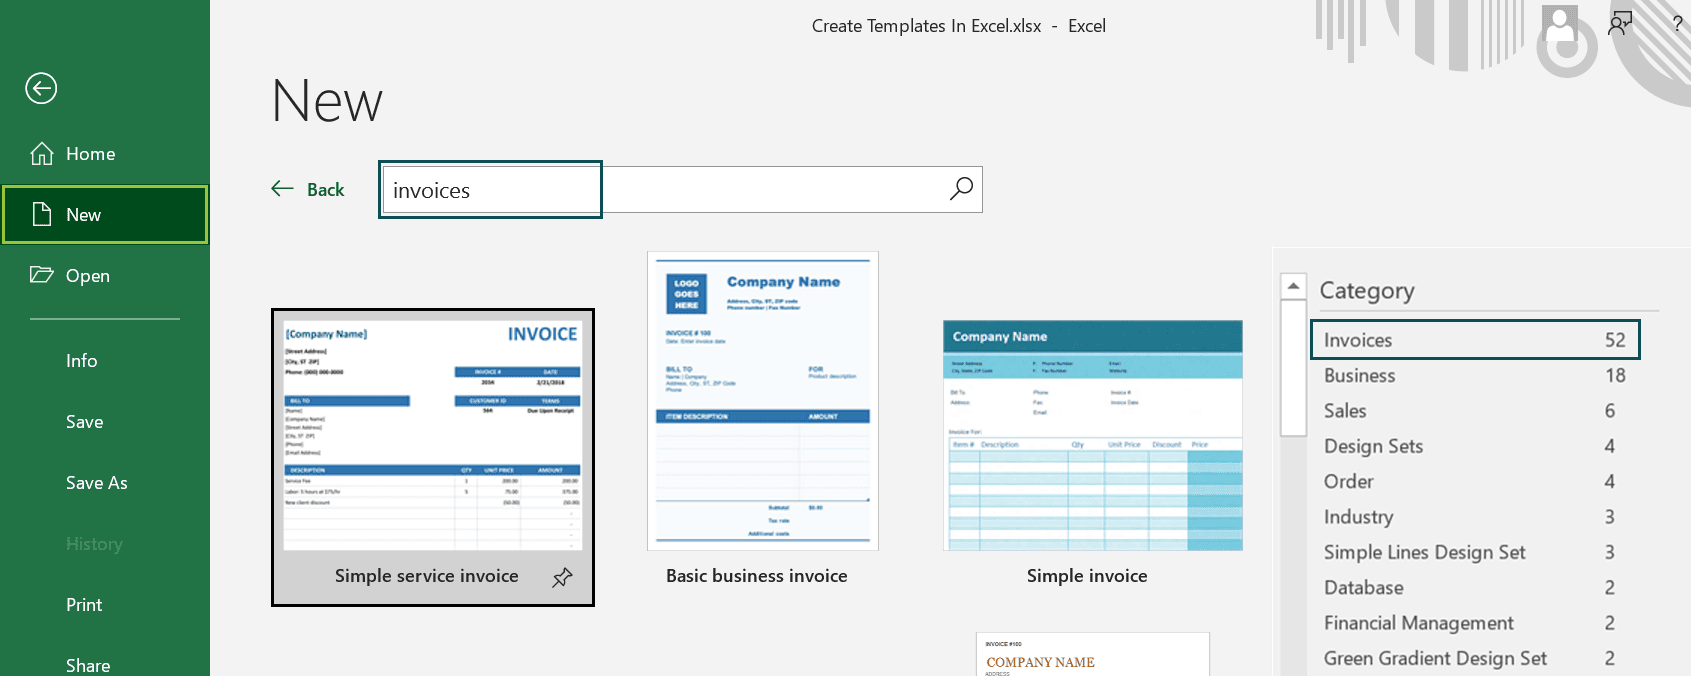
And once we search for invoices in the search field, we can see 52 standard invoice templates in Excel. Pick the one that fits our requirements. For instance, choosing the first template will result in the below worksheet.
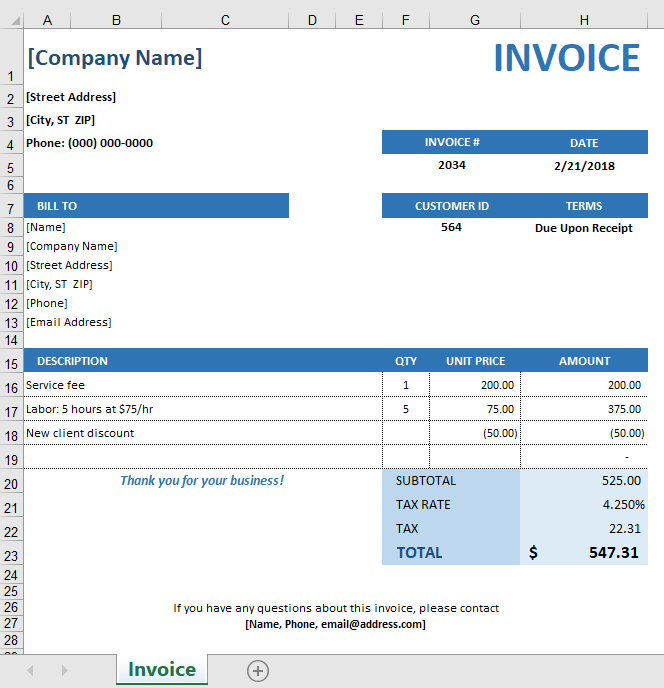
The texts and tables in the template are editable. So, we can fill our data in the respective cells and save the file.
Thus, if we must create an invoice in the same layout again, we can choose the saved template and update the data without working on the design elements from scratch.
Key Takeaways
- Templates in Excel are predesigned workbooks containing one or more sheets, which help create new worksheets or workbooks with the same predefined formatting.
- Users can use Excel templates to repeatedly create reports and spreadsheets in specific formats without the need to work on the basic formatting elements each time.
- Excel templates are editable. And we can modify the existing design elements and add new features, such as macros and images from external sources, to suit our requirements.
- While users can access the standard templates from File → New, creating customized templates and saving them for reuse in the future is possible.
Explanation And Usage
Templates in Excel help one to use worksheets with predefined or customized design formats for performing specific tasks repeatedly. And users can use a template as is or make the necessary modifications according to their requirements.
Typically, excel templates are of three types:
- Default Worksheet Template: It helps one to build a new spreadsheet with predefined design elements, which are editable.
- Default Workbook Template: It helps create an entire workbook with predefined design elements, which are editable. And the workbook can include one or more worksheets based on the requirement.
- Custom-made Workbook Template: A user can create and save a customized workbook template for reuse. While the file gets saved at a specific location in the computer, users can access the template from the PERSONAL window in the New tab under File. Also, these workbooks contain adjustable design elements, format, and template structure.
The uses of Excel templates are as follows:
- Excel templates are useful when performing repetitive tasks, such as preparing calendars, budgets, planners and trackers, and invoices.
- Users can create customized templates for developing complex reports with a specific purpose.
How To Select Standard Excel Template?
The steps to select standard templates in Excel are as follows:
- Open an Excel worksheet and follow the path File > New.
- The New tab will show a Search field where we must enter the required template category.
- If Excel has standard templates in the specified category, it will show the exact matches. And if it does not have the exact matches, it will show the closest matches in the specified category.
- Click once on the required template to see its preview. And if we wish to proceed with the chosen design, click the Create icon next to the preview. Otherwise, we can double-click on the required template to open it.
- The above action will show one or more worksheets in a new workbook with the chosen template design.
- Enter the data in the template elements to view the data in the chosen design format.
Let us see the above-mentioned steps with an example.
Suppose we need to set up an academic calendar in Excel. Then, we can check out the calendar templates in Excel to pick the one that fits our requirements.
- Open a worksheet and click File → New to open the New tab under File.


- Click on Calendars.
While Excel shows the available standard calendar templates in Excel, it also lists the different categories of predefined calendar templates.
- Click the calendar template that suits our requirements once.

Excel will show the template preview. And if we decide to go with the chosen template, click Create. Otherwise, we can preview other templates using the left and right arrows.
And if we are using the chosen template for the first time, Excel will show the downloading message.
Otherwise, a worksheet in a new workbook will open with the chosen template applied.
[Alternatively, double-click the required template to obtain a worksheet in a new workbook with the chosen template applied.]
Now that we have the required template, we can modify the design elements, such as the colors, pictures, and the start day of the week, to suit our requirements.
But if we wish to search for a specific template, which we do not see as the suggested searches in the New tab. Then, we can search for the exact term using the Search field.
For example, though Excel shows a template type, Planners and Trackers, we require project plan templates in Excel. Then, we can enter the phrase Project plan in the Search field, as shown below:
And clicking the search icon or pressing Enter will show the available project plan templates in Excel, from which we can pick the one that suits our business needs.


How To Create A Custom Excel Template?
Excel allows users to create customized Excel templates.
For example, we can find a variety of predesigned budget templates in Excel. However, if we want to build a customized budget template for our personal or business needs. Then, we can create customized Excel templates by changing design elements, such as:
- The worksheet type and count
- Cell styles and formats
- Graphics, formulas, and hyperlinks
- Data validation options
- Frozen panes
- Page layout and print areas
- Areas to hide or protect cells, rows, and columns
- Macros
The following illustration shows how to create a customized Excel budget template.
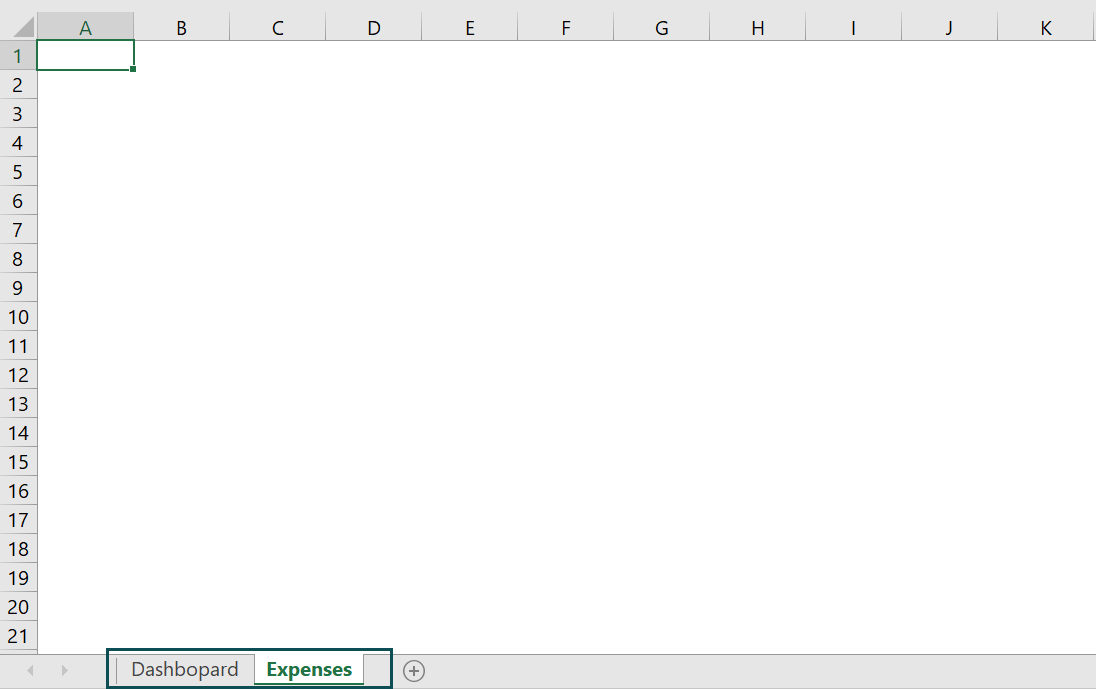
- Step 1: We shall open a new workbook with two worksheets and name them Dashboard and Expenses.

- Step 2: Enter the expenses data in the Expenses sheet.

And select the cell range A2:E20 and press Ctrl + T to convert it into an Excel table.


Next, set the table name and style from the Design tab, as shown below.

Clicking the desired table style will give the below table.

- Step 3: Select the cell range E3:E20 and click on the Data Validation feature in the Data tab.

In the Data Validation window, press the Allow drop-down button in Settings and pick List.

And update the Source field with the values we wish to enter in the Notes column.


Click OK. And when we click on a cell in the Notes column, we will see a drop-down button.

Clicking the drop-down button will show the values we updated in the Data Validation window.
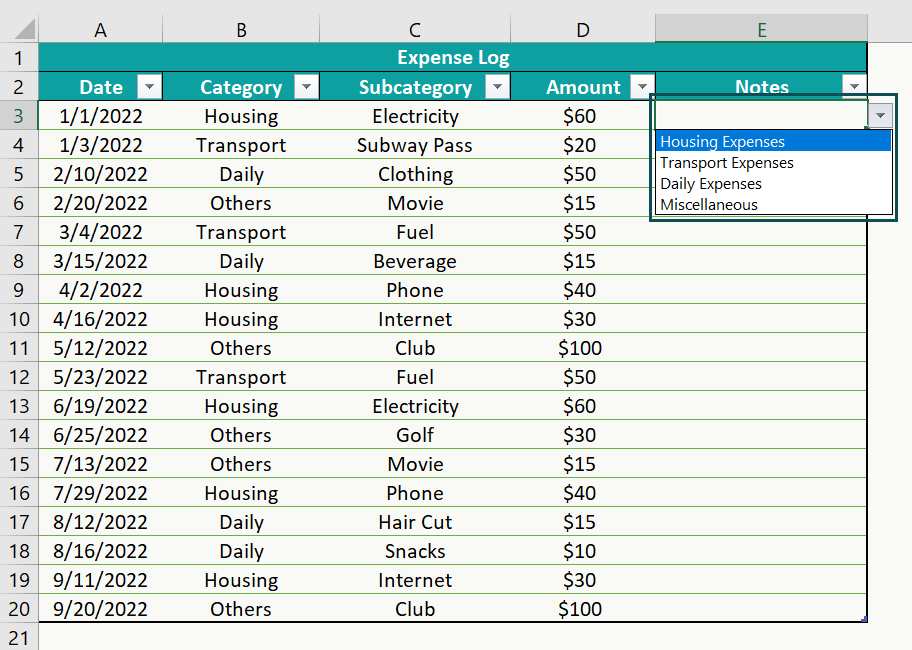
And picking a value from the list will show it in the chosen cell.

- Step 4: Select cell F21, enter the required text, and click Insert → Link.

The Insert Hyperlink window will open, where we must select the second option in the Link to field and pick Dashboard as the place in the document. And click OK.

The above action will take us to the Dashboard worksheet by clicking the link in cell F21.

Set the below-highlighted Font and Alignment settings from the Home tab in cell F21.

- Step 5: Click on Insert → Pivot Charts in the Dashboard worksheet.

The Create PivotChart window will open, where we must update the table range to achieve the required chart.

Select the data range from the Expenses tab.

Clicking OK will show an empty chart area, PivotChart Fields pane, and PivotTable.

Set the fields as shown below to obtain the required plot.


Right-click on the three value fields, one at a time, and click the option to hide them from the context menu.

Next, right-click the second data series in the chart and pick the Format Data Series option from the context menu.

The Format Data Series window will open, where we can update the Series Overlap and Gap Width settings to achieve the required clustered column chart.

And resize the chart to make it appear as below.

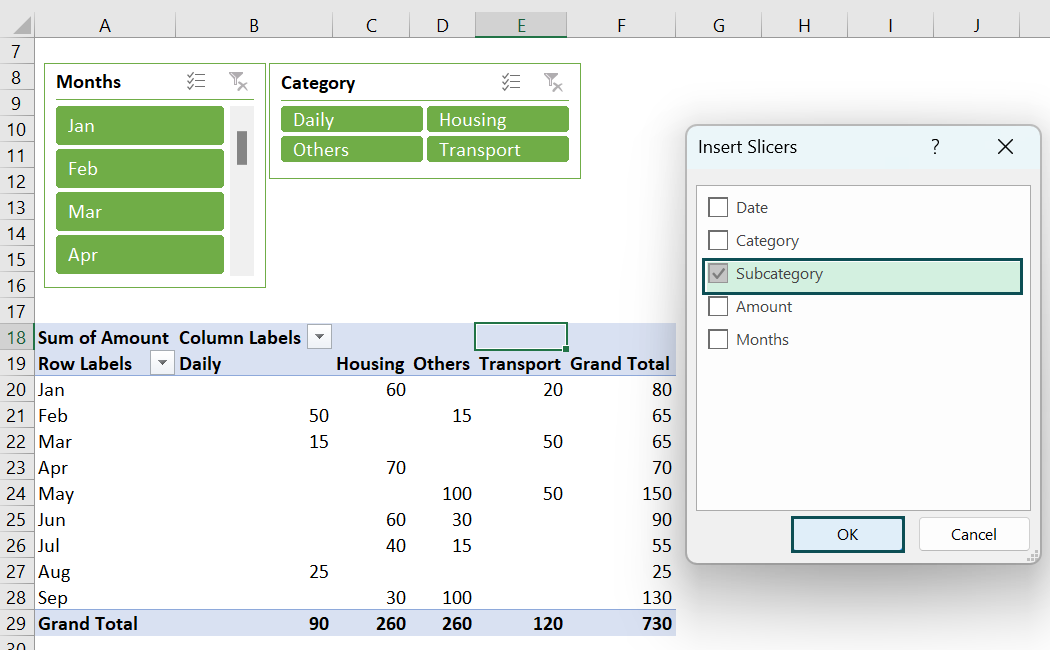
- Step 6: Right-click on the pivot table and click Analysis → Insert Slicer.

The Insert Slicers window will open, where we must select Months.

Clicking OK will give the Months slicer.
Next, click the Months slicer to enable the Options tab and format the slicer.

Likewise, repeat the process for obtaining slicers for Category and Subcategory.


- Step 7: Right-click the pivot table and pick Hide in the context menu to hide it.

- Step 8: Select a cell in the Dashboard worksheet and click on Insert → Pictures. The action will open the Insert Picture window, where we can browse and pick the image we wish to display in the worksheet.

Clicking Insert will show the image in the Dashboard worksheet.

We can then resize it and right-click it to open the Format Picture window to format it according to our requirements.


- Step 9: Select a cell to enter the heading text, as shown below.

Select and format the cell using the Font and Alignment options in the Home tab.

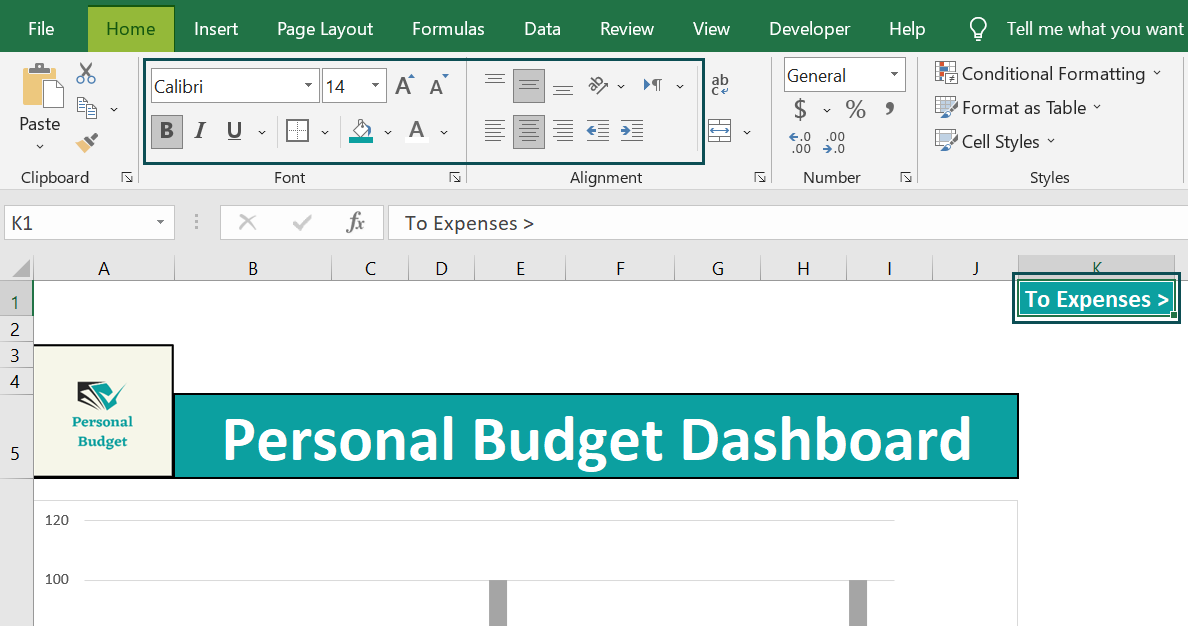
- Step 10: Select cell K1, enter a text, and insert a hyperlink, as explained earlier.


And use the Font and Alignment options in the Home tab to format cell K1 according to the requirement.
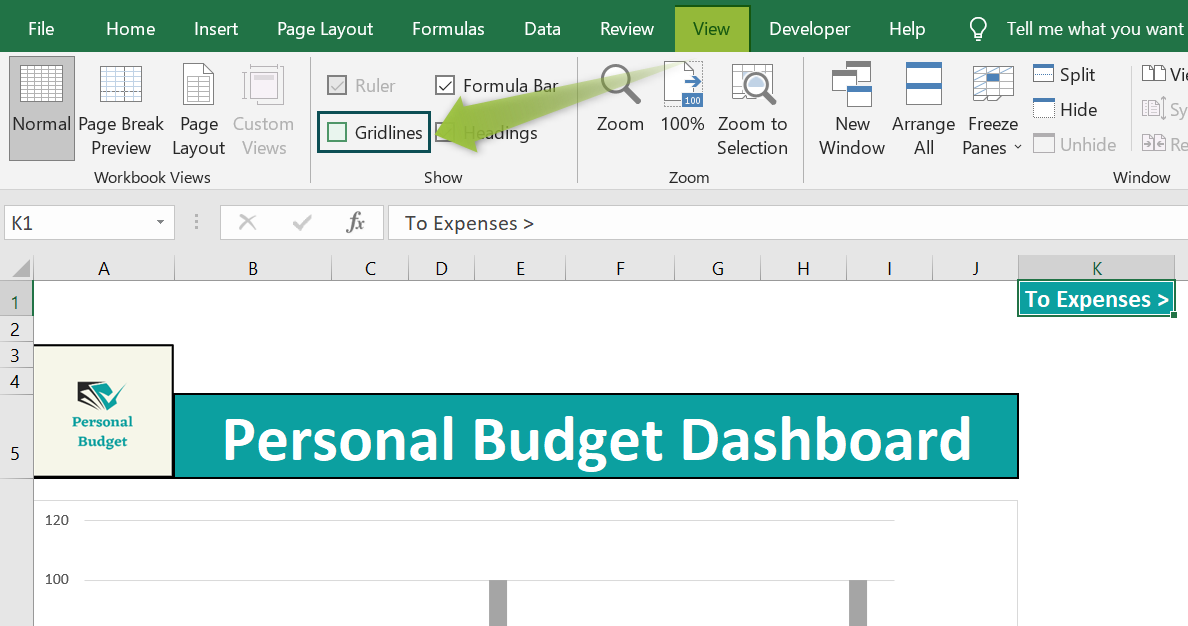
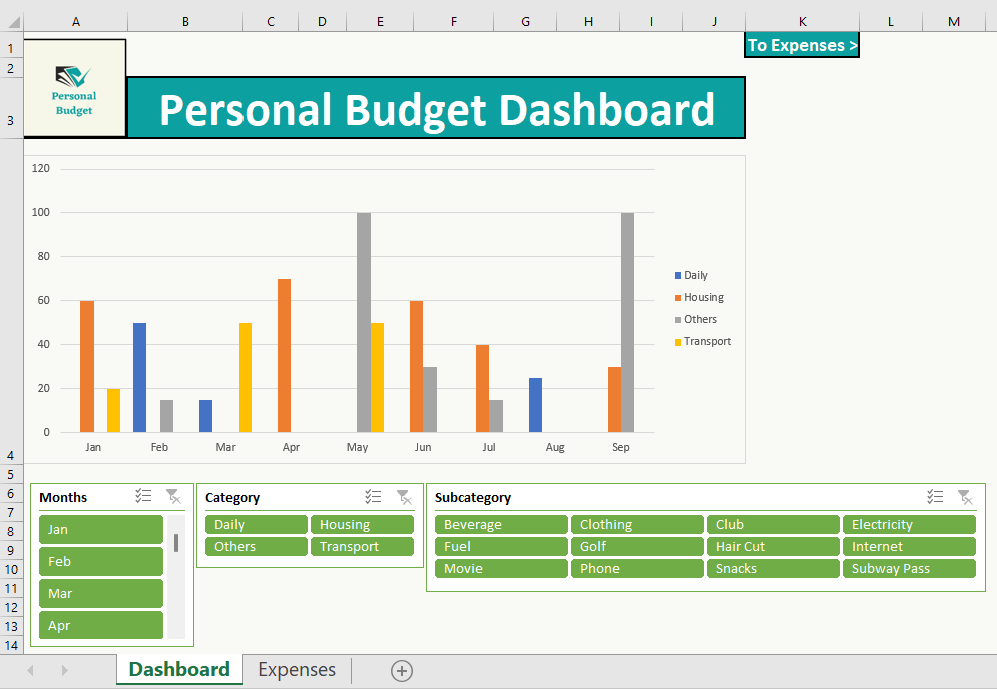
- Step 11: Uncheck the Gridlines box in the View tab to remove the gridlines from the Dashboard tab.
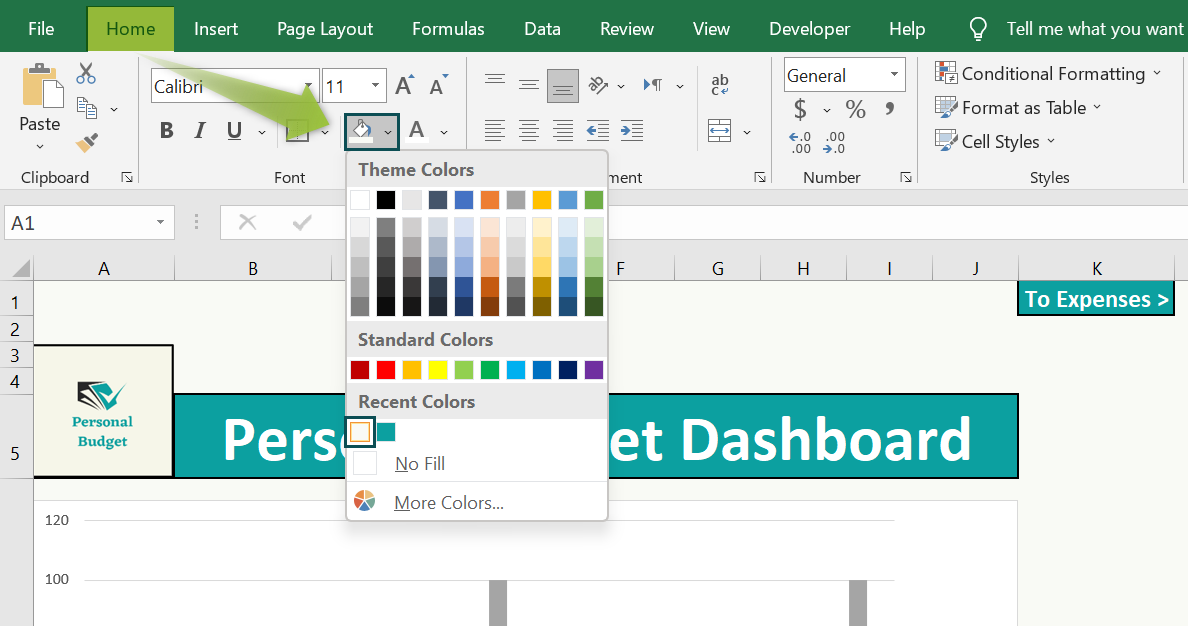
And let us update the worksheet color using the Fill Color option in the Home tab.
Next, right-click the chart area and pick the Format Chart Area option in the context menu.
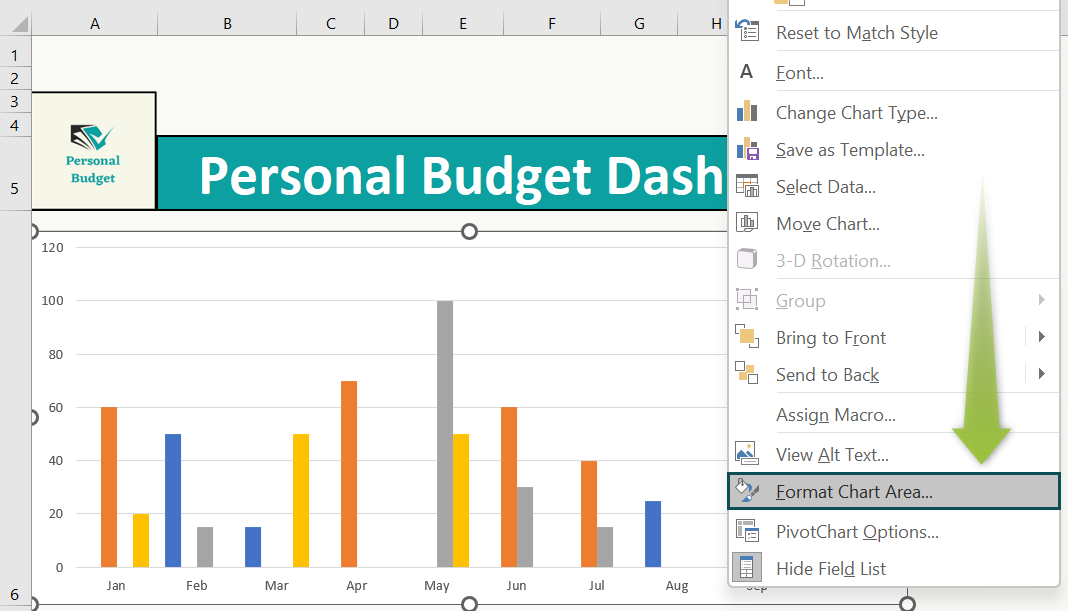
The Format Chart Area window will open, where we can set the options to format the chart area according to our needs.

Thus, the Dashboard window will appear as shown below.
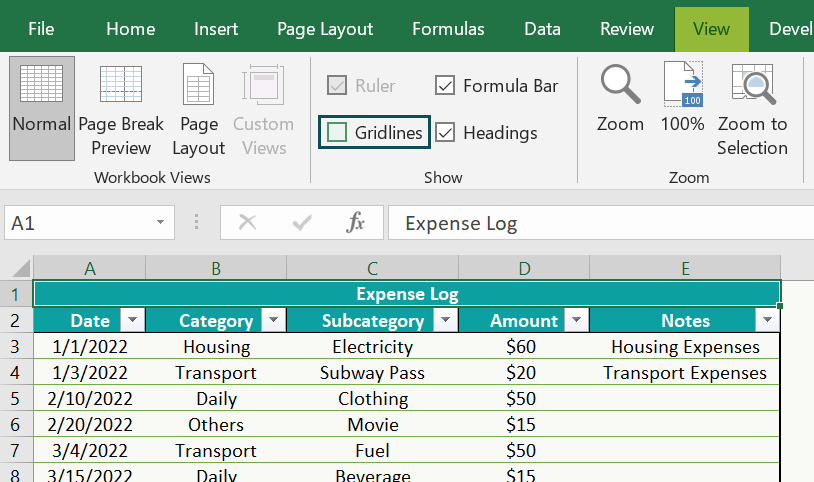
- Step 12: Remove the gridlines from the Expenses sheet.
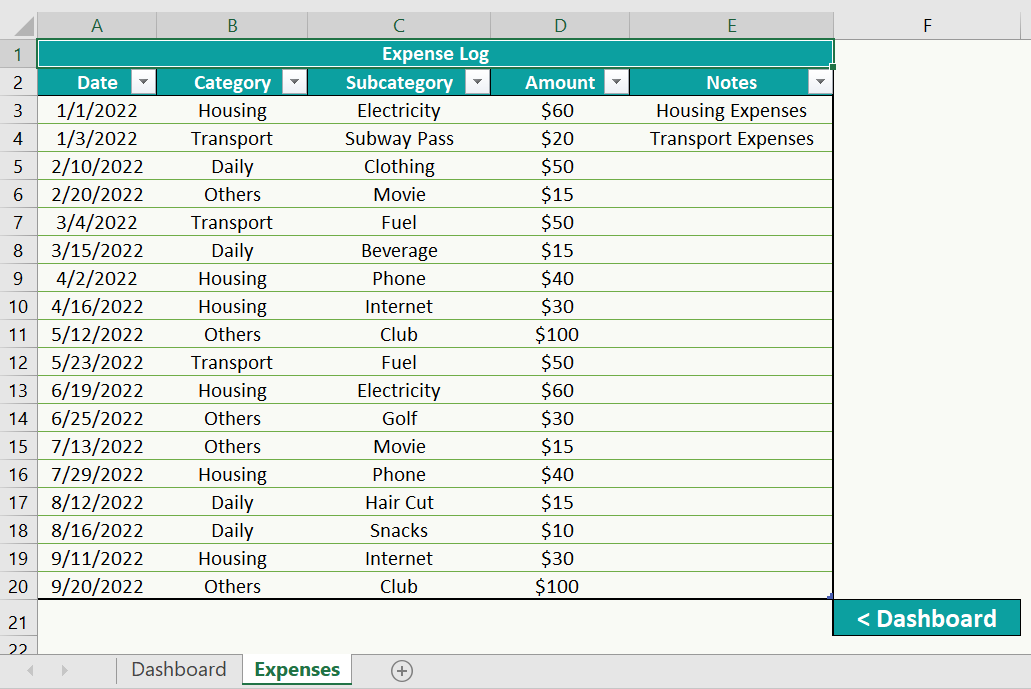
And the final Expenses sheet will appear as shown below.
Thus, the above-customized budget template contains two sheets, similar to the other standard budget templates in Excel.
Now, we can save the file and open the template whenever we wish to prepare the budget without working on the design elements from scratch.
How To Use The Created Excel Template?
Before saving an Excel template file with the Excel Template extension, ensure the Default personal templates location field in the Excel Save settings shows the appropriate path.
- Step 1: Click File → Options to open the Excel Options window.

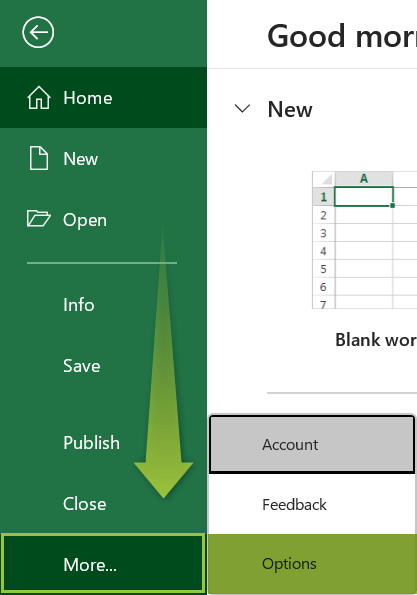
- Step 2: Go to the Save tab and update the Default personal templates location field as shown below.
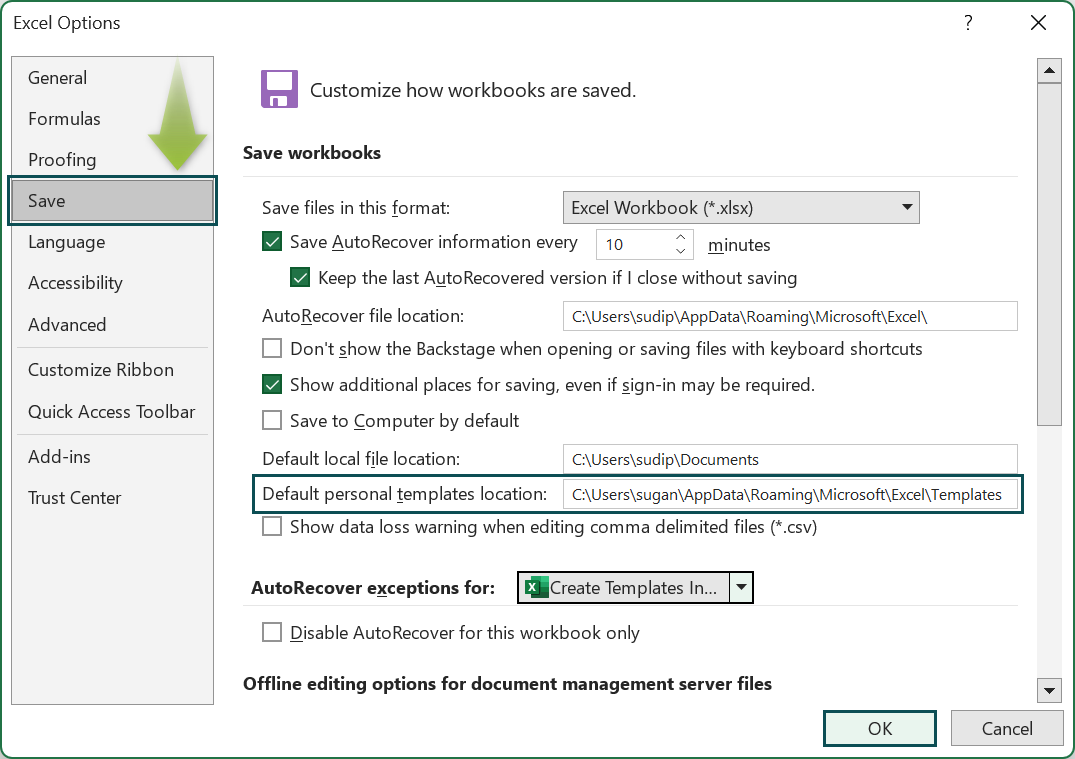
The folder after the Users folder is the Username folder. And click OK.
- Step 3: Click File → Save As in the custom budget workbook template created in the previous section.


Next, update the file name and set the save file type as Excel Template. Otherwise, if the template includes macros, the save file type should be the Excel Macro-Enabled Template option.


Clicking Save will store the file in the following location:
C:\Users\<Username>\AppData\Roaming\Microsoft\Templates
Now, we can open a new workbook and click File → New.

And click PERSONAL in the New tab to pick the custom budget template created in the previous section.
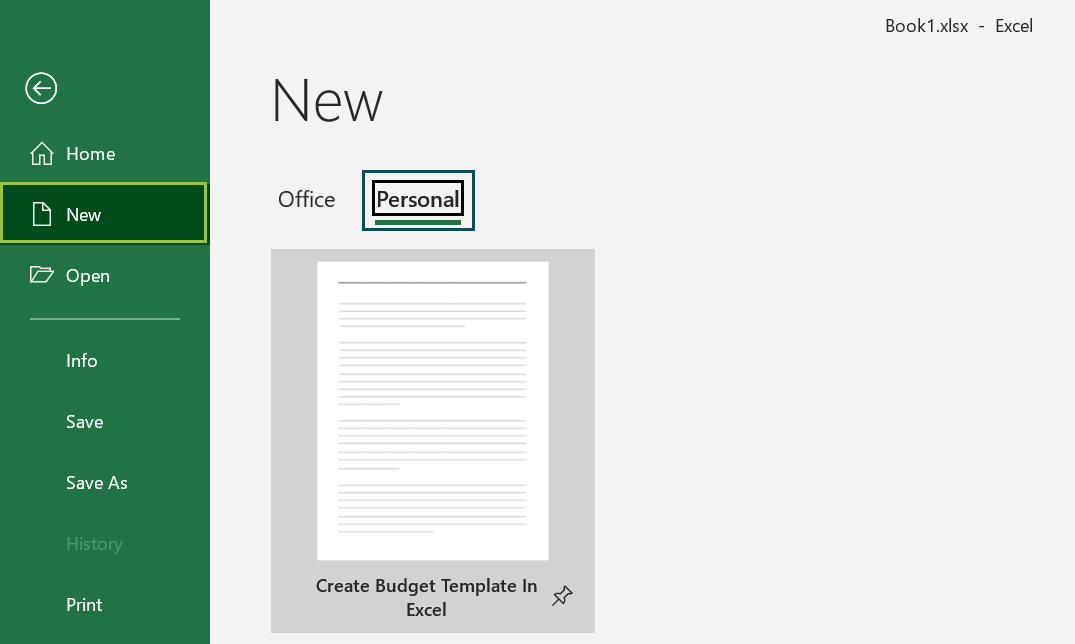
The required custom budget template will appear with the predefined design elements.

Thus, now we can use the sheets to prepare the budget without the need to work on the template design elements from the start.
For example, we will update the notes and the amount in the last row of the Expenses sheet.
- Step 1: Select cell E20, and click the drop-down button to update the notes as Miscellaneous.


And select cell D20 and enter the amount as $50.

- Step 2: Clicking on the hyperlink in cell F21 will take us to the Dashboard sheet.
And in the Dashboard sheet, click on the chart area and Analyze → Refresh to view the updated chart.


We can also use the slicers in excel to apply the appropriate filters to use the template effectively.
Advantages And Limitations
The advantages of templates in Excel are as follows:
- Excel templates have integrated predefined design elements, which are reusable. Thus, they increase repeatability.
- Excel templates save time and effort, as working on the design and format aspects of a report is a one-time effort.
- Excel templates help one to focus more on the report data and content. And thus, they enhance efficiency.
The limitations of templates in Excel are as follows:
- Lack of originality.
- Excel templates may curb the users’ drive to learn about the Excel features they can use more effectively.
Important Things To Note
- Before saving an Excel template, ensure the Default personal templates location setting is C:\Users\<Username>\AppData\Roaming\Microsoft\Templates.
- When saving templates in Excel containing macros, use the Excel Macro-Enabled Template extension (*.xltm). Otherwise, use the Excel Template extension (*.xltx).
- When accessing customized Excel templates, go to File → New and click the PERSONAL tab to find the required custom templates.
Frequently Asked Questions (FAQs)
Templates can contain macros in Excel. Whether it is a standard or a customized Excel template, we can add macros to perform repetitive tasks without working on the template design from scratch.
However, we must save the file with the Excel Macro-Enabled Template extension to ensure the macro works every time we use the template.
Excel has timeline templates.
For example, we require a project timeline template. Then, the steps are as follows:
• Step 1: In the active worksheet, click File → New.
• Step 2: Enter timeline in the Search field and press Enter.
Excel will show the various standard timeline Excel templates. Let us pick the first option by double-clicking it.
The above action will open a new workbook with the chosen project timeline template.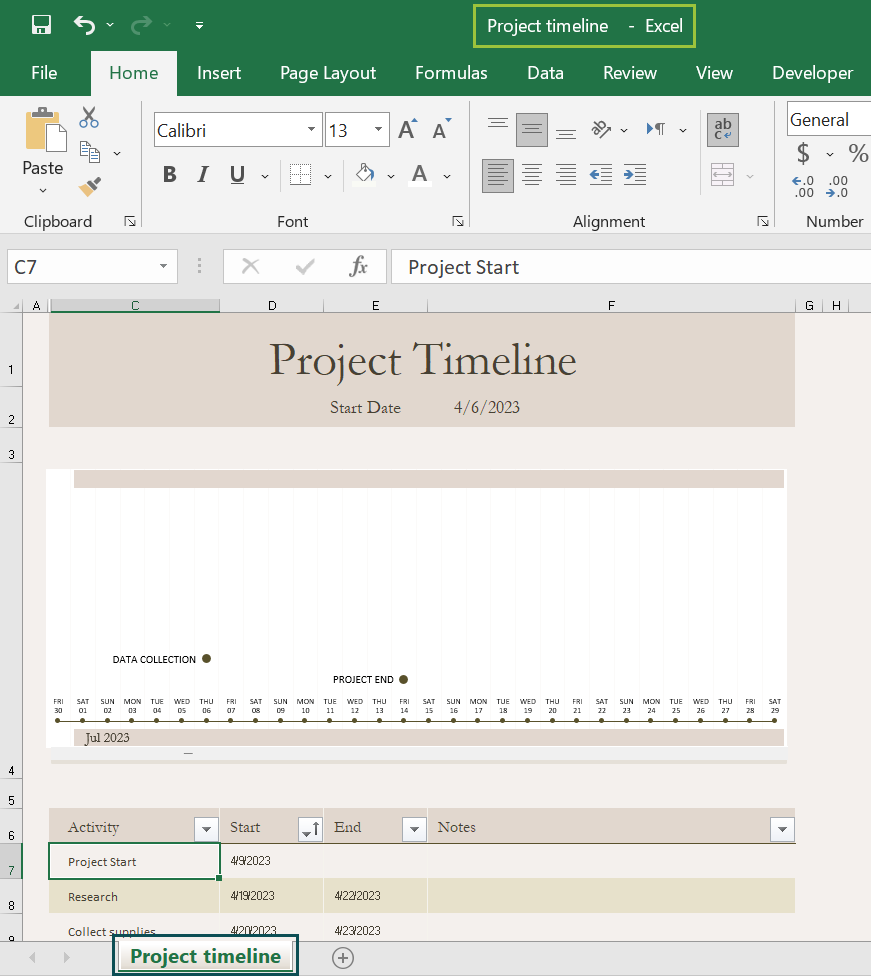
We can now update the source data according to the project requirements.
The templates get stored in Excel in the New tab under File in the Ribbon.
And the Excel templates get stored in the below location as Excel Template and Excel Macro-Enabled Template files:
C:\Users\<Username>\AppData\Roaming\Microsoft\Templates
Use this Create Templates In Excel Template to follow along with the examples in this article.
Download Excel TemplateRecommended Articles
Continue with these related resources when you want the next practical step in this topic.
- Dashboard In Excel
- KPI Dashboard In Excel
- Blank Invoice Excel Template
- Calendar Template In Excel
- Accounting Templates In Excel
Explore the full Excel Dashboards and Reporting guide or browse Excel Resources.