
What Is Track Changes In Excel?
Track changes in Excel highlight the changes made by a user in a shared workbook. It marks the cells with data that has been edited in a different color. In simple terms, this feature helps users update and review the altered data in Excel.
When working in a team, sharing an Excel workbook with the members is customary. It is quite common to get unintended data errors in the spreadsheet. Identifying the changes made by the other team members is a tedious manual task. To save time and effort, we can make use of track changes in excel.
📥Download the ready-to-use Excel template to practice this tutorial yourself.
Track Changes in ExcelFor example, consider the below table with the details of account holders in a bank. Column A displays the names of the account holders, and column B shows their residential addresses. Let us understand how to use track changes in Excel with the following steps.

The steps used to find edited data using track changes in Excel are as follows:
Step 1: Under the Review tab, click on the Track Changes option from the Changes group.
Step 2: Select the desired option from the drop-down list.
Now, we have activated track changes in excel.
Let us assume that the bank should note old and updated account holder’s addresses.
For instance, if Edward has changed his residential address, the excel sheet highlights the data along with the name of the user and the date & time with which the user has made the changes, as shown in the image below.
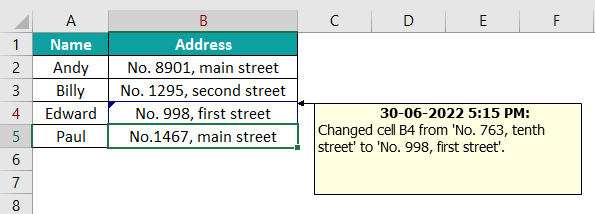
- Thus, we can use track changes in excel to review the altered data.
Table of contents
- What Is Track Changes In Excel?
- Understanding Track Changes Feature In Excel
- How To Track Changes In Excel (Example)
- Validate Changes (Accept Or Reject)
- Set For How Long The Change History Should Be Kept
- How To Turn Off Track Changes In Excel
- How To Track The Last Changed Cell
- Important Things To Note
- Frequently Asked Questions
- Download Template
- Recommended Articles
Key Takeaways
- Track changes in Excel automatically records all the changes we make in the workbook. It displays the changes along with the user’s name, date and time in the comment box.
- It highlights the altered cell with a blue triangle at the top left corner of the cell.
- We can accept or reject the changes made by the users using Accept or Reject option.
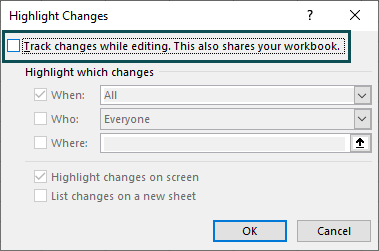
- We can disable the track changes using Review -> Track Changes -> Highlight Changes… and uncheck the Track changes while editing. This also shares your workbook box.
Understanding Track Changes Feature In Excel
The track changes feature is available in the Review tab in Excel. However, in Office 365 versions, we will not see Track Changes Option under the Review tab.

In that case, we can add the feature manually. Let us learn how to enable track changes in excel office 365 with the following steps.
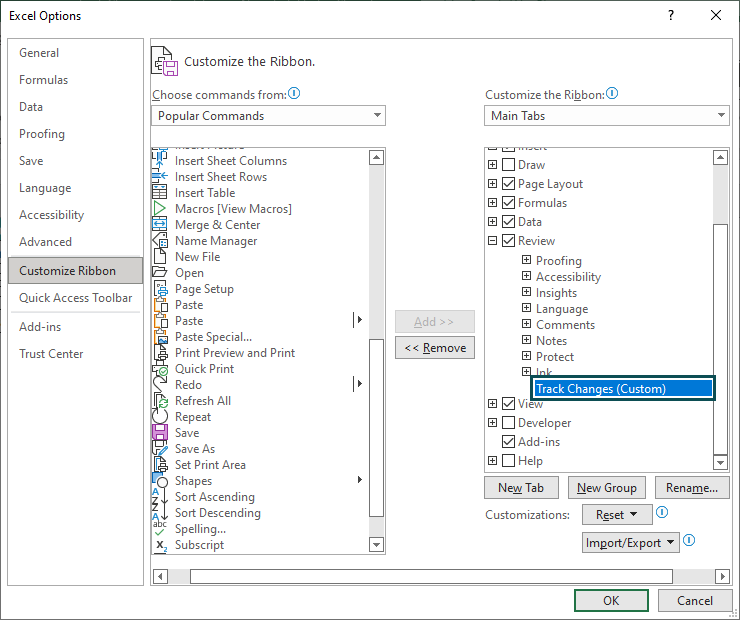
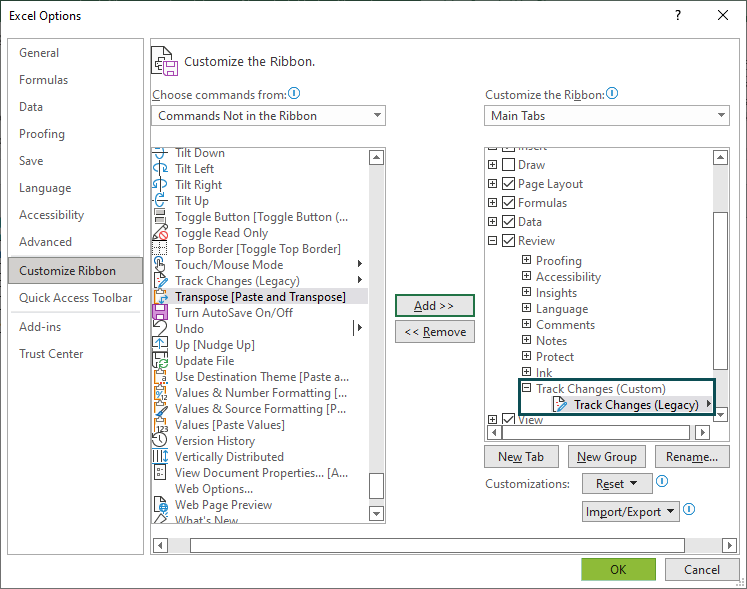
Step 1: Right-click on the Review tab and click on Customize the Ribbon… option.

Step 2: The Excel Options window appears. Select the Customize Ribbon option.
Step 3: Click on the Review option under Main Tabs, click on New Group and select OK.

Step 4: We can see the New Group (Custom) option under the Review group.
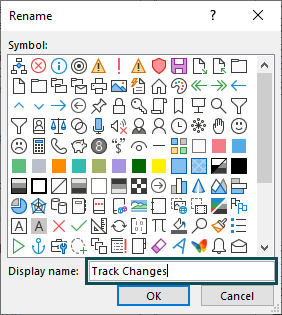
Now, select the New Group (Custom) option and click on Rename.

Step 5: The Rename tab pops up. Type Track Changes in the Display Name: dialog box.
Step 6: Click OK.
We can see Track Changes (Custom) option under the Review tab.
Step 7: Select Track Changes (Custom) and choose Commands Not in the Ribbon option under Choose Commands From: box.
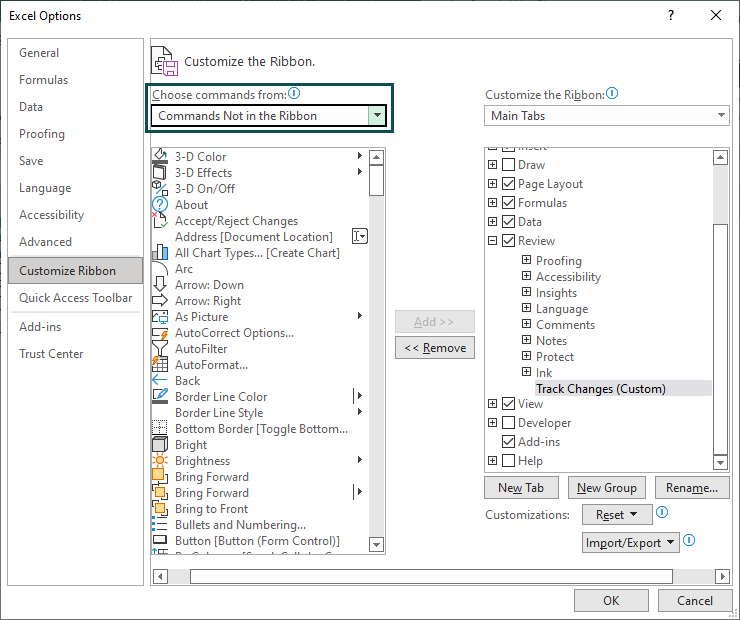
Step 8: The commands yet to be included in the ribbon are shown here.
Scroll down, choose the Track Changes Legacy option, and then click on the Add >> button.

Step 9: Now, we can see the Track Changes feature under the newly added group.
Click OK.
Now we can see the Track Changes feature under the Review tab.

So, we have learned how to enable track changes in excel office 365.
Enable Track Changes Feature:
Let us learn how to enable Track Changes in Excel, with the below steps:
Step 1: From the Review tab, select the Track Changes (Legacy) option from the Changes group.
Next, Choose the Highlight Changes… option in the drop-down list.

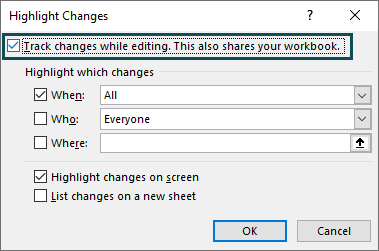
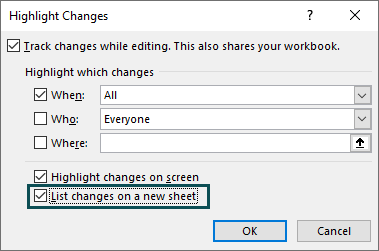
Step 2: Check the Track changes while editing. This also shares your workbook box in the Highlight Changes window .
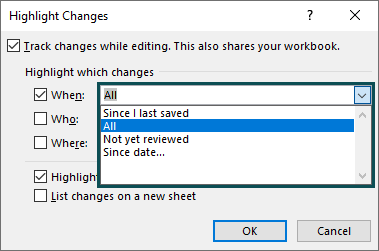
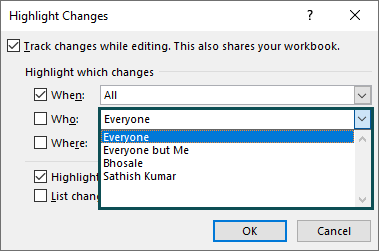
Next, in the Highlight which changes section, we can see three options: When, Who, and Where.
- When: This indicates the time. This category has four options, and Excel highlights the changes from the chosen time.
- Who: It highlights the changes made by the user. There are three options in this category.
- Where: It highlights the changes in a particular cell or a range.
Step 3: Select the Highlight changes on screen option and click OK.

Please Note: Excel will prompt us to save our workbook on the computer or network drive like a shared folder. Even though the file is already saved, it will still ask us to save it after we enable track changes in Excel.
How To Track Changes In Excel (Example)
When we enable track changes in Excel, it highlights the edited cells with a blue triangle found at the top left corner of the cell.
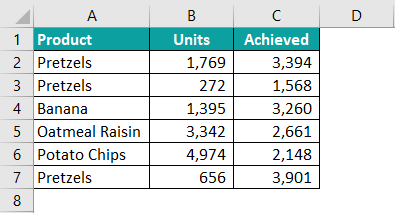
For instance, the following table shows a list of products in column A, units and achieved (sold units) in columns B and C. Let us learn how to use track changes in Excel.
The below steps are used to track changes in excel:
Step 1: Initially, we should click on the Track Changes option in the Changes group.
Step 2: In the drop-down list, select the desired track changes option.
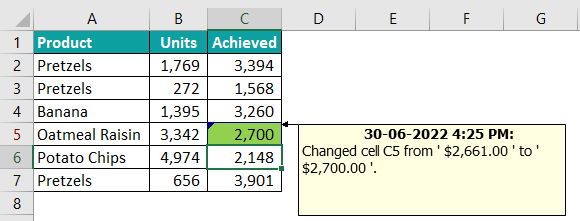
The changes made by users will get tracked in the table. So, change the value of C5 from 2661 to 2700.

As we can see, Excel highlights the altered data with a blue triangle. When we hover on the cell, Excel displays the edited data along with the user’s name, and the date and time with which the user has made the changes in the comment box.
Please Note:
- When we enable Track changes in excel, it will be a shared workbook (we can see the word Shared in front of the workbook name).

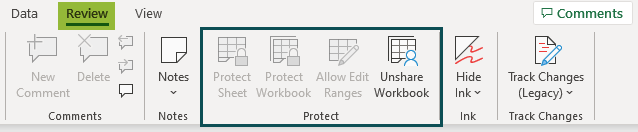
- The feature disables the Protect Sheet, Protect Workbook, and Allow Edit Ranges options in the Protect group.
Track Changes In A Separate Sheet
Highlighting the edited cells is not the only use of the Track Changes tool. We can also list down all the changes in a separate worksheet.
The steps to get all the changes in a separate worksheet are as follows:
Step 1: Under the Review tab, click on the Track Changes tool and choose Highlight Changes.
Step 2: The Highlight Changes window pops up. Along with the other options, check the List changes on new sheet option.
Step 3: Click OK to create a new worksheet called History.
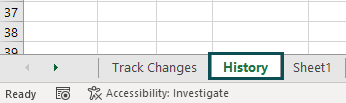
Therefore, we can see the changes made in excel in a separate sheet using Track changes in Excel.
Validate Changes (Accept Or Reject)
Let us assume we have sent a shared workbook to a team member. Once we receive the updated file, we need to know what changes are made to review the updated content. We can then accept or reject the changes.
Let us learn the steps to accept or reject changes in excel.
Step 1: Choose Accept / Reject Changes option from the Track Changes drop-down list under the Review tab.

Step 2: The Select Changes to Accept or Reject window pops up.

Here, we can choose the categories to accept or reject the changes.
Step 3: Click OK to display all the changes made in the workbook.

Step 4: If we are satisfied with the changes, we can click on Accept or Accept All. If unsatisfied, we can click on Reject or Reject All option.
Set For How Long The Change History Should Be Kept
When we make changes to a worksheet, Excel will keep the history (of all the edits made in the workbook) for 30 days by default. However, we can edit this by using the following steps.
Step 1: Click on Share Workbook legacy from the Track Changes group in the Review tab.

Step 2: The Share Workbook window pops up. Click on the Advanced tab.
Step 3: Change the number of days in the Keep change history for: box.
Step 4: Select OK.

We can have the history (of all the edits made in the workbook) for as many days as we want.
How To Turn Off Track Changes In Excel
We can disable or turn off track changes in excel using the following steps:
Step 1: Go to the Review tab.
Click on the Track Changes option from the Changes group
Step 2: Choose Highlight Changes… from the drop-down list.
Step 3: Uncheck the Track changes while editing. This also shares your workbook box in the Highlight Changes dialog box.
Step 4: Click OK.
Please Note: Turning off track changes in excel will permanently delete the change history. Therefore, it is advised to list down all the changes in the workbook to save the changes history.
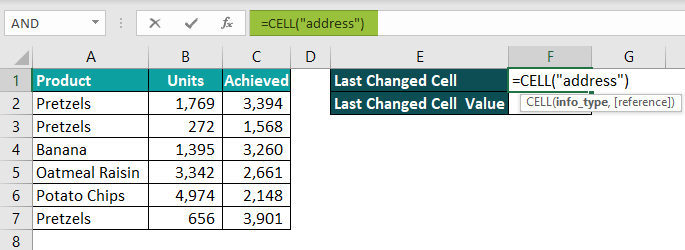
How To Track The Last Changed Cell?
We can track all the changes in Excel, but we may need to track the last edited cell. Unfortunately, this feature is not available in the track change options, but we can use the CELL function to track the last changed cell.
The syntax of the CELL function is
where,
info_type: In this argument, we need to provide the type of information we require from the cell. The information can be of any kind, as mentioned by default in excel.
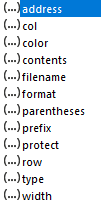
[reference]: This denotes the particular cell’s information. So, we need to provide the cell reference in Excel.
Example
For example, let us use the same table that shows a list of products in column A, units, and achieved (sold units) in columns B and C. Let us learn how to track the last changed cell in excel.
The below steps are used to track changes in excel:
Step 1: In the excel sheet, insert the Last Changed Cell, and Last Changed Cell Value.
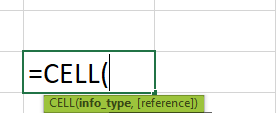
Step 2: Now, enter =CELL(“address”) in cell F1 to track the last changed cell address.
Press Enter to obtain the result.
Step 3: Similarly, enter the CELL function with Contents in F2 to get the last changed cell value.
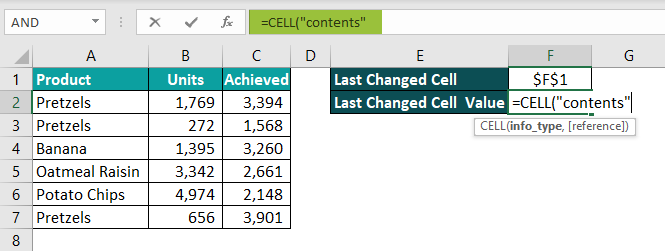
Now, let us change the value of cell C5 from 2661 to 2700.

As soon as we edit the value of cell C5, the Last Changed Cell and Last Changed Cell Value gets updated.
- Clearly, we can find the last changed cell in excel.
Important Things To Note
- Track changes in excel is a feature that is hidden in Office 365. We can enable it from File -> Options -> Customize Ribbon.
- The comments displayed are non-editable.
- Importantly, when we enable track changes in excel, it will disable some options like Protect worksheet, Protect Workbook, and Allow Edit Ranges in the Protect.
- The CELL function is volatile and is used to find the last changed cell in excel.
- By default, Excel keeps the change history for 30 days. We can alter the number of days using Review -> Share Workbook -> Advanced -> Keep change history for:

Frequently Asked Questions (FAQs)
Track changes in excel show the changes made in the worksheet or workbook, and allow the workbook owner to review (accept or reject) the changes.
For example, consider the below table with the marks obtained by students. Column A displays the students’ names, and column B shows the marks obtained. Let us understand how to use track changes in Excel with the following steps.
The steps used to find edited data using track changes in excel are as follows:
Step 1: Add the data in excel
Step 2: Go to the Review tab.
Step 3: Click on the Track Changes option from the Changes group.
Step 4: Select the desired option from the drop-down list.
Let us assume that the marks scored by Jerry are updated incorrectly. So, if we update 45 to 54, excel highlights the edited cell with a blue triangle.
When we hover on the blue triangle, excel highlights the data along with the name of the user and the date & time with which the user has made the changes, as shown in the image below.
Thus, we can use track changes in excel to review the altered data.
It is not possible to track changes without sharing the workbook. When we enable it, Excel will display the name Shared in front of the workbook’s name.
When we edit data, the feature will record the author’s name. We cannot edit the author’s name from the comments. However, we can change the author’s name in the settings.
Step 1: Go to the File tab.
Step 2: Click on Options.
Step 3: Select General.
Step 4: In the Personalize your copy of Microsoft Office box, we can change the name.
Download Template
📥Download the ready-to-use Excel template to practice this tutorial yourself.
Track Changes in ExcelRecommended Articles
This has been a guide to Track changes in Excel. Here we discuss how to enable, use, track last changed cell, validate changes, and disable using examples with downloadable excel template. You can learn more from the following articles –
Leave a Reply