
Delete Row In VBA
In VBA, using Delete Row command, we can delete row(s). The trick is that if we need to delete a single row, we give a single row reference, but for multiple columns, we give multiple row references. For anyone who works in Excel, adding and deleting rows and columns is a common daily task. We use shortcut keys to swiftly do this task in Excel, however, when we develop automation of reports, we may have to eliminate some of the rows in the process.
Hence, when we write VBA macro coding, it is important to apply the deletion of the row in the code. As part of this, we need to delete alternative rows, and/or based on certain conditions, etc.,
Use this VBA Delete Row Template to follow along with the examples in this article.
Download Excel TemplateIn this tutorial, we will learn how to delete rows using VBA code.
Key Takeaways
- Using VBA Delete Row code, we can delete rows based on the cell value.
- Deleting an entire row is possible by using the Entire Row property of the ROW or RANGE Object.
- We can delete rows with full empty or cells with values and every Nth row.
- Similarly, we can also delete all the duplicate rows using VBA delete row.
- Remember, to delete a single row, we should give a single-row reference, and to delete multiple rows, we should give multiple-row references.
How To Delete Row In VBA?
To delete row in Excel VBA, we need to mention the row number and then choose the entire row property and then choose the delete method.
Use the following methods to write VBA code to delete the entire row.
Step 1: Go to the Visual Basic Editor window by pressing the Excel shortcut keys ALT + F11.
Step 2: Start the subroutine procedure by naming the macro in Excel.

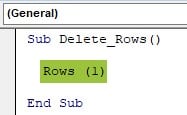
Step 3: Type the ROW property.

Step 4: For the ROWS property, we need to give the row number without double quotes. Provide the desired row number like the following.
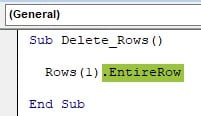
Step 5: Enter the dot to decide what to do with the given row number. Choose the property EntireRow.
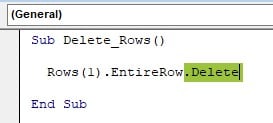
Step 6: After choosing the EntireRow property, we need to choose the method i.e., the Delete method.
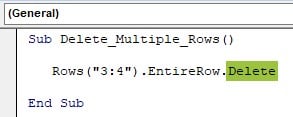
We have the following value in row number 1.
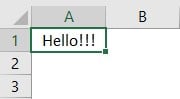
Let’s run the code, and it should delete row number 1, and we will have a blank row number 1.

As we can see, the code that we have written deleted row number 1 upon executing the code.
Similarly, the following codes will delete respective row numbers.
Rows(4).EntireRow.Delete – This will delete row number 4.
Rows(8).EntireRow.Delete – This will delete row number 8.
Rows(20).EntireRow.Delete – This will delete row number 20.
Note: Deletion of rows
Examples
Example #1 – Delete Multiple Rows Using VBA
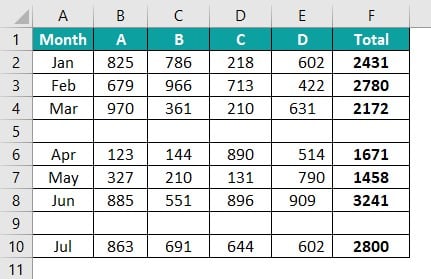
We can delete multiple rows by using VBA code. For example, we have the following data in an Excel worksheet.
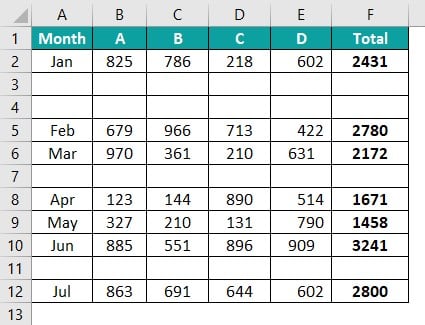
From the above data, we need to delete row numbers 3 and 4 because we have blank rows.
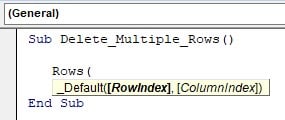
To delete these two rows, open the ROWS property in the VBA code.
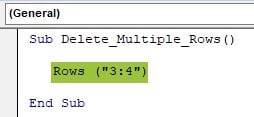
Open double quotes and provide the required row numbers like the following.
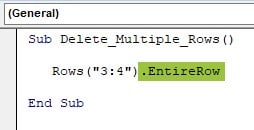
After the row numbers are provided, we need to choose the EntireRow property. However, while working with the ROWS property, we will not get to see the IntelliSense list to choose the properties and methods, so this makes the coding difficult, especially for new learners.
We will show you the alternative way to tackle the IntelliSense list. As of now, enter dot and enter the property EntireRow.
Now enter another dot (.) and enter the method Delete.
When we run this code, it will delete row numbers 3 and 4.
When we delete row numbers 3 &4, all the subsequent rows shifted up, and the 5th and 6th rows become the 3rd and 4th, respectively.
This is where we need to be careful while deleting the rows.
Tackling IntelliSense List
When we used the ROW property, we were not getting an IntelliSense list to assist us in writing codes, so we needed to be absolutely sure of what code we are writing.
However, to get the assistance of the IntelliSense list, we need to use the VBA Range object.
Open the Range object in VBA coding.
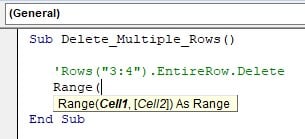
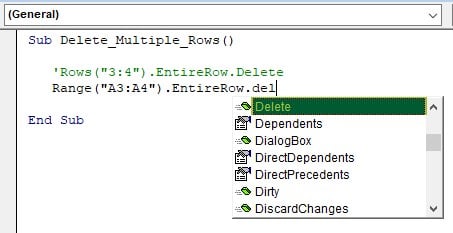
Enter the cell addresses A3:A4 in double-quotes.

After providing the cell addresses, enter the dot (.) and start writing the entire row.

As we can see, we can see the IntelliSense list shows the options for us. Choose the EntireRow property from the IntelliSense list.

Enter one more dot to choose the delete method.
Here also, we can see the IntelliSense list.
After choosing the delete method, we will have the following code.
Sub Delete_Multiple_Rows()
Rows(“3:4”).EntireRow.Delete
End Sub
This will also delete row numbers 3 and 4.
Example #2 – Deleting A Row If Any Cell Is Empty
In the above example, we have seen deleting rows only if the entire row is empty. However, take a look at the following data.

Apart from having a complete row empty, we have some blank cells as well in rows 6 and 10. To delete a row, if any of the cells are empty, it requires a different VBA delete row technique.
Sub Delete_Rows_Cells_Empty()
Dim HeaderCount As Integer
Dim RowCount As Integer
Dim K As Integer
Dim LR As Integer
Dim Rng As Range
Dim RowNum As Integer
LR = Cells(Rows.Count, 1).End(xlUp).Row
HeaderCount = WorksheetFunction.CountA(Range(“B1:F1”))
For K = 2 To LR
RowCount = WorksheetFunction.CountA(Range(“B” & K & “:F” & K))
If RowCount < HeaderCount Then
Cells(K, 1).EntireRow.Delete
LR = Cells(Rows.Count, 1).End(xlUp).Row
K = K – 1
If K = LR Then Exit For
End If
Next K
End Sub
The following code will test the count of cells and the count of the header. If the count of cells doesn’t match the count of the headers, we need to delete those rows.
The above code will check the header cells count from columns B to F and loop through each row and find the count of the looping cell row. If any blank cells come, the count will be less, so that cell’s entire row will be deleted.
Example #3 – Deleting A Row If The Entire Row Is Empty
Deleting empty rows in the data range is one of the common tasks. For instance, look at the following data in Excel.

There are empty rows in the data table, and we need to delete these rows with VBA code. Follow the steps described below.
Step 1: Start the subroutine by naming the macro.

Step 2: Enter the RANGE object and provide the complete data range from A1:F12.

Step 3: Here, we are not targeting any row because we are not sure which rows are actually empty. So, to do this, we need to choose the Special Cell method.

Step 4: After choosing the special cells method, open the bracket, and we will see various properties of the special cells.

Step 5: From the various cell types, choose xlCellTypeBlanks.
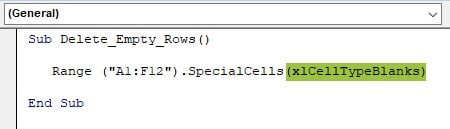
Step 6: Enter another dot and choose the delete method.
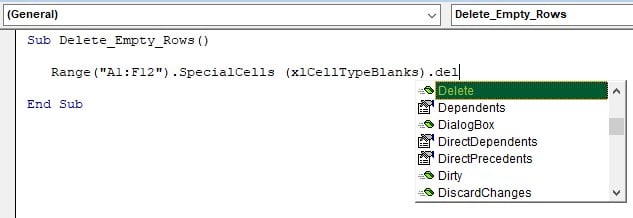
The completed code is here in the following box.
Sub Delete_Empty_Rows()
Range(“A1:F12”).SpecialCells(xlCellTypeBlanks).Delete
End Sub
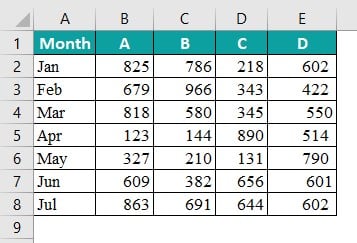
When we run the above code, it will delete all the empty rows from the given range of cells A1:F12, and we will have the following data table.

Example #4 – Deleting Every Nth Row
To delete every Nth row, look at the following data.

In the above data, every odd row has a blank row, so we can use the following code to delete every odd row.
Sub Delete_Every_Nth_Rows()
Dim K As Integer
Dim LR As Integer
Dim Rng As Range
LR = Cells(Rows.Count, 1).End(xlUp).Row + 1
For K = LR To 2 Step -2
If K Mod 2 <> 0 Then
Cells(K, 1).EntireRow.Delete
End If
Next K
End Sub
This will delete all the odd rows and gives the following cleaned data table.
Example #5 – Deleting Row Based On Cell Value
Deleting rows based on cell value is one of the key tasks in data analysis. For example, look at the following data in Excel.

We have the flight name and their arriving status as Yes or No.
We need to delete all the rows that have the status “No”. The following code will delete all the rows that have the value “No”.
Sub Delete_Rows_With_Specific_Value()
Dim K As Integer
Dim LR As Integer
LR = Cells(Rows.Count, 1).End(xlUp).Row
For K = LR To 2 Step -1
If Cells(K, 2).Value = “No” Then
Cells(K, 2).EntireRow.Delete
End If
Next K
End Sub
The above code will loop through all the cells in the data range and check for the value in the status column. If the status column is “No” then, it will delete that row.
Example #6 – Deleting Duplicate Rows
Deleting duplicate rows is a day-to-day requirement. For example, look at the following data in Excel.

By using the following code, we can get rid of duplicate rows.
Sub Delete_Duplicate_Rows()
Dim Rng As Range
Set Rng = Range(“A1:B8”)
Rng.RemoveDuplicates Columns:=Array(1, 2), Header:=xlYes
End Sub
The above code will remove all the duplicate rows.
Example #7 – Deleting Rows Having Any Strings
This is the easiest method because here, we are not testing any logic or criteria rather, we just want to delete the row having any string.
Simply mention the rows that we would like to delete either by using the VBA CELLS Property or the RANGE object.
For example, if we want to delete rows 1 to 10, then mention the rows like the following.
Range(“A:A10”).EntireRow.Delete
This would delete all the rows from 1 to 10.
Example #8 – Deleting Row Based On Dates
When we work with data with dates, we may need to delete rows based on the date value. For example, we have the following data in Excel.

We have the policy number and the due date for each policy. We need to delete rows based on the due date if the due date is less than TODAY, then we need to delete that row.
The following code is for your reference.
Sub Delete_Rows_Date()
Dim K As Integer
Dim LR As Integer
LR = Cells(Rows.Count, 1).End(xlUp).Row
For K = LR To 2 Step -1
If Cells(K, 2).Value < Now() Then
Cells(K, 2).EntireRow.Delete
End If
Next K
End Sub
The above code will loop through all the data cells and delete rows where the date value is less than the TODAY date.
Important Things To Note
- We can delete a single row or rows in Excel using VBA delete Row.
- With the ROWS property, we will not get the access to IntelliSense list.
- It will reduce the effort of using multiple variables when we delete rows.
- In VBA Delete Rows, Step -1 means the loop automatically reduces to -1 after every loop runs.
- Even a small space character will not make the cell blank or empty.
- When we reference a single cell, we need to choose the entire row property to make the deletion applicable for the entire row.
Frequently Asked Questions (FAQs)
To delete rows when the filter is applied, we need to use the special cells method and use the xlCellTypeVisible from that method.
For example, to delete rows with the range A1:F10 when the filter is applied the following code will delete only visible rows.
Range(“A1:F10”).SpecialCells(xlCellTypeVisible).Delete
For example, look at the following data in Excel.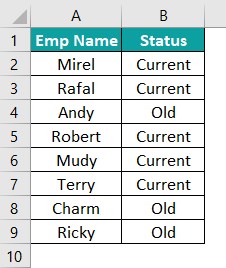
If we want to delete the rows with the value “Old”, we can use the following code.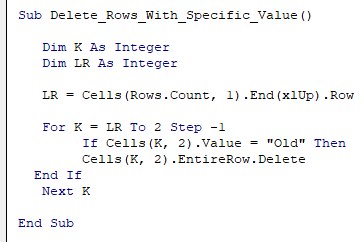
If you want to delete the row with specific text in a cell, we can use the following code. The following code will delete the rows wherever we have “No”.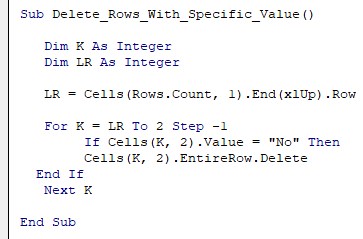
Use this VBA Delete Row Template to follow along with the examples in this article.
Download Excel Template