What Is Insert Button In Excel?
The Insert button in Excel is a powerful feature that allows users to easily add various elements to their spreadsheets. This button on the toolbar gives access to a dropdown menu with several options for inserting different objects. Users can insert rows and columns to expand their data range or add new information. Additionally, they can insert charts that dynamically represent and analyze the data visually, making it easier to interpret trends and patterns.
The Insert button also allows for inserting shapes, pictures, hyperlinks, and even equations for complex calculations. Users can seamlessly incorporate these elements into their Excel workbook by selecting the desired option from the dropdown menu. With its versatility and user-friendly interface, the Insert button greatly enhances spreadsheets’ visual appeal and functionality in a professional setting.
For example, consider the below table. Now, let us include the checkbox button.
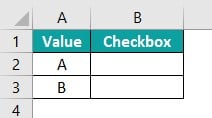
The steps to insert button in Excel are:
Step 1: First, go to the Developer tab, click the Insert button and then, choose the Check Box feature.
Step 2: To insert a checkbox, click on the desired cell within the data. A checkbox will then appear near that location. We can adjust the size and position of the checkbox to suit our specific needs.
Step 3: Drag B2 using the Autofill excel option to insert checkbox to all the desired cells.
Likewise, we can add button in Excel.
Table of contents
- What Is Insert Button In Excel?
- How To Insert Button In Excel?
- Steps To Insert Developer Option In Excel Ribbon
- How To Make Use Of Insert Button Option In Excel?
- Example
- How To Add More Controls In Excel?
- How To Format The Control Function In Your Excel Sheet?
- Important Things To Note
- Frequently Asked Questions
- Download Template
- Recommended Articles
Key Takeaways
- Buttons in Excel are single-click commands used to perform specific tasks.
- The size and separation of the options button within the control cannot be adjusted.
Avoid oversizing the control option when inserting a button in Excel. - When adding a button, ensure the text and size are nearly identical.
- Avoid using thick lines for the box, as it may hinder the visibility of the button’s content.
- While inserting a button in Excel, creating a user-friendly control option that can be easily understood and provides valuable information within the Excel sheet is crucial.
How To Insert Button In Excel?
- To enable the insertion of buttons, we need to access the Developer tab. Within the Insert form controls in Excel, we can locate the button tab for insertion. Once found, we can proceed to draw the button on the worksheet.
- Typically, the button remains in Design Mode, but it can be removed after coding and utilized as needed. When utilizing the Insert option, it is essential to first insert the Developer option in the Excel ribbon.
- In a professional tone, buttons in Excel serve as convenient single-click commands that execute specific tasks. These buttons, commonly employed in excel macros, can be easily inserted by accessing the Developer tab. Within the Insert form controls in Excel, users can effortlessly locate the button tab for seamless insertion. Once identified, the button can be drawn onto the worksheet, ready to be utilized.
- Although the button typically remains in Design Mode, it can be removed after coding, allowing for efficient usage. To ensure a smooth integration, it is crucial to initially insert the Developer option in the Excel ribbon before utilizing the Insert feature.
Steps To Insert Developer Option In Excel Ribbon
One must follow specific steps to insert the Developer tab option in the Excel ribbon.
To insert a button in Excel, we can follow these steps.
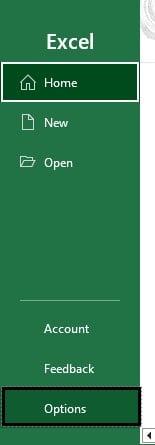
Step 1: To begin, go to the File tab and select Options.
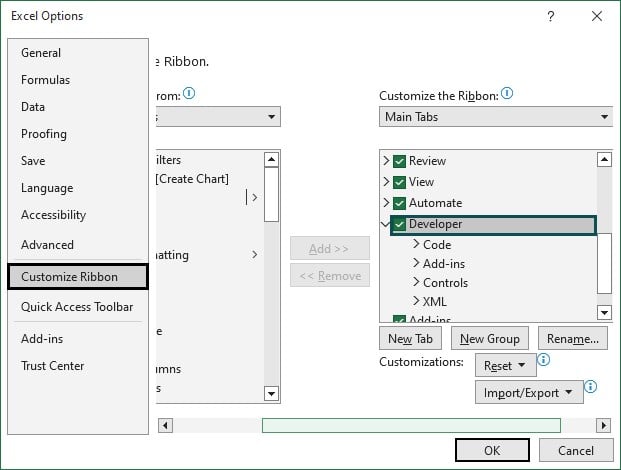
Step 2: A dialog box will appear, allowing access to Excel’s Customize Ribbon feature.
Step 3: We can see numerous options within the Customize Ribbon tab. Locate the checkbox next to Developer and select it to enable the Developer option in the Excel ribbon.
Step 4: Next, click OK to confirm the selection.
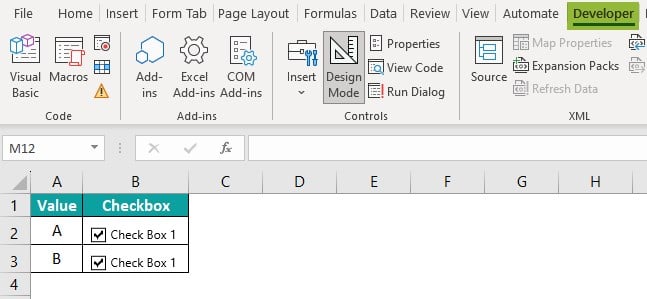
Step 5: We will now notice the presence of the developer tab in our Excel ribbon, as illustrated below:

Following these steps, users can add a new tab called Developer to their Excel ribbon, providing easy access to advanced features and settings designed for developers and power users.
How To Make Use Of Insert Button Option In Excel?
The Insert button option in Excel is a powerful feature that allows users to add various data elements and objects to their worksheets. To make use of this function, professionals can follow a few steps.
- Firstly, they must select the cell or range where the object should be inserted.
- Then, navigate to the Home tab and locate the Cells group.
- From there, click the Insert button, which opens up a drop-down menu with several choices, such as inserting rows, columns, cells, tables, charts, shapes, or pictures.
- Professionals can seamlessly incorporate these elements into their spreadsheets for enhanced data analysis and presentation by selecting the appropriate option based on their requirements and preferences.
Example
In the following example, we have a list of seven days, and we will insert a checkbox in the status column using Insert Button in Excel.
Step 1: We must carefully select and organize the necessary data according to our requirements.
Step 2: Next, go to the Developer tab and choose the Insert option located within the tab.
Step 3: Upon clicking Insert, we will be presented with various relevant options for our data.
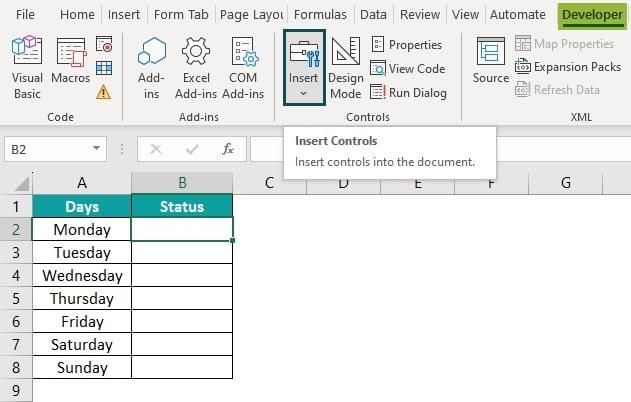
Step 4: Now, select the Checkbox excel option. This feature allows us to create checkboxes within our spreadsheet wherever they are needed conveniently.
Step 5: To insert a checkbox, click on the desired cell within the data. A CheckBox (Form Control) will appear near that location. If necessary, we can adjust the size and position of the checkbox to suit our needs.

Step 6: If we wish to remove or modify the text associated with a specific checkbox, we can right-click on it, select the text, and either delete or edit it accordingly. Alternatively, we can right-click the checkbox and choose the Edit option.
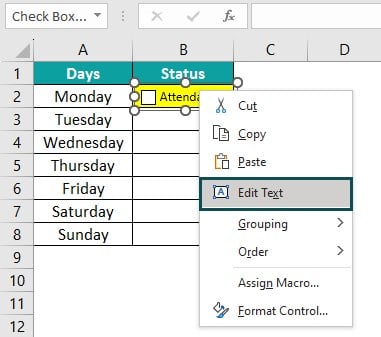
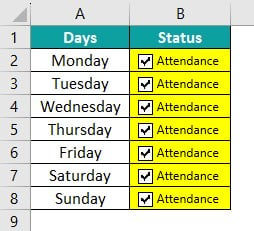
Step 7: To apply the same checkbox to multiple columns, we can easily accomplish this by dragging the Column B2 checkbox to all the desired tabs or pressing CTRL + D to paste it into the corresponding cells.
Step 8: We will observe that the same checkbox is now displayed across all the cells.
How To Add More Controls In Excel?
To add more controls in Excel,
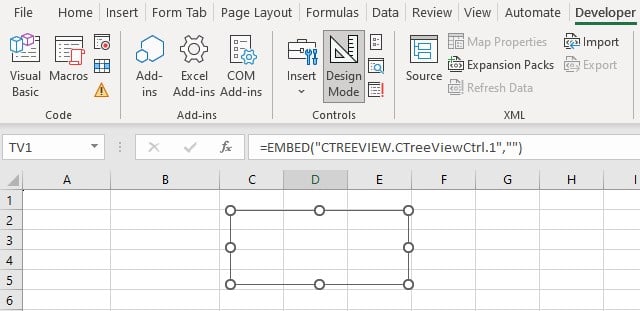
- To expand the range of control options in the Insert tab, navigate to the More Control option.

- By selecting More Control, a dialogue box will promptly appear, as shown below:
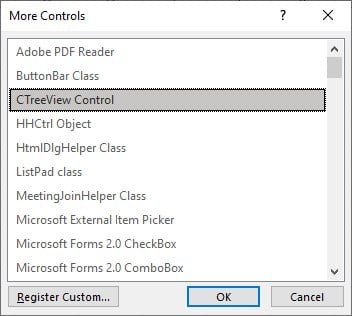
- Choose the control we wish to incorporate and confirm our selection by clicking OK. The chosen control will seamlessly integrate into the insert button of the Excel tab.
This process allows users to easily add intuitive interfaces or interactive elements to enhance data input or analysis within their Excel workbooks.
How To Format The Control Function In Your Excel Sheet?
Consider the following example. We will insert a checkbox in the status column and format the Control Function using Insert Button in Excel.
Step 1: Go to the Developer tab and locate the Insert option.
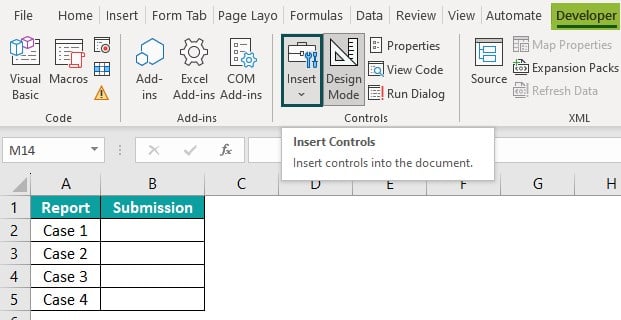
Step 2: Upon clicking on Insert, a range of relevant options will be presented to us, tailored to our data.
Step 3: Now, let’s opt for the Check Box feature. This functionality lets us conveniently create checkboxes within our spreadsheet wherever needed.
Step 4: To insert a checkbox, click on the desired cell within the data. A Check Box (Form Control) will appear near that location. If necessary, we can adjust the size and position of the checkbox to suit our specific needs.
Step 5: If we wish to remove or modify the text associated with a particular checkbox, we can right-click on it, select the text, and either delete or edit it accordingly. Alternatively, we can right-click on the checkbox and choose the Edit option.
Step 6: To apply the same checkbox to multiple columns, we can easily achieve this by dragging the Column B2 checkbox to all the desired tabs.
We can see the same checkbox across all the cells. It provides a consistent and efficient representation of our data.
Step 9: Select the control option inserted into our Excel sheet.
Step 10: Right-click and go to the Format Controls option.

Step 11: A dialog box will appear after clicking Format Control.
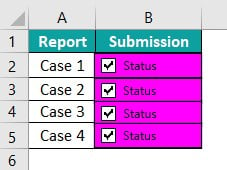
Step 12: Fill Color and Line sections to choose the box’s desired color and style.
Step 13: Click OK to apply the chosen color to the control option.

We can see the formatted cells in the following image.
Important Things To Note
- When inserting a button in Excel, carefully considering the required data option is crucial.
- It is essential to ensure the control size is easily readable when inserting a button in Excel.
- When inserting a button in Excel, adding one checkbox or options button at a time is possible.
- After adding the first control, right-click and select “Copy” and “Paste” to expedite the process.
- Before inserting a button in Excel, we should check if the “Developer” tab is enabled.

Frequently Asked Questions (FAQs)
• The number of buttons that can be added to a worksheet is limited. Excel restricts the maximum number of ActiveX control buttons to 255 per worksheet, so if we exceed this limit, we won’t be able to add more buttons.
• Buttons cannot be placed directly on protected sheets or charts. If we want to use a button on a protected sheet, we must unlock the cells where the button is located, place it on an unprotected sheet, and link it to the protected sheet.
• Firstly, a single click can execute a specific macro or VBA code. This is particularly useful for complex operations or repetitive tasks as it saves time and reduces errors.
• Secondly, the button can be a navigation tool within a workbook or between worksheets, making switching between different sections or dashboards easier.
• Additionally, it is possible to assign conditional formatting rules to the button to change its appearance based on specific criteria.
For instance, we need to navigate to the Developer tab to insert the checkbox button in Excel.
The steps to insert button in Excel are:
Step 1: First, go to the Developer tab, click the Insert button and choose the Check Box feature.
Step 2: To insert a checkbox, click on the desired cell within the data. A checkbox will then appear near that location. We can adjust the size and position of the checkbox.
Step 3: Drag B2 using the Autofill option to insert checkbox to all the desired cells.
Likewise, we can add button in Excel.
Download Template
This article must help understand Insert Button in Excel formulas and examples. We can download the template here to use it instantly.
Recommended Articles
Guide to Insert Button In Excel. Here we learn to insert the button and format the controls, and make use of it in excel along with examples & downloadable excel template. You can learn more from the following articles –

Leave a Reply