
What is ISEMAIL in Google Sheets?
ISEMAIL in Google Sheets is a function used to determine whether a given text string is a valid email address. The function returns TRUE if the value is a valid email address. It is determined in accordance with its internal validation rules. It returns FALSE otherwise.
The ISEMAIL function checks various aspects of the input value to assess if it conforms to a standard email address format. This includes checking for the presence of the “@” symbol, the structure of the domain, and adherence to certain country/region codes and common top-level domains (like .com, .org, .net, .edu, .gov, and others). As an example, let us enter the following email address an its parameter within quotes. The function returns TRUE as based on its validation rules, it is a valid email address.
=ISEMAIL(“user@example.com”)

Use this ISEMAIL in Google Sheets Template to follow along with the examples in this article.
Download Excel TemplateKey Takeaways
- ISEMAIL in Google Sheets checks whether a given text string is in a valid email format and returns TRUE or FALSE.
- The function is useful when you need to validate email entries in datasets, forms, or contact lists to ensure proper formatting.
- The syntax of the ISEMAIL function is as follows: =ISEMAIL(value)
value → The text or cell reference to be tested.
- ISEMAIL validates the structure of an email (presence of @ and domain name) but does not verify if the email account actually exists.
- For broader data validation, you can combine ISEMAIL with functions like IF (to flag invalid entries) or FILTER (to extract only valid emails).
Syntax
The ISEMAIL in Google Sheets formula is as follows:
=ISEMAIL(value)
Argument:
- value: The text string or cell reference containing the value you want to check to determine if it’s a valid email.
How To Use ISEMAIL Function in Google Sheets?
The ISEMAIL function in Google Sheets is used to check whether a given text string is in a valid email address format. It returns TRUE if it is considered a valid email and FALSE if not.
It is useful in scenarios where you need to validate email addresses in bulk, such as employee contact lists, customer signup forms, or student emails.
There are two main ways to enter the ISEMAIL function in Google Sheets:
- Enter ISEMAIL manually
- From the Google Sheets menu
Enter ISEMAIL Manually
Let us look at the manual method to enter the ISEMAIL function. To illustrate this, we will validate a set of email addresses.
Step 1: Open Google Sheets and in a new spreadsheet, enter the email addresses in column A (A1:A5).

Step 2: Enter the ISEMAIL formula in cell B2 as shown below.
=ISEMAIL(A2)

Step 3: Press Enter. The cells in column B will display the results will shown the results as seen below. Here, we drag the formula all the way to cell B7.
The function checks the format only, the presence of @ and domain name. It does not verify if the email account actually exists.
Entering ISEMAIL Through the Menu Bar
- Go to the Insert tab. Choose Function → Information.
- From the list, select ISEMAIL.
- Enter the required argument.
- Press Enter to get the result.
Examples
Now that we have an idea on how ISEMAIL works, let us look at some practical scenarios where it can be used with the help of some simple examples.
Example #1
The ISEMAIL function is commonly used to validate email entries in a dataset. In this example, we will use ISEMAIL to check if a list of email addresses is in a proper format. This helps ensure that invalid entries do not slip into databases or mailing lists.
Step 1: Enter the required email addresses to a sheet. Enter a list of email addresses in column A.

Step 2: In the empty column B, enter the ISEMAIL formula in cell B2.
=ISEMAIL(A2)
Here:
A2 → The cell containing the first email address you want to validate.

Step 3: Press Enter. Drag the formula down for all rows to apply it to the entire range.

The cells in column B will display TRUE if the email is valid and FALSE if it is invalid.
In this way, one can quickly scan large datasets of email addresses and flag invalid entries. It is especially useful in HR, marketing, or customer service databases to ensure only correctly formatted emails are stored.
Example #2 – Using ISEMAIL with IF function
While the ISEMAIL function is very useful as it returns TRUE or FALSE, these results are not always user-friendly in reports. Instead of showing TRUE/FALSE, we can display clear labels such as “Valid” or “Invalid” next to each email address. This is where combining ISEMAIL with the IF function becomes useful.
Step 1: Set up the data. In a new spreadsheet, enter a list of email addresses in column A.

Step 2: Enter the formula in cell B2s shown below:
=IF(ISEMAIL(A2), “Valid”, “Invalid”)
Here:
ISEMAIL(A2) checks if the email in cell A2 is properly formatted.
IF(…, “Valid”, “Invalid”) displays “Valid” if TRUE, otherwise “Invalid”.

Step 3: Press Enter and drag the formula for the other values as well.
The cells in column B will now display “Valid” for properly formatted emails and “Invalid” for incorrectly formatted ones.

By combining ISEMAIL with IF, you can create more readable validation outputs. This makes it easier for team members to identify incorrect email entries immediately without needing to interpret TRUE/FALSE values.
Example #3 – Using ISEMAIL with Conditional Formatting
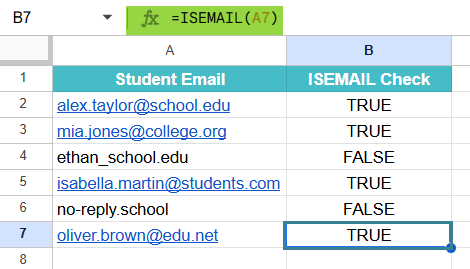
A school maintains a list of student email addresses, but some may be incorrectly entered. We need a quick way to check which emails are valid and which are not. The ISEMAIL function can help flag these issues automatically.
Step 1: In a new spreadsheet, enter the student email addresses in column A.

Step 2: Enter the formula in cell B2, as follows:
=IF(ISEMAIL(A2), “Valid”, “Invalid”)
Here:
- ISEMAIL(A2) checks if the student’s email in A2 is in a valid format.
- The IF function outputs “Valid” if TRUE, otherwise “Invalid”.

Step 3: Press Enter and drag the formula for the other values.
Column B will now display whether each student email is valid or invalid.

Now, let us apply conditional formatting to the same.
Step 4: Select the email column. Highlight the range of cells that contain the student emails.
Open Conditional Formatting
- Go to the top menu → Format → Conditional formatting.
- In the Conditional format rules sidebar, choose “Custom formula is”.
- Enter the formula: =ISEMAIL(SA2)
Here, ISEMAIL(SA2) returns TRUE only for valid emails. We use $ such that it shades the entire row of valid email.
- Choose a formatting style
- Select a style like bold or a particular color to highlight valid emails.
- Click Done.

It will highlight all valid emails in column A.

With this setup, valid student emails stand out visually, making it easy to spot errors without even checking a separate “Valid/Invalid” column.
Important Things to Note
- Remember that only properly formatted email addresses and URLs will return TRUE when passed through =ISEMAIL() more accurately
- The function only validates the structure of the email. Mainly, it checks for the presence of @ and domain. However, it does not confirm if the email account actually exists.
- ISEMAIL is particularly useful in data cleaning and validation, to ensure email entries in signup forms or contact lists are properly formatted.
Frequently Asked Questions (FAQs)
We require Email validation in a wide variety of scenarios. Let us look at some of the places where this function is useful.
Data Validation: It is used to find if the email addresses entered into a sheet are in a correct format.
Validating forms: Used to validate email inputs from forms like Google Forms before further processing.
Cleaning of data: It is used to identify and flag invalid email addresses in a dataset.
The ISEMAIL function checks if a given text is a properly formatted email address. In contrast, the ISURL function validates whether a string is structured like a URL. It checks if it begins with http:// or https://while ISEMAIL mainly checks for @ and a domain name.
ISEMAIL is useful for cleaning up contact lists, while ISURL is better suited for verifying website links or reference data.
Both the functions return TRUE/FALSE outputs.
ISEMAIL is a simple function which is most useful when combined with other Google functions to perform complex data operations. ISEMAIL can be integrated with other functions like IF and FILTER, for advanced data manipulation. When used in conjunction with FILTER, we can create a list of valid emails only.
Also, the function can be combined with IF like:
=IF(ISEMAIL(A2), “Valid Email!”, “Not valid!”)
Use this ISEMAIL in Google Sheets Template to follow along with the examples in this article.
Download Excel Template