What Is Numbering In Excel?
Numbering in Excel automatically generates the numbers in a sequence or the desired pattern. Excel doesn’t have an inbuilt formula for Auto Numbering; however, we can use methods like Fill Handle, Fill Series, or the Row function to perform Excel Numbering.
For example, we will apply Auto Numbering for the image below depicting the numbers in the first two cells of column A.

Select the first two cells, A1 and A2, and drag till cell A6 using the fill handle, i.e., the “+” sign.

The output is shown above, i.e., the numeric series is auto-filled.
Table of contents
Key Takeaways
- Numbering in Excel helps users auto-fill a series of numbers or a pattern of numbers, date series, etc., in an orderly way in Excel.
- The Numbering function helps users maintain the order of the data, ascending or descending.
- Auto Numbering is not an inbuilt function, so we use some methods such as Fill Handle, Fill Series, and the Row function to fill the required series.
- Some methods generate static numbering that remains constant, whereas others generate dynamic numbers that change when we add or delete the rows.
- Auto Numbering depends on the type of dataset we want to enable.
- The Fill option in the Editing group is enabled for Auto Numbering.
How To Use Numbering In Excel?
We can perform the Numbering in Excel using the following three methods, namely,
- Using the Fill Handle.
- Using the Fill Series.
- Using the Row formula.
#1 – Using the Fill Handle
The Excel Fill Handle feature helps us drag the number or a numeric pattern from a cell or cells, and fills the rest of the selected empty cells. It automatically completes the lists in Excel.
After selecting the cells, we place the mouse cursor over the bottom right corner of the cell, and a plus “+” sign appear. Then click and hold the mouse button and drag the cell to where we want to auto-fill the pattern. The values in the sequence will be auto-filled.
#2 – Using the Fill Series
The Fill Series is used by selecting the “Series” option from the drop-down list of the “Fill” button under the “Editing” group of the “Home” tab. The series always starts with the value in the selected cell or first cell when more than one cell is selected.
Some of the types of Fill Series available are “Fill up,” “Fill down,” “Fill right,” “Fill left,” and “Fill Series” commands, as shown below. It is similar to copying the data from one cell to selected cells.

#3 – Using the ROW Formula
The ROW formula in Excel finds the row numbers for the selected cell or cell range. If a reference is not entered, by default, it accepts the cell reference where the ROW formula is applied.
We know that the ROW function returns the row numbers of reference as a vertical array if the reference is a range of cells, and if ROW is entered as a vertical array. The formula is =ROW([reference]). The function counts the number of rows and returns the row number.
Let us take a basic example to understand this.
We will apply the Fill Handle method to perform the Numbering in Excel for the names of the students of the finance class. The coordinator missed entering the Serial Number.
In the table, the data is,
- Column A contains the Serial Number.
- Column B contains the Names of students.

The steps to fill the serial numbers using Excel Numbering are,
- Select cells A2 and A3, containing the entered serial number.

- Plus “+” sign appears on the bottom left corner of the selected cells. Click the plus “+” sign and drag the cursor till cell A7, as shown below. The series get auto-filled, as shown below.

Examples
We will consider some advanced scenarios using the Numbering Excel Function.
Example #1
We will apply the Fill Series method to perform the Excel Numbering for the list of grocery items made by Mrs. Lorence. She forgot to enter the Serial Number.
In the table, the data is,
- Column A contains the Serial Number.
- Column B contains the Items.

The steps to fill the serial numbers using Excel Numbering are,
- Step 1: Choose cell A2 → select the “Home” tab → go to the “Editing” group → click the “Fill” option drop-down → select the “Series” option, as shown below.

- Step 2: The “Series” window opens.
- Select the “Columns” radio button of the “Series in” category because we are numbering in column A.
- Enter the “Step value:” as ‘1’ and “Stop value:” as ‘8’ because we have eight items.

- Step 3: Click “OK”.

The output is shown above, i.e., the numbering is done in cells A2 to A9.
Example #2
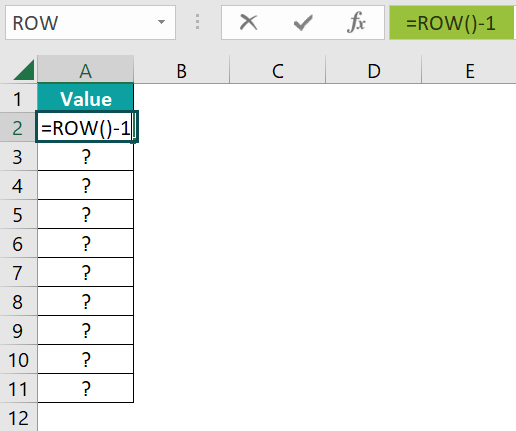
We will apply the ROW formula to perform the Excel Numbering in the empty cells in column A.

The steps to fill the numbers using Excel Numbering are,
- Step 1: Select cell A2, and enter the formula =ROW()-1.

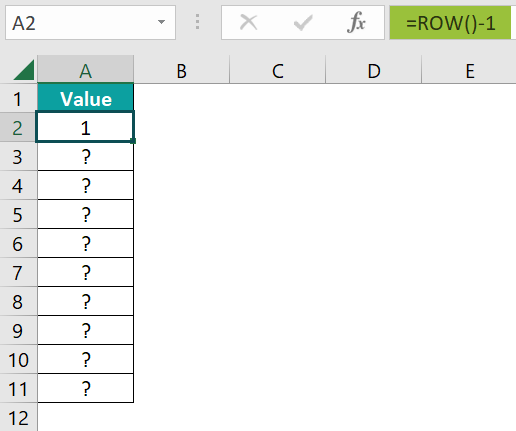
- Step 2: Press the “Enter” key. The result in cell A2 is “1”, as shown below.

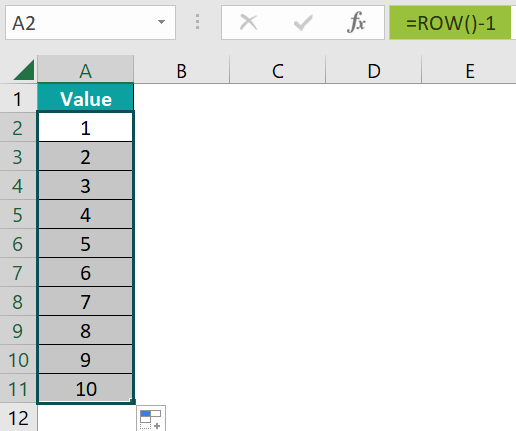
- Step 3: Drag the formula from cell A2 to A11 using the fill handle. The output is shown below.

Example #3
We will apply the Fill Handle to perform the Excel Numbering to fill the date series.
In the table, the data is,
- Column A contains one Date.

The steps to fill the date series using Excel Numbering are,
- Step 1: Select cell A2.

- Step 2: The plus “+” sign appears on the bottom left corner of the selected cells. Drag the plus “+” sign, or the fill handle, to the cell where we want to enter the numbering, here, till cell A13.

The date series get auto-filled, as shown above.
Important Things To Note
- We can fill and drag the numbers down to the limit we want.
- We can enable the option of Auto numbering available in the Excel Options’ “Advanced” tab.
- The ROW function returns the row number and helps fill the row number series.
- We can generate auto numbers by adding +1 to the cell values, and incrementing the same.
- The “Fill Handle” and “Fill Series” options are static. Therefore, if we delete any record or row in the dataset, the row number will not change accordingly.

Frequently Asked Questions (FAQs)
Let us understand, with an example, the working of Auto Numbering.
For example, the image below depicts the numbers in the cells in a certain format, and we will apply the Fill Handle method of Auto Numbering to get the output.
The numbers in the multiplication of the ‘2’ format is entered in Row 1.
The steps to fill the values using Excel Numbering are,
• Step 1: Select cells A2 and B2 containing the entered number.
• Step 2: The plus “+” sign appears on the bottom left corner of the selected cells. Click the plus “+” sign, and drag the cursor from cell A2 to E2. The output is shown below.
Shortcuts for the Numbering in Excel are as follows;
• CTRL + D – Auto Fill Numbering in the downward direction of the cell.
• CTRL + U – The Auto Fill Numbering in the upward direction of the cell.
• CTRL + L – Auto Fill Numbering in the left direction of the cell.
• CTRL + R – Auto Fill Numbering in the right direction of the cell.
If Excel Numbering is not working, the Fill Handle option isn’t enabled.
The steps to enable the Fill Handle and Cell Drag and Drop Command are as follows:
Select the “File” tab → click the “More…” option → select the “Options” option, as shown below.
The “Excel Options” window opens.
• On the left side, select the “Advanced” option.
• On the right side, under the “Editing options” group, check/tick the “Enable fill handle and cell drag-and-drop” checkbox to display the fill handle, and click “OK”, as shown below.
Download Template
This article must help understand the Numbering Excel Function’s formula and examples. You can download the template here to use it instantly.
Recommended Articles
This has been a guide to Numbering In Excel. Here we explain top 3 Methods and formulas for numbering in excel along with examples & downloadable excel template. You can learn more from the following articles –


Leave a Reply