What is Excel VBA Resize?
VBA Resize is a property that can be used to readjust or resize a range of cells from an active cell or any given cell address. For example, assume you are selecting cell B2, and if you want to readjust the range size by two or three rows and columns, we can use the VBA Resize property.
If you have already used the VBA Offset property, understanding the VBA Resize property is much easier. The only difference between VBA Offset and VBA Resize property is that VBA Offset is flexible enough to move upwards and downwards, while VBA Resize range is not.
Sub Resize_Basic()
Range(“A1”).Resize(7, 2).Select
End Sub
For example, look at the following VBA Resize code. This code will start the selection from cell B2, then resize the range from cell B2 to 3 cells down and five cells to the right, i.e., it will resize the range from cell B2 to F4.
Once we run this code, you will see the selection as follows.

Table of contents
Key Takeaways
- VBA Resize changes the cell range given to a variable name earlier with expanded rows and columns.
- VBA Resize can be used to resize the named ranges by dynamically finding the last used rows and columns with variables.
- It can be used to resize the table ranges by dynamically finding the last used rows and columns with variables.
- VBA Resize cannot resize images. Instead, we have to use the width and height properties of shapes to resize them.
Excel VBA 5-in-1 Course Bundle – (30+ Hours of Expert-Led Training)
If you want to learn Excel and VBA professionally, then the Excel VBA 5-in-1 Course Bundle (30+ hours) is the perfect solution. Whether you’re a beginner or an experienced user, this bundle covers it all – from Basic Excel VBA to Event Automation, Error Handling, Email Automation, and real-world applications with downloadable templates.
Syntax of VBA Resize Property
The syntax of the VBA Resize property is as follows.
Range(Cell Address).Resize([Row Size], [Column Size])
Range(Cell Address): To access the VBA Resize property, first, we must give the cell reference from which the resize begins using the RANGE object. Once the cell reference is given, we can use the VBA Resize property.
[Row Size]: The number of cells downwards from the given cell to be resized. For example, if the cell address is B2 and we give the row size as two, it will resize the cells from B2 to B4.
[Column Size]: The number of cells towards the right from the given cell that must be resized. For example, if the cell address is B2 and we provide the column size as three, it will resize the cells from B2 to E2.
How to Resize in Excel VBA?
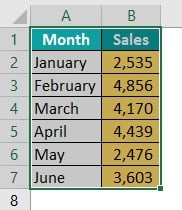
We use the Resize property on a practical data table in the example. For example, look at the following data in the Excel spreadsheet.

Assume we must select all the cells starting from cell A1. Then, follow the steps listed below.
Step 1: Open the Visual Basic Editor (VBE) window by pressing the Excel worksheet’s ALT + F11 shortcut key.
Step 2: Once the Visual Basic Editor (VBE) window is opened, go to the Insert tab and click on “Module” to insert a new module.
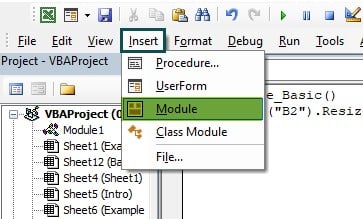
Step 3: Double-click on the “Module.” You will see a white coding space on the right side. Start the sub-procedure by naming the macro in excel.

Step 4: Since we must start the resize from cell A1, let us reference the cell using the RANGE object.
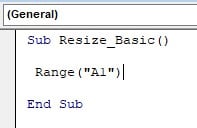
Step 5: Enter a dot to see its properties and methods after referring to the desired cell using the RANGE object.
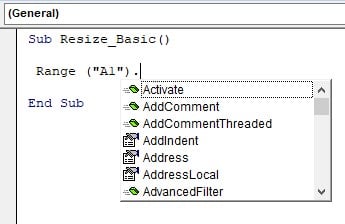
Step 6: From the IntelliSense list, choose the “Resize” property.

Step 7: Since we must select all the cells in the data table, the data is spread out till the 7th row. Enter number 7 for the row size argument of the VBA Resize property.

Step 8: The data is spread to two columns, so enter 2 for the column size argument.
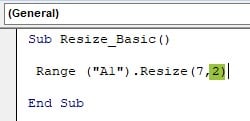
Step 9: After the property, enter a dot and choose the “select” method from the IntelliSense list.

Step 10: Now, execute the code. We will see the entire data table. The VBA Resize has extended the named range to all the available cells.
Examples of Using Resize in VBA
Example #1: Resize Named Range
Working with named ranges helps us dynamically access a range of cells; however, resizing is also required at times with the named ranges to work dynamically.
For example, look at the following data in Excel.
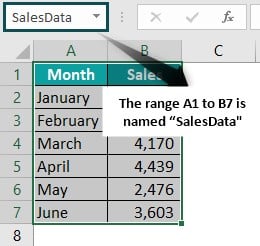
For the above data range, we have given the name “SalesData.” To reference the range of cells from A1 to B7, we can use the named range “SalesData” instead of the full range address A1 to B7. Here, we will add two more rows of data for July and August.
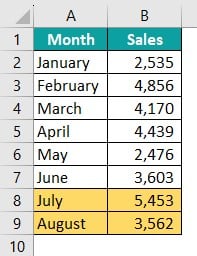
Even though we have added two extra rows after the last data row number 7, the named range still refers to the old data range, i.e., A1 to B7.
The newly added rows are not part of the named range. To overcome this issue, we can use the VBA Resize property to resize the named ranges in Excel dynamically.
Follow the steps listed below to resize named ranges using the Resize property.
Step 1: Start the sub-procedure by naming the macro.

Step 2: Define two variables of the Long data type to find the last used row and columns.

Step 3: For the variable LR, write the following code to find the last used row dynamically.

Step 4: Similarly, write the following code for the variable LC to find the last used column dynamically.

Step 5: Before resizing the named range, let us show you how to access the named range in VBA. Use the RANGE object, and inside the range object, use the named range in doubt quotes with the select method to select the named range.

Once we run the code, it should select the named range from cell A1 to B7.

Similarly, to resize the named range, we must use the named range name in the Range object followed by the VBA Resize property.

Step 6: For the row size, we have already found the last used row in the variable “LR.” Let’s enter this variable name as a row size argument of the VBA Resize property.

Step 7: For the column size, we have already found the last used column in the variable “LC.” Let’s enter this variable name as the column size argument of the VBA Resize property.

Step 8: We must set the name as “SalesData” for the resizing range. Use the Name property.

Step 9: Now enter an equal sign and provide the name “SalesData.”

Step 10: Write the code to select the named range using the Range object. The complete code is below for your reference.
Sub Resize_Named_Range()
‘To find last used row (LR)
Dim LR As Long
‘To find last used column (LC)
Dim LC As Long
‘Find the last used row and assign it to variable LR
LR = Range(“A1”).End(xlDown).Row
‘Find the last used column and assign it to variable LC
LC = Range(“A1”).End(xlToRight).Column
‘Resize the named range using the variables
Range(“SalesData”).Resize(LR, LC).Name = “SalesData”
‘Select the named range after resize
Range(“SalesData”).Select
End Sub
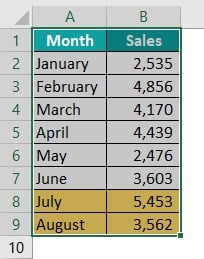
Execute the code. Now, the named range extends to the newly added rows, and the Select method should also select the newly added rows.
Example #2: VBA Resize Table Dynamically
Table format is a structured reference in excel for easy and smooth data handling. For example, look at the following data.
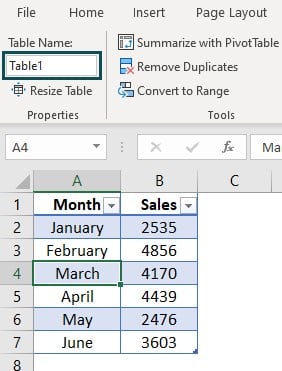
The cell range A1 to B7 is converted to a table format, and the table name is “Table1.” Now let’s add extra rows after the current table range.
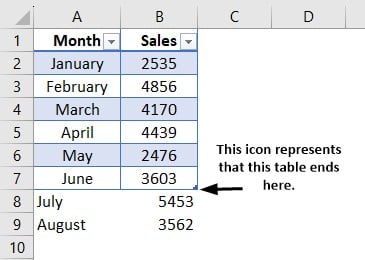
The newly added rows are not part of the table structure; let’s add these two rows dynamically to the table range.
The code looks similar to the previous one.
Sub Resize_Table()
‘To find last used row (LR)
Dim LR As Long
‘To find last used column (LC)
Dim LC As Long
‘Find the last used row and assign it to variable LR
LR = Cells(Rows.Count, 1).End(xlUp).Row
‘Find the last used column and assign it to variable LC
LC = Cells(1, Columns.Count).End(xlToLeft).Column
‘Define variable to assign dynamic table
Dim Rng As Range
‘Set the range reference to new range
Set Rng = Cells(1, 1).Resize(LR, LC)
Rng.Select
‘Define varaible to assign worsheet
Dim Ws As Worksheet
‘Set worksheet reference to active sheet
Set Ws = ActiveSheet
‘Define variable to hold table object
Dim TBL As ListObject
‘Set table object reference to list object variable
Set TBL = Ws.ListObjects(“Table1”)
‘Resize the table
TBL.Resize Rng
‘Select the resized table
TBL.Range.Select
End Sub
This code will resize the table range till the last used row and column and select the resized table range.
The following is the result of the above code.
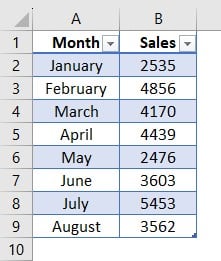
As observed, the table range has been extended to all the cells.
Example #3: Resize Image
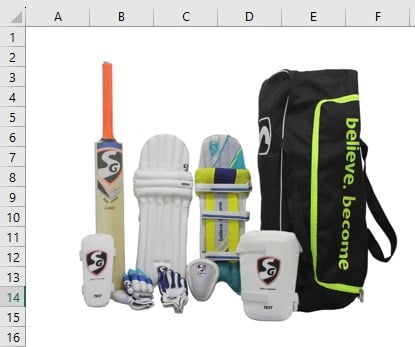
Resizing an image is also possible in VBA. However, this can be done not by using the VBA Resize property but by the height and width property of shapes. For example, we have the following image in the Excel spreadsheet.
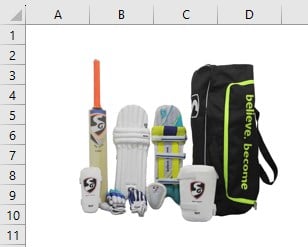
The following code will change the height and width of the image.
Sub Resize_Image()
‘Define varaible to assign worsheet
Dim Ws As Worksheet
‘Set worksheet reference to active sheet
Set Ws = ActiveSheet
‘Define variable to hold shape object
Dim TBL As Shape
‘Set image object reference to shape variable
Set TBL = Ws.Shapes(1)
‘Change width
TBL.Width = 200
‘Change height
TBL.Height = 200
End Sub
Once we run the code, we can see the resized image.
Important Things to Note
- VBA Resize is a property that accepts only numerical values as its arguments. We can see subscript out-of-range VBA error if the given values are not numerical.
- When we resize tables in VBA, we must provide the new range full address instead of the row and column number.
- VBA resize array requires the ReDim statement to be used. VBA will not come into the picture when we try resizing arrays.
- The VBA Resize property does not accept negative numbers.

Frequently Asked Questions (FAQs)
To resize only columns, we must skip the row size argument of the VBA Resize property. For example, look at the following data in Excel.
We have selected all the rows in the data table. Now we need to increase the selection size to all the available columns. To do that, the following code can be used.
Sub Resize_Columns()
Range(“A1:A7”).Resize(, 4).Select
End Sub
As we can see, we have ignored the row size by keeping it blank. However, to access the column size, we entered a comma and then provided four, i.e., four columns to be resized in the range.
It will select all the columns to the right.
Offset offsets the number of rows and columns from the active or given cell address. The offset helps us offset rows downward and upward and columns towards the right and left.
Resize is used to resize the rows downwards and columns towards the right.
ReDim stands for “Re Dimension.” It is used to resize an array range.
VBA Resize accepts only numerical values for the row size and column size arguments and only positive integer numbers. If the given value is not numeric or a positive integer, then VBA resize will not work as expected.
Recommended Articles
This has been a guide to VBA Resize. Here we learn how to resize the table, image, and Named range using resize property in Excel VBA with examples. You may learn more from the following articles –

Leave a Reply