What Are The Header And Footer In Excel?
The header and footer in Excel are the sections that appear at the top and bottom of a printed spreadsheet. Users can insert the headers and footers in their spreadsheets to show essential information about the worksheets. Thus, this Excel feature makes the printed version of the sheets look more professional and organized.
For example, the below Excel table shows the monthly laptop sales report.

We can insert the header and footer with the required details about the worksheet and then print the document. Thus, we can view header and footer in Excel printed version. It ensures that the worksheet is complete with the sales data and the required additional information. When we apply the header and footer in Excel feature and print the sheet, the printed version will appear as shown below:
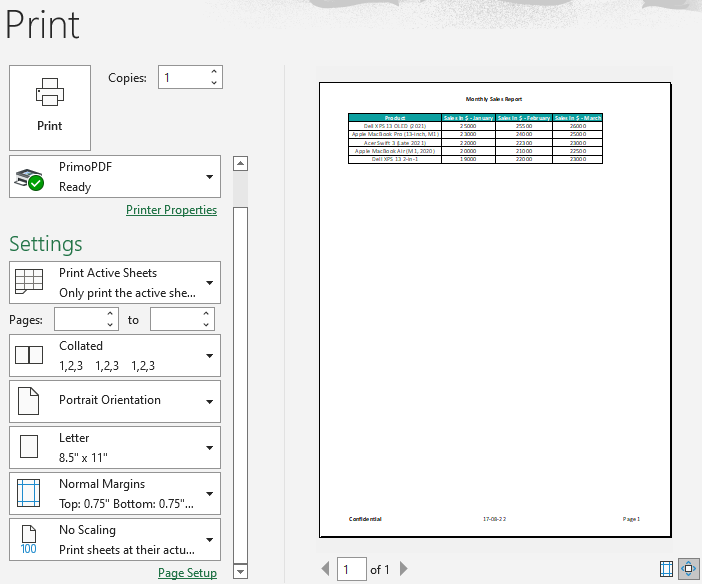
Thus, we can view header and footer in Excel at the page’s top and bottom in the Print Preview.
For example, while the header in the above example table is the Monthly Sales Report, the footer shows three details, Confidentiality, current date, and the page number.
Table of contents
Key Takeaways
- The header and footer in Excel are the texts placed at the top and bottom of the spreadsheet. The feature gives a standard document appeal to the worksheet when printed.
- We can manually enter header and footer text and use the header and footer elements from the Design tab in a spreadsheet.
- We may click on the header and footer box containing the text and press the Delete or Backspace key to delete a specific header and footer.
- We can enter custom text in the header or footer using the predefined options or the header and footer elements in the Design tab.
How To Add A Header And Footer In Excel?
We can find the header and footer feature under the Text function in the Insert tab. Let us understand the process of adding header and footer in Excel with an example.
Consider the below table where column a shows the items and column B contains the details of units sold.

The steps used to add the header and footer in Excel are as follows:
Step 1: Select the Header & Footer option under the Text function of the Insert tab in the worksheet containing the above table.

Once we click the header and footer in the Excel option, our worksheet will appear in the Page Layout, view as shown below.

We will have to scroll down the page to view the footer section.

The header and footer sections show three boxes each, with the box in the center being the default. We may click on the boxes to insert the required information in the header and footer. Thus, we can make the best use of header and footer in Excel to ensure our worksheet data appear more presentable when printed.
Step 2: Click the required header box to enable the Design tab in the Excel ribbon.
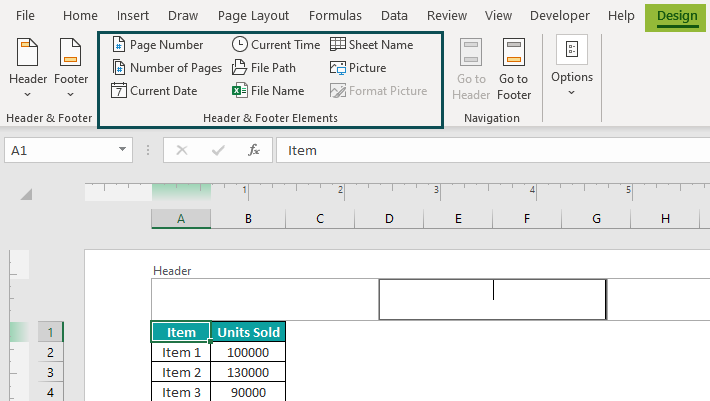
We can manually enter the required information and insert the Header & Footer Elements in the header section highlighted in the above image.
For example, let us manually enter a text and insert the page number using the Page Number element in the second header box.

&[Page] is a dynamic code representing the page number. It appears when we click the Page Number option in the Design tab. And once we click outside the header section, the header will appear as below:

Likewise, we can click the left and right header boxes and enter additional information by iterating the above steps.
Step 3: Next, click the header section to enable the Design tab and choose the Go to Footer option in the Navigation group.

Alternatively, we can scroll down to click the footer section at the end of the page.

We can now click the specific footer box to enable the Design tab in the Excel ribbon. And the process to update the required details in the footer section will be the same as explained in step 2, except the chosen area is a footer box.
For the example table, let us first choose the left-most footer box to enter the number of pages using the Number of Pages option from the Header & Footer Elements group.
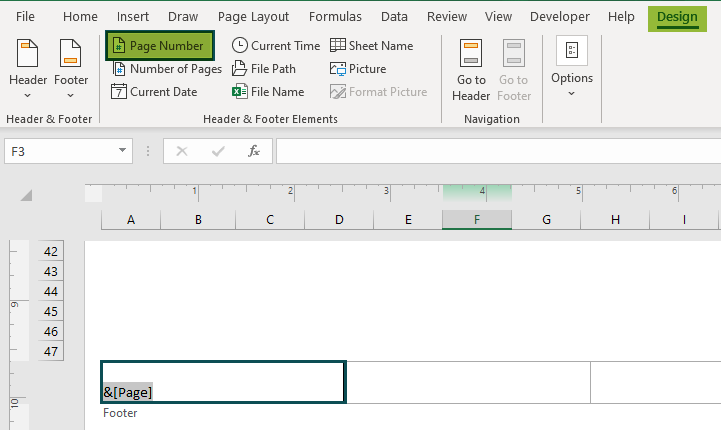
And then, choose the third footer box to enter the current date using the Current Date option.

Now, once we click outside the footer section, the page will appear as below:

Please Note: We need to add the header and footer only on the first page of the worksheet. The inserted header and footer will then automatically reflect in the remaining pages of the worksheet.
Alternatively, using the Page Setup option in the Page Layout tab, we can simultaneously add headers and footers in multiple worksheets.
Step 1: In the active worksheet, choose Page Layout > Page Setup dialog box launcher to open the Page Setup window.

Step 2: In the Page Setup window, open the Header/Footer tab and click on the Header and Footer drop-down boxes to choose the header and footer settings from the preset options.


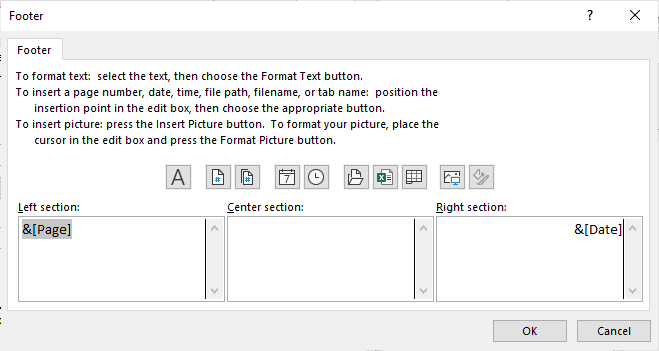
We can also click the Custom Header and Custom Footer buttons to enter the required header and footer data in individual text boxes. The Header and Footer windows contain the instructions, the header and footer elements of the Design tab, and the text boxes where we need to enter the specific text.


How To Remove Header And Footer In Excel?
Though we know the use of header and footer in Excel and its benefits, we might require to remove them in some scenarios.
Let us see the procedure to remove the header and footer in Excel with an example.
Consider the table below. It shows the overall rank data of 9th-grade students with header and footer information.


Step 1: In the worksheet containing the header and footer data, click on the specific header and footer text box and press the Delete or Backspace key.
In the above example, the second header and first footer boxes contain information. So, firstly we need to click the second header box and press the Delete key.


We can then click on the first footer text box and iterate the above step to delete the footer.

Alternatively, we can apply the below steps to remove the header and footer in Excel:
Step 1: In the worksheet containing the header and footer data, choose Page Layout à Page Setup dialog box launcher to access the Page Setup window.

And then go to the Header/Footer tab in the Page Setup window.

Step 2: Click on the Header and Footer drop-down boxes and choose (none). In the above example, the header and footer have data we need to remove. Otherwise, we can set the specific section where we need to remove the data as (none).

Once we click OK, the header and footer data get deleted from the worksheet.


Please Note: This above process is helpful when we need to delete the header and footer from multiple sheets simultaneously. First, we must select the worksheets in the workbook where we need to remove the header and footer. And then, apply the above two steps to delete the header and footer on the selected sheets in one go.
In the following sections, we will understand how to customize and change header and footer in Excel.
How To Put Custom Text In Excel Header?
We can have a customized header and footer in Excel.
For example, assume we need to enter custom text in the Excel header for the below table.

The options we can use are:
Using Preset Header
Step 1: Open the worksheet in the Page Layout view.
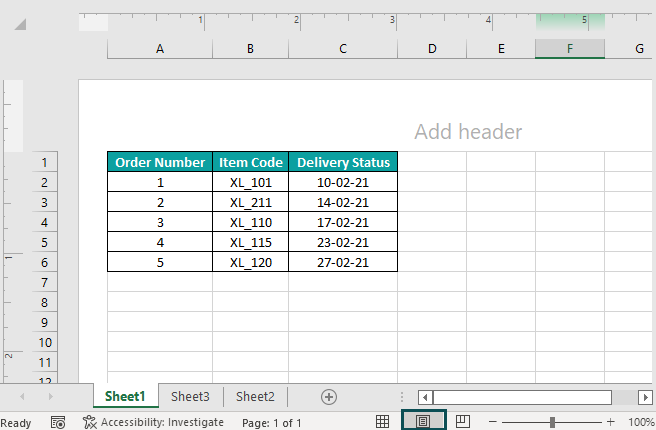
Step 2: Click on the required header box to enable the Design tab.

Step 3: Click on Header in the Header & Footer group of the Design tab.
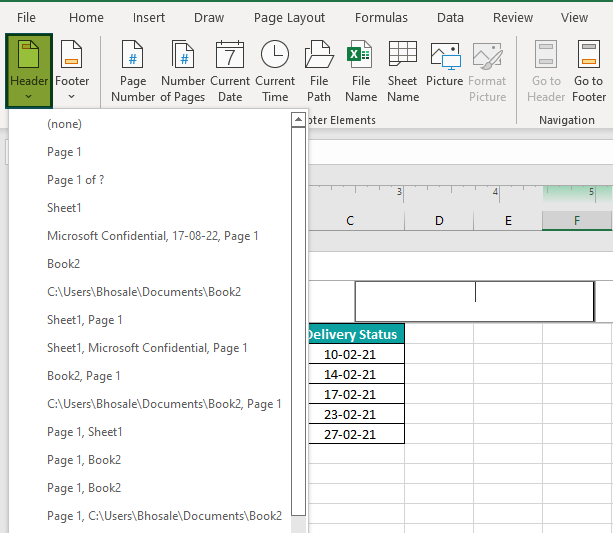
We can select the required header from the list shown in the above image. Once we add the header in the header text box, we can modify it to create a custom text.
Please Note: We might be unable to edit some entries, such as file or worksheet names. However, we can delete the inserted header data and enter the required custom text.
Also, the preset headers are dynamic, and we can insert them only in fixed header boxes, thus limiting the header text customization.
Using Header & Footer Elements
We can insert custom text in the Excel header as explained in the How to Add A Header and Footer in Excel section.
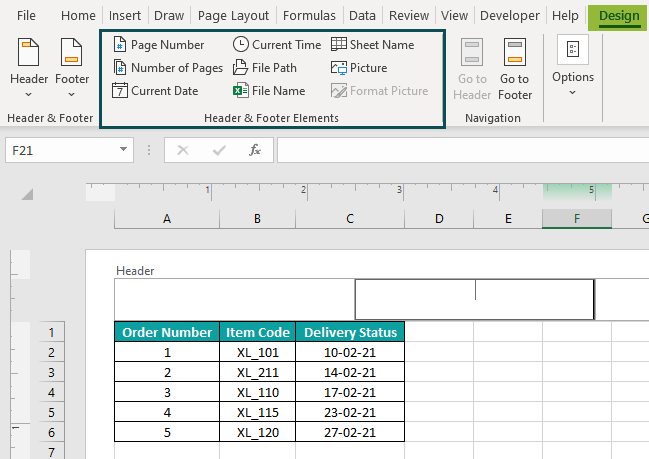
We may click on the specific header box, enter the custom text, or choose the required built-in elements (as highlighted in the above image).
For example, once we choose the center header box, click on Sheet Name, enter an ‘_’, and click on Page Number in the Design tab, the selected header box will become:

And once we click outside the header region, the worksheet will appear as:

Please Note: If we want to enter the custom text in a new line inside a header box, press Enter and enter the required text. On the other hand, if the custom text contains the ‘&’ sign, enter the character twice without space (&&). And when we enter and select the required text, Excel allows us to customize it by changing the font, size, and color and making the text bold and italic.
How To Assign Page Number In Excel Footer Text?
We can assign a page number in Excel footer text by clicking on the required footer box and then choosing Design > Page Number.

Once we click outside the footer area, the sheet will appear as:

Now, let us learn how to can add page numbers in Excel using the following steps:
Step 1: Open the worksheet in the Page Layout view by clicking the Page Layout icon on the bottom-right of the worksheet. In the below illustration, the table extends to two pages.

Step 2: Scroll down to reach the footer section and click on the required footer box.

Step 3: Click Design > Page Number. Now, enter &[Page] of &[Pages] and click Number of Pages in the Design tab. The code in the chosen footer box will appear, as shown in the image below.

Once we click outside the footer area, all the pages in the worksheet will have page numbers in the footer.

We can also use the above steps to edit or change header and footer in Excel.
Important Things To Note
- The header and footer in Excel make a printed spreadsheet appear professional. However, they do not appear by default; we must add them manually.
- We can insert the header and footer on one page of our worksheet using the Header & Footer option under the Insert tab. Then, it automatically gets added to the rest of the pages.
- To add or delete headers and footers in multiple sheets, we can use the Page Setup option in the Page Layout.
- Adding, modifying, or deleting the header and footer in Excel is possible only when the worksheet is in the Page Layout.

Frequently Asked Questions (FAQs)
There is a header and footer in Excel. It is available as the Header & Footer option under the Text function in the Insert tab.
The use of header and footer in Excel are:
1. Firstly, they make the printed worksheets more professional and presentable.
2. They provide essential information about the spreadsheet, such as the number of pages and file and sheet names.
We cannot lock the header and footer in Excel, even using VBA macro.
We can hide the header and footer in Excel by changing the worksheet view from Page Layout to Normal.
For example, the below worksheet contains the header and footer, and it is in the Page Layout view.

If we need to hide the header and footer, click on the Normal view icon on the left of the Page Layout view (highlighted in the above image).
Once we click on the Normal view icon, the header and footer get hidden.
Download Template
This article must be helpful to understand the Header and Footer In Excel, with its formula and examples. You can download the template here to use it instantly.
Recommended Articles
This has been a guide to Header And Footer In Excel. Here we discuss how to add/ remove, add page numbers to header and footer with downloadable excel template. You can learn more from the following articles –

Leave a Reply