
What Is Page Break In Google Sheets?
The Page Break in Google Sheets is a feature predominantly used during printing to limit page length and to avoid the misalignment of data while printing. The Google Sheets Page Break helps users to align the print area, as to where the page starts, ends or the next page begins, and ensures to print the complete data into one sheet.
For example, we have the dataset that consists of student names and their marks. Let us insert the Page Break for the required area.

Select the cells A1:C10 and insert the Page Break.
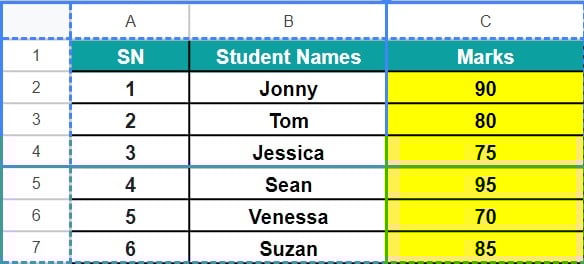
The output is shown above. We can see the solid Blue lines, the vertical one after column B and a horizontal one after row 4, indicating the Page Breaks.
Use this Page Break In Google Sheets Template to follow along with the examples in this article.
Download Excel TemplateKey Takeaways
- Page Break in Google Sheets, as the name suggests, breaks or divides the worksheet data to be printed, in an aligned an organized way, because we want the desired data to be printed separately from one another.
- It is used to specify from where a new page will start in the printed copy of the worksheet data.
- To insert page break in Google Sheets, we can use the shortcut keys, “CTRL + P” to get to the Print preview option and then use the Edit mode to modify, reset or remove the Page Breaks.
- If we are unable to View the complete data in the Print Preview to drag the horizontal bar further down, then, we can use the zoom out option.
- Alternatively, when we remove the Vertical and the horizontal Page Breaks and save the changes in the Edit mode, it is as good as Resetting the Page Breaks.
- By default, the page orientation will be selected to “Landscape”, we can also change it to “Portrait” and then we can insert Page Break.
How To Insert Page Break In Google Sheets?
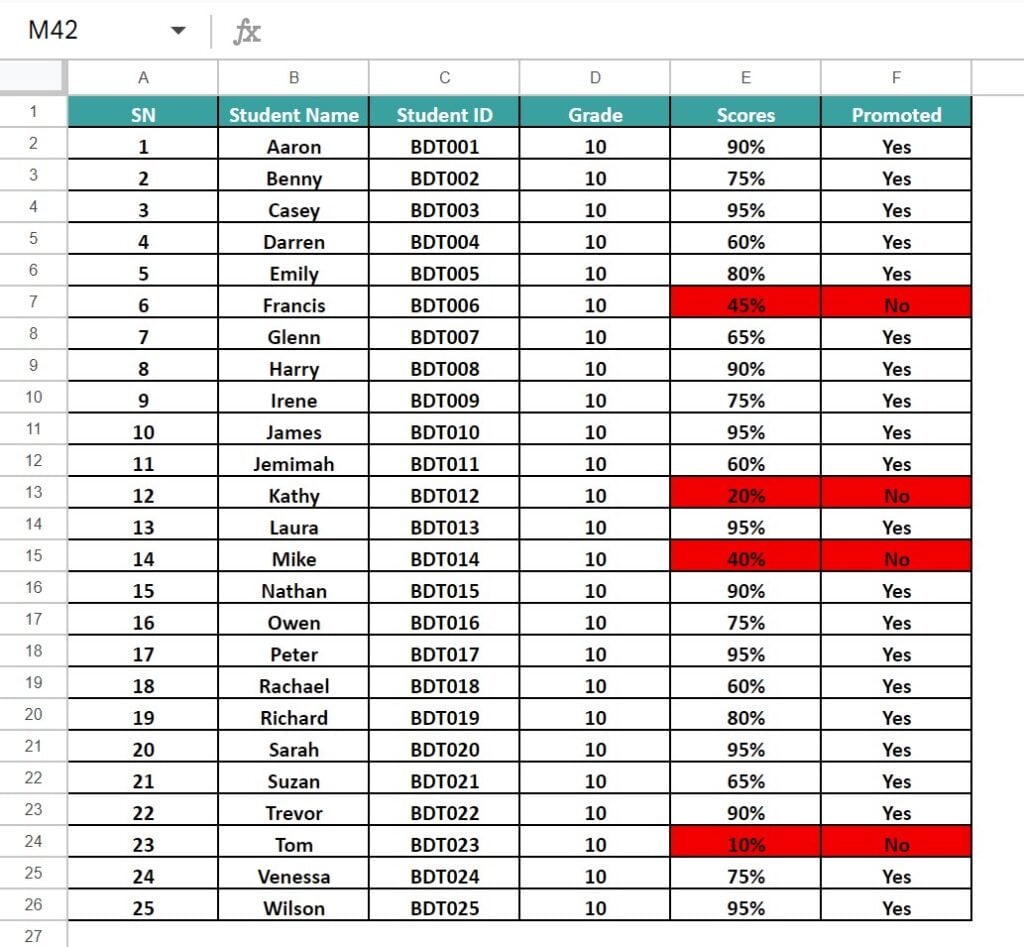
Using the following dataset that consists of student details such as their names, ID’s, Scores, etc, we will understand how to Insert, Reset, Edit and Remove Page Breaks.
The steps to Insert Page Break In Google Sheets are as follows:
Step 1: Choose the cell range where we want the Page Break à select the “File” tab – click the “Print” option, as shown below.

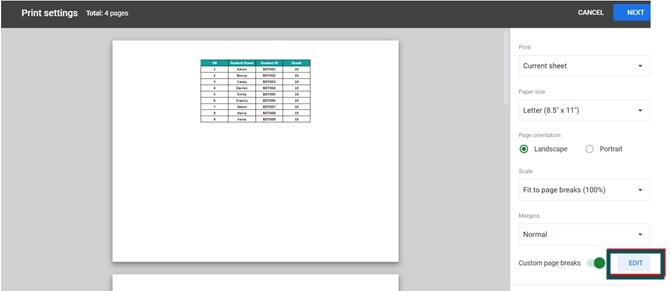
Step 2: The “Print settings” window opens with the page preview in the middle and the “Settings” pane on the right-side, as shown below. Here, click the “SET CUSTOM PAGE BREAKS” option at the bottom.

Step 3: Once we click the “SET CUSTOM PAGE BREAKS” option, we get the following page. It is as shown below.

Step 4: When we hover around the cells, we will get the horizontal and the vertical blue bars at the start of the dataset, i.e., near the row numbers and the column letters, as shown in the below images, respectively.


- Vertical Page Break – To insert the Vertical Page Break, drag the vertical bar as required, here, after column F, as shown below.

- Horizontal Page Break – To insert the Horizontal Page Break, drag the horizontal bar as required, here, after row 26, as shown below.

Step 5: Finally, click the “CONFIRM BREAKS” option at the top right corner to save the changes and proceed with the printing.

How To Edit Page Break In Google Sheets?
To Edit, Reset or Remove Page Break in Google Sheets, ensure thatthe Page Break is already applied to the dataset. Else, we will not be able to perform any modifications.
Imagine we apply the Page Break till column D and row 10, as shown below.

The steps to Edit Page Break in Google Sheets are,
Step 1: Select the “File” tab – click the “Print” option, as shown below.

Step 2: The “Print settings” window opens with the page preview in the middle and the “Settings” pane on the right-side, as shown below. Here, click the “EDIT” option next to the “Custom page breaks” option, at the bottom.
Step 3: When we click the “Edit”, we will get the page break preview window, where we can make the necessary changes. Here, move the vertical Page Break after Column E and Horizontal Page Break after row 21 and click the “CONFIRM BREAKS” option to save the changes, as shown below.

Now, we will get the following print preview.

How To Reset Page Break In Google Sheets?
Imagine we have the set Page Breaks till column E and row 21, as shown below.

The steps to Reset Page Break in Google Sheets are,
Step 1: Select the “File” tab – click the “Print” option, as shown below.

Step 2: The “Print settings” window opens with the page preview in the middle and the “Settings” pane on the right-side, as shown below. Here, click the “EDIT” option next to the “Custom page breaks” option, at the bottom.

Step 3: When we click the “Edit”, we will get the page break preview window, where we can make the necessary changes. Here, click the “RESET” option on top of the window, which will be greyed-out when we select it, and click the “CONFIRM BREAKS” option to save the changes.

How To Remove Page Break In Google Sheets?
Imagine we apply Page Break, as shown below.

The steps to Remove Page Break in Google Sheets are,
Step 1: Select the “File” tab – click the “Print” option, as shown below.

Step 2: The “Print settings” window opens with the page preview in the middle and the “Settings” pane on the right-side, as shown below. Here, click the “EDIT” option next to the “Custom page breaks” option, at the bottom.

Step 3: When we click the “Edit”, we will get the page break preview window, where we can make the necessary changes. Here, hover around the vertical Page Break after Column B, click the “x – cross mark” to remove the Page Break and click the “CONFIRM BREAKS” option to save the changes, as shown below.

Now, we will get the following print preview, indicating that the Vertical Page Break is removed.

Important Things To Note
- Ensure to select the right cell or cell range before inserting page break in Google Sheets.
- Only when we apply a Page Break already, we will be able to Edit, Move, Remove, or Reset the Page Break. Else we will have the options to Insert and not for the other modification features.
- The print preview helps us check whether there is correct alignment of page breaks.
- Moving a Page Break is the same as Editing or modifying a Page Break. We must follow the same steps for moving as we learnt in the Edit Page Break section, in the article.
- By default, the Page Break Vertical and horizontal bars will be near the row numbers and the column names, i.e. at the start of the column A and Row 1.
- Ensure to save any modifications or changes made to the Page Breaks by pressing the “CONFIRM BREAKS” option.
Frequently Asked Questions (FAQs)
The Page Break Preview in Google Sheets is the feature that appears immediately when we press the “File- Print” or the shortcut keys “Ctrl+P”. It displays how the print out will appear before Page Break. And once we set the Page Break and save the changes, we will again get the preview that displays how the print out will appear with the applied Page Breaks.
• Unlike MS Excel, the Page Break will not be visible in the worksheet. However, we can go to the Print Preview and go to the Edit mode to view the Page Breaks. The highlighted cell’s break line after the selected cells indicates a Page Break in Google Sheets.
• It also displays the range of cells that will be printed and indicates where one-page ends and another one begins.
• It lets us see the print preview clearly with all the page breaks. The white area bordered by blue is the area that will be printed.
Unlike MS Excel, we do not have shortcut for the Page Break in Google Sheets. However, we can use the “Ctrl+P”, the shortcut for print option, to go to the print preview and then the edit mode.
A few reasons the Page Break in Google Sheets may not work are,
• The page break is not applied yet and we are trying to remove them.
• If the dataset is less and we are trying to give extra rows or columns as page break, then we are unable to drag the page breaks.
An alternateway to Remove Page Break In Google Sheets is by using the Drag-And-Drop method.
• Drag the vertical Page Break Bar towards the start of column A and drop it there.
• Drag the horizontal Page Break Bar towards the start of row 1 and drop it there.
These positions are nothing but the default positions of the Vertical and the Horizontal Page Break bars, before applying the Page Breaks. So, it is as good as removed or reset.
Use this Page Break In Google Sheets Template to follow along with the examples in this article.
Download Excel TemplateRecommended Articles
Continue with these related resources when you want the next practical step in this topic.
- Columns In Google Sheets
- Add Column In Google Sheets
- Insert Rows In Google Sheets
- AutoFit In Google Sheets
- Border In Google Sheets
Explore the full Google Sheets Basics guide or browse Google Sheets Resources.