
What Does AutoFill Do In Excel VBA?
VBA AutoFill performs sequential tasks where Excel’s Autofill features recognize a pattern in the data and complete the remaining task with a double click. For example, look at the following data in Excel.

We are trying to insert serial numbers from 1 to 10 in an incremental order. To do this, we have inserted the first three numbers incremented by one. We must use the following VBA AutoFill method to insert the remaining numbers.
Use this VBA Autofill Template to follow along with the examples in this article.
Download Excel TemplateSub AutoFill_Intro()
Range(“A1:A3”).AutoFill Destination:=Range(“A1:A10”)
End Sub
When we run this code, VBA AutoFill does the job for us by filling numbers from 1 to 10 in cells A1 to A10 by recognizing the pattern in cells A1 to A3. The following image is the result of applying the VBA AutoFill function.

Key Takeaways
- The VBA AutoFill will apply AutoFill only until the provided destination cell range.
- VBA AutoFill requires the correct order of the source range and the right destination range.
- In an Excel spreadsheet, the shortcut key to perform Flash fill is ALT + E.
- VBA AutoFill throws an error if the source and destination range is incorrect.
How to Use AutoFill in Excel VBA?
Below is the syntax of the VBA AutoFill method.
Range(“A1:A3”).AutoFill(Destination As Range, Type As XlAutoFillType)
Syntax explanation:
- Range(“A1:A3”): Here, we provide the range of cells where the pattern to apply the Autofill already contains some data. For example, to fill serial numbers 1 to 10, we can fill numbers 1, 2, and 3 in cells A1, A2, and A3, respectively.
- Destination: In this argument, we must provide the targeted range of cells where we want to apply the VBA Autofill logic.
- Type As XlAutoFillType: Here, we can select the series fill type. The following are some of the fill types available as part of this argument.
- xlFillCopy
- xlFillDays
- xlFillFormats
- xlFillMonths
- xlFillSeries
- xlFillValues
- xlFillWeekdays
- xlFillYears
Examples
Now, we will explain various practical scenarios where we can apply the VBA AutoFill method for the smooth functioning of sequential tasks.
Example #1 – xlFillDefault
The first VBA AutoFill type we must understand is the default AutoFill feature. The “xlFillDefault” feature recognizes the pattern and does the default task required based on the pattern given in the first three cells of the Excel.
For example, look at the following data in Excel.

We have serial numbers from 100 (cell A1) to 102 (cell A3). In the pattern, every cell value is incremented by one, starting from 100.
Assume we need to insert serial numbers until 110. Then, we can use the xlFillDefault type. Follow the steps listed below to apply the xlFillDefault type. First, let us have a look at VBA AutoFill sequential numbers.
Step 1: Start the sub-routine by naming the VBA macro in the Visual Basic Editor window.
Note: To open the Visual Basic Editor window, use the Excel shortcut key ALT + F11 from your active Excel workbook.

Step 2: Since we must apply the VBA AutoFill method, we must first mention the cell range where the pattern is already defined. Here, we have a pattern defined from cells A1 to A3.
To provide the pattern’s cell references, use the Range object as follows.

Step 3: Once the cell address is given using the VBA RANGE object, enter a dot to see all the properties and methods associated with the RANGE object in the IntelliSense list of VBA.
The following image illustrates the same.

Step 4: The best part of the IntelliSense list is that once you start typing the required property or method, it will filter out the rest and shows only the matching results.
Start typing “AutoFill.” We can see the method in the IntelliSense list.

Step 5: Choose the “AutoFill” option from the IntelliSense list or type the whole word. Now, enter the space bar, and we will see the arguments of the Autofill method.

Step 6: For the “Destination” argument of the AutoFill method, we must provide the range of cells till which we wish to extend the pattern provided in the RANGE object. Since we want to insert the numbers till 110, we give the cell range A1:A11.
Provide the destination cell range using the RANGE object as follows.

Step 7: Enter a comma to access the following argument of the AutoFill method. We can see the IntelliSense list shows the list of AutoFill types.

Step 8: Choose the “xlFillDefault” option from the list. Below is the complete code.
Sub AutoFill_Example1()
Range(“A1:A3”).AutoFill Range(“A1:A11”), xlFillDefault
End Sub
Execute the code through the shortcut key F5, and we should see the serial numbers from 100 to 110 in cells A1 to A11.

By default, Excel recognizes the pattern and inserts similar values till the provided cell range, i.e., till cell A11.
Similarly, now look at the following data.

This time the values in cells A1 to A3 are incremented by 10, starting from 110 to 130. If we apply the same code to this data, we will get the following result in cells A1 to A11.

Now the data has been filled from 110 to 210, where every cell sees an increment of 10 compared to the previous cell.
Example #2 – xlFillCopy
xlFillCopy works differently compared to the xlFillDefault option. xlFillCopy copies the pattern of the given cells to the destination cells along with the formatting of the pattern cells.
Let’s take the same data from the previous example.
Follow all the steps listed above, instead of providing the xlFillDefault provide xlFillCopy as the AutoFill type option.
Sub AutoFill_Example2()
Range(“A1:A3”).AutoFill Range(“A1:A11”), xlFillCopy
End Sub
Execute the code and get the following result for cells A1 to A11.

Here, we get the same three numbers in A1 to A3 in all cells till the destination. For example, the values in cells A1 to A3 are copied to cells A4 to A6.
For better understanding, let us apply formatting for the first three cells.

Now, execute the code. We get the following action performed by xlFillCopy of the VBA AutoFill method.

xlFillCopy has copied all the A1 to A3 cell values and formatted and filled the destination cells with the same numbers and format. Therefore, there is no increment performed by the xlFillCopy option.
It just copies the given cell values to VBA AutoFill Destination cells.
Example #3 – xlFillMonths
Using xlFillMonths we can auto-populate all the months. So, for example, we have the following months in the first three cells.

There are 12 months overall; to insert them all, we must include 12 cells starting from cell A1.
However, let’s test this out with fewer destination cells.
Look at the following code where we have used the xlFillMonths as type.
Sub AutoFill_Example3()
Range(“A1:A3”).AutoFill Range(“A1:A6”), xlFillMonths
End Sub
We have used the destination cell range till A6. So, let’s execute and see what we get in return.

Because we have used the destination cell range only till cell A6, the VBA AutoFill method filled the months until Jun. To get all the months, we must extend the destination cell range to 12 cells, i.e., till cell A12.
The following code will insert all 12 months from cells A1 to A12.
Sub AutoFill_Example3()
Range(“A1:A3”).AutoFill Range(“A1:A12”), xlFillMonths
End Sub
Once we execute this code, we will get the following result.

Because we extended the destination cell range till cell A12, the VBA AutoFill method fills all the months available.
What happens if we extend the destination cell range beyond 12 cells?
Let’s extend the VBA Autofill destination till cell A15.
Sub AutoFill_Example3()
Range(“A1:A3”).AutoFill Range(“A1:A15”), xlFillMonths
End Sub
Execute the code. You get the following result.

Since we have entered the destination cells beyond the limit of 12 months, the VBA AutoFill method has started to insert the month names from the beginning i.e., from Jan onwards.
Get Full Month Names: Previously, the VBA AutoFill method was smart enough to identify patterns and insert short names of the months because we gave the pattern in the first three cells as short names.
To get the full month names, let’s enter them as follows in the first three cells.

Now, run the following code.
Sub AutoFill_Example3()
Range(“A1:A3”).AutoFill Range(“A1:A12”), xlFillMonths
End Sub
We get the whole month’s names.

Example #4 – xlFillFormats
VBA AutoFill xlFilFormats will fill the format of the given cells to the destination cell. For example, look at the following data in Excel.

Let’s use the following code with xlFillFormats.
Sub AutoFill_Example4()
Range(“A1:A3”).AutoFill Range(“A1:A9”), xlFillFormats
End Sub
It will fill only the format for the destination cells.

As observed, the VBA AutoFill xlFillFormats has filled just the format of the pattern cells to their corresponding destination cells. So, for instance, cell A1 format has been copied to cell A4, and cell A2 format has been copied to cell A5 and so on.
One thing we need to keep in mind here is that xlFillFormats has not copied any values from the pattern reference given cells.
Example #5 – xlFlashFill
Flash Fill is a smart feature available in Excel to extract a portion of the text value based on the few initial inputs given by the users.
For example, look at the following data in Excel.

We have the city and its code in Column A. In Column B, we must extract only the Pin Code from Column A.
To do this, we have to either type the pin code one by one or write complex formulas. However, using the Flash fill, we can extract pin codes. First, type the pin code for the city of Washington in cell B2.

After the first pin code is entered, press the Flash fill shortcut key “ALT + E,” and we will get all the pin codes as follows.

Similarly, we can perform the same task using the VBA AutoFill method. Again, all we must do is use the xlFlashFill type.
The following code will apply the Flash fill technique.
Sub AutoFill_Example5()
Range(“B2”).AutoFill Range(“B2:B6”), xlFlashFill
End Sub
Once we run the code, it will extract all the pin codes taking the reference from cell B2 which has the pin code entered manually.
Note: VBA AutoFill dynamic range requires additional code when we need to find the last used cell dynamically and perform Flash fill.
Important Things to Remember
- VBA AutoFill will apply AutoFill only till the destination cell range provided.
- VBA AutoFill requires the correct order of the source range and also the right destination range as well.
- In Excel spreadsheet, the shortcut key to perform Flash fill is ALT + E.
- VBA AutoFill throws an error if the source and destination range are incorrect.
Frequently Asked Questions (FAQs)
To perform AutoFill till the last cell, we must use the VBA Autofill dynamic range. For example, look at the following data.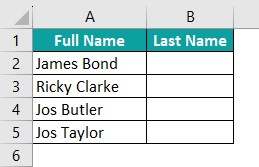
To use the VBA AutoFill dynamic range, first, we will enter the last name for the first name.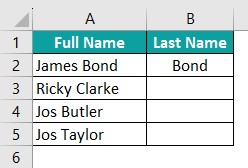
The following code will dynamically find the last used cell and perform Flash fill.
Sub AutoFill_Example_FAQ()
Dim LR As Long
LR = Cells(Rows.Count, 1).End(xlUp).Row
Range(“B2”).AutoFill Destination:=Range(“B2:B” & LR), Type:=xlFlashFill
End Sub
It will dynamically find the last used row and execute the VBA AutoFill method.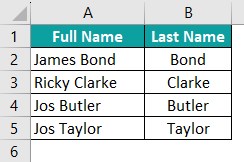
If the source range differs from the destination range, VBA AutoFill will not work.
To Autofill numbers in VBA, we must first give the sequence and then use the VBA AutoFill method. We can use any one of the following Autofill types.
xlFillDefualt
xlFillSeries
Use this VBA Autofill Template to follow along with the examples in this article.
Download Excel TemplateRecommended Articles
Continue with these related resources when you want the next practical step in this topic.
Explore the full VBA Basics and Macros guide or browse VBA Resources.