What is Excel VBA XLUP?
While working on Excel worksheets, we use a lot of shortcut keys to get the job done quickly. One such example is going to the top cell of the column from the bottom. The shortcut key used for this is Ctrl + Up Arrow.
For a similar task in VBA, we must use the XLUP direction within the RANGE object. Hence, VBA XLUP helps us get to the first nonblank cell in the upward direction from the current cell. Let us show you a simple example of how this works in the Excel worksheet. Look at the following data in Excel.
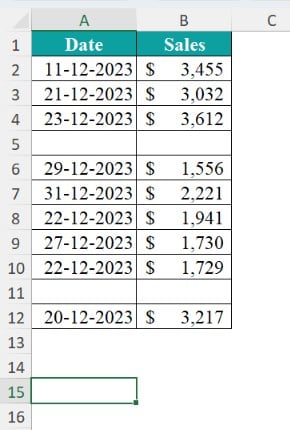
We have data from range A1 to B12, and we are currently in cell A15. Let’s use the shortcut key Ctrl + Up Arrow on the keyboard.
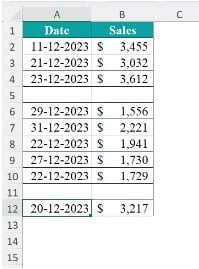
When we press the shortcut key, the active cell moves from cell C15 to C12, i.e., the first non-blank cell. The XLUP method performs a similar function as seen below.
Sub VBA_XLUP()
Range(“A14”).End(xlUp).Select
End Sub
This will select the first non blank cell upwards from the cell A14. The key thing is we have used the VBA XLUP in this code.
Table of contents
Key Takeaways
- VBA XLUP is used to get to the last non blank cell from the given cell upwards. And it has also been used to shift cells up to occupy the deleted cells space.
- VBA XLUP represents the same action of Ctrl + Up Arrow in worksheets.
- We can get the last used row number; we can select the last used row of any specific column by using the VBA XLUP.
- We can use the last used to decide on how many times the loop has to run.
Excel VBA 5-in-1 Course Bundle – (30+ Hours of Expert-Led Training)
If you want to learn Excel and VBA professionally, then the Excel VBA 5-in-1 Course Bundle (30+ hours) is the perfect solution. Whether you’re a beginner or an experienced user, this bundle covers it all – from Basic Excel VBA to Event Automation, Error Handling, Email Automation, and real-world applications with downloadable templates.
How to use VBA XLUP in Coding?
Let us show you the step-by-step approach to using VBA XLUP in coding. Do follow the steps listed below. For example, look at the following data in the Excel worksheet.\
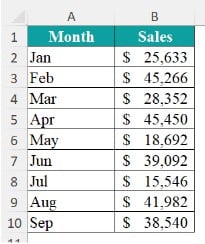
We have a data range from A1 to B10. The critical thing here is to understand the functionality of the VBA XLUP command.
To understand this, we first need to look at the syntax of the VBA XLUP with Range.End property.
Syntax of Range End Property
The Range.End property allows us to maneuver to a specific cell within the data range we are working on. The syntax is as follows:
Range(From Cell).End(Direction)
Inside the Range object, we must provide the cell address from which we start maneuvering. For example, we need to start the maneuvering from cell A10.
Next, the END property is used as part of the RANGE object to control the direction of the maneuvering. Inside the END property of the RANGE object, we can use the following four direction commands.
xlDown – To move down to the last nonblank cell from the starting cell of the RANGE object. This is the same as using the Ctrl + Down Arrow key.
xlUp– To move upwards to the last nonblank cell from the starting cell of the RANGE object. This is the same as using the Ctrl + Up Arrow key in keyboard excel shortcut.
xlToLeft – To move to the left side of the last nonblank cell from the starting cell of the RANGE object. It is the same as using the Ctrl + Left Arrow key in a keyboard shortcut.
xlToRight – To move to the right side of the last nonblank cell from the starting cell of the RANGE object. It is the same as using the Ctrl + Right Arrow key in a keyboard shortcut. The following is the image of the options available as part of the RANGE END property.

Assume we must go to the last nonblank cell from A15. Follow the steps listed below.
Step 1: Start the sub-routine procedure by naming the macro in excel.

Step 2: First, we need to decide from where we need to start the VBA XLUP property. In this case, we must start from the cell A15. Hence, use the RANGE object and provide the cell address as A15.

Step 3: Since we must move upwards from the given cell, we have to choose the “End” property for the direction. Hence, enter a dot and use the END property.
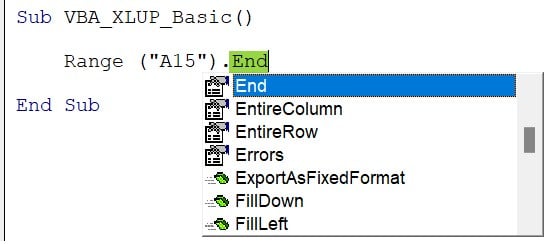
Step 4: Open a parenthesis for the END property. We will see direction options in the IntelliSense list.
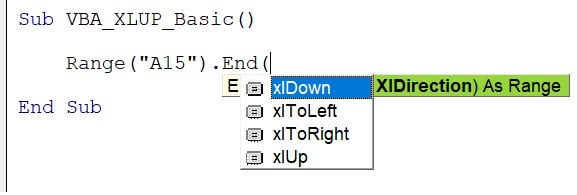
Step 5: Since we must move upwards, choose the VBA XLUP option and close the bracket.

Step 6: Once we move upwards, we must select the last non-blank cell. Hence, enter a dot and choose the Select method.

Now, let’s place your cursor on cell A15 first.
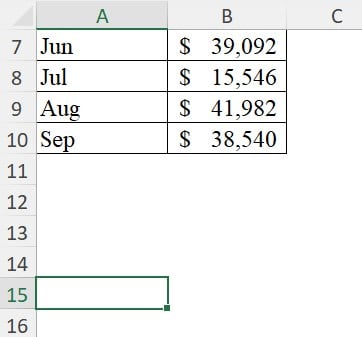
Now, execute the code. It should select the first non-blank cell, i.e., cell A10.
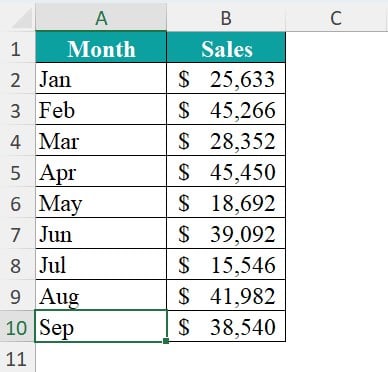
As we can see, the first nonblank cell from cell A15 upwards is cell A10, and the same has been selected by the VBA XLUP property.
In this way, we can use the VBA XLUP to select the non-blank cell.
Examples of VBA XLUP
Example #1 – Move Cells to Deleted Position of Cells
When we work with the data, we deal with the blank cells, and we need to get rid of those blank cells to work smoothly with the data. For example, look at the following data in the Excel worksheet.
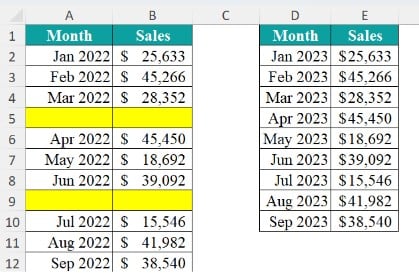
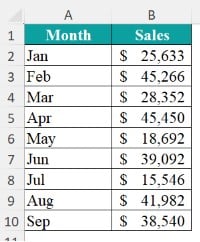
In the first set of data, we have monthly sales from range A1 to B12. However, we have some blank rows in row #5 and row #9.
The simplest way is select the blank row and delete them. However, the problem here is we have another set of data to the right side. If we try to delete these blank rows it will delete those rows data from the right-side table as well. Eventually we will end up deleting some data from the second table as well.
One way of doing this is by using the special cells. Let’s follow the steps listed below to delete the blank cells only from the first table before we show how we can apply the same logic in VBA coding using the VBA XLUP.
Step 1: Select the entire data range from A1 to B12.
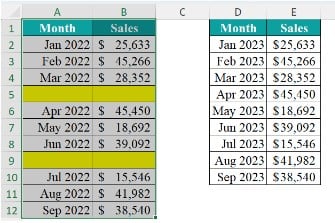
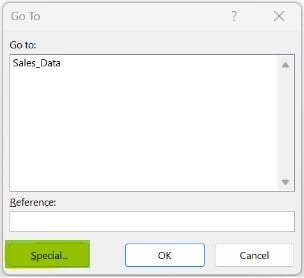
Step 2: Press the F5 key, which will open the “Go To” window. In this window, click on the “Special” option.
Step 3: In the “Go To Special” window, choose the “Blank” option.
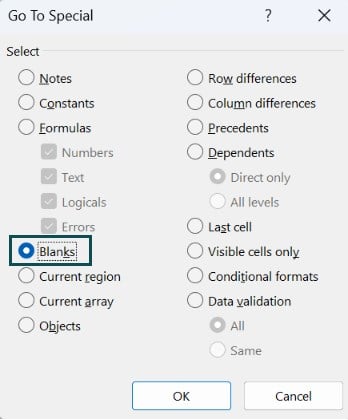
Step 4: Click on “OK.” It will select all the blank cells from the selected region, i.e., A1 to B12.
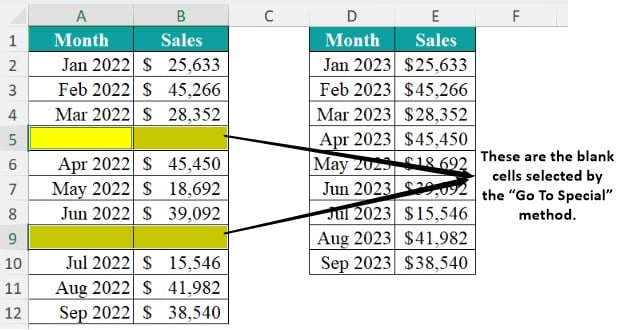
Step 5: While keeping the blank cells selected, press the Delete key “Ctrl and Minus (-)” sign to bring the following “Delete” window.
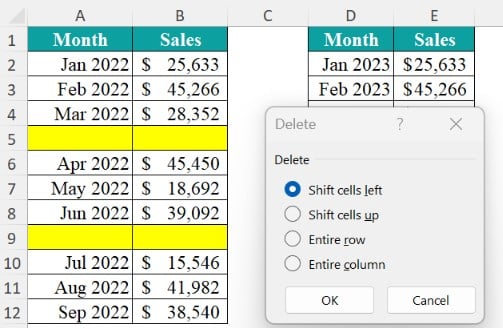
From here, choose the option “Shift Cells Up,” which is the replica of the VBA XLUP in VBA.
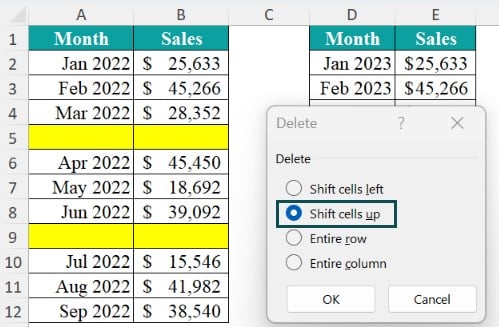
Click on “OK.” It should select all the selected rows and shift up the cells below them.
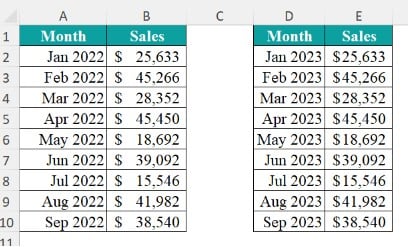
A similar set of actions can be performed in VBA using the VBA XLUP method. The following code is an example of the same. Let us explain this in detail.
Sub VBA_XLUP_Ex1()
Range(“A1:B12”).SpecialCells(xlCellTypeBlanks).Delete Shift:=xlUp
End Sub
Range(A1:B12) – Since our data is spread across the cell range A1 to B12, we have provided the data range reference using the RANGE object.
SpecialCells (xlCellTypeBlanks) – In the given range reference, we must work only with the blank cells. Hence, we are using the VBA Special Cells method. From this special cell, we have chosen only blank cells using the xlCellTypeBlanks.
Delete Shift:xlUp – Since we must delete the blank cell, we have used the VBA Delete method. Also, we must shift all the cells upwards. Hence, we have used the Shift argument of the Delete method and used the VBA XLUP to push the data from the bottom cells to the top.
Example #2 – Find Last Used Row by using VBA XLUP
When we need to perform the same task for multiple numbers of rows, we need to use loops and to find how many times the loop needs to run depends on the last row of the data range.
To find the last used row dynamically, we need to use the VBA XLUP. Let’s do this in a practical example now. The following is the data we are going to use for this example.
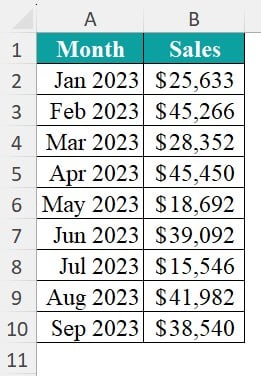
To find the last used row, let’s follow the steps listed below.
Step 1: Start the sub-procedure by naming the macro.

Step 2: As we know, when we press the shortcut key Ctrl + Up Arrow, it will take us to the first nonblank cell. We need to use the same method here as well.
Which cell do we need to go up from? It depends on the data. However, the best way to go up is from the last cell of the Excel worksheet.
We have more than 1 million rows in the Excel worksheet.
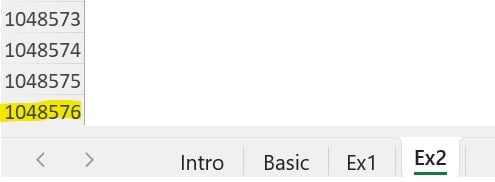
Let’s start from this cell.

Step 3: Next, from this cell, we need to go up using the VBA XLUP. For that, we must use the VBA XLUP end, enter a dot, and use the END property.

Step 4: Within the END property, we need to use the VBA XLUP to go to the first nonblank cell from the last cell.

Step 5: The action does not stop here; next, we need to choose what we need to do after going to the first non-blank cell from here. Let’s say we need to select that cell; hence, use the SELECT method.
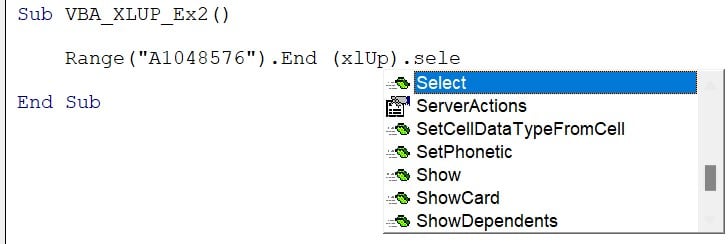
Ok, that’s it.
Let’s execute the code. It should select the first nonblank cell from the last cell, i.e., from cell A10.
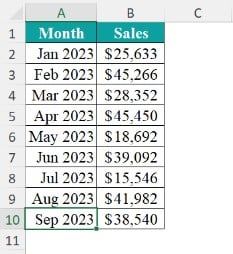
As we can see, it has selected cell A10, which is the first nonblank cell.
We can just play around with this code to get the last used row number to a variable. For example, look at the following code.

Part #1: We have defined the variable to store the last used row number. Since the value we will be assigning is a number, we have used the LONG VBA data type.
Part #2: For the defined variable, we are assigning the last used row number. Hence, instead of using the SELECT method, we are using the ROW property, which will return the row number.
Part #3: At last, we are showing the assigned variable value in a message box.
Let’s execute the code, and we will get the last used row number in a message box like the following.
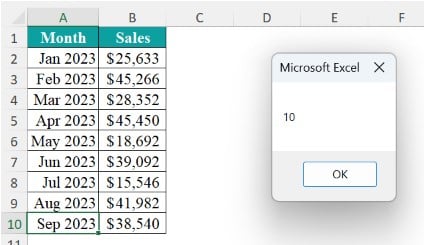
So, the last used row number is ten, and the same has been returned in a message box.
The beauty of this code is it is a dynamic one. As and when the data increases, it automatically retrieves the latest row number according to the data size of column A. For example, now look at the following data.
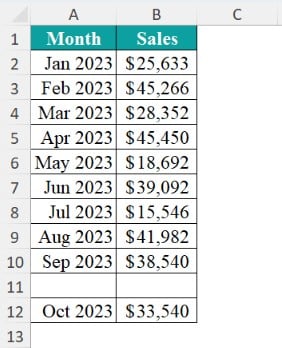
We have a space in row 11 and added new data in row 12.
Let’s execute the code now and it should return the last used row like the following.
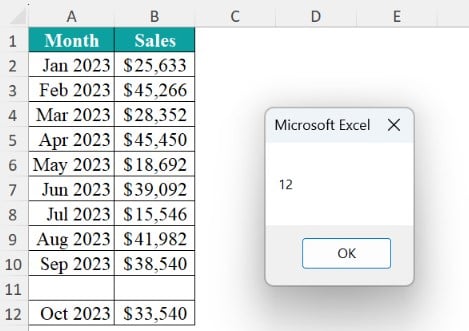
Since the data is spread till the 12th row, the same has been returned by the code.
Important Things to Note
- If we delete blank rows instead of shifting cells up, we will end up deleting the data of the same rows of other columns as well. Hence, we must use VBA XLUP while deleting.
- When finding the last used row, always start from the last cell of the worksheet.
- We can also use the CELLS property instead of the RANGE object to find the last used row. The following code will give us the last used row number.
CELLS(Rows.Count,1).End(xlUp).Row

Frequently Asked Questions (FAQs)
There are no limitations while using the VBA XLUP to be considered. The only thing you should be sure of is if you want to shift cells up or not while deleting unwanted cells.
If there are blank cells between data, VBA XLUP will first select the first non-blank cell.
Handling errors depends on situation to situation. One error would be from which cell you start finding the last used cell. It is always better to start from the last cell of the worksheet.
There are several alternative methods available to replace VBA XLUP to find the last used row and following are some of them.
• VBA Find Function
• VBA Special Cells Method
• VBA Used Range Method
• VBA Named Ranges
Recommended Articles
This has been a guide to Excel VBA XLUP. Here we explain the how to use XLUP in Excel VBA and syntax along with examples & downloadable excel template. You can learn more from the following articles –

Leave a Reply