
What are Borders in VBA Excel?
VBA Borders are lines placed around cells, ranges, or objects within a worksheet. They serve as visual boundaries, allowing users to differentiate and organize data effectively. Borders can be applied to individual cells, ranges of cells, or even objects such as shapes and charts.
For example, let’s consider a scenario where you have a worksheet containing a table of sales data.
Use this VBA Borders Template to follow along with the examples in this article.
Download Excel Template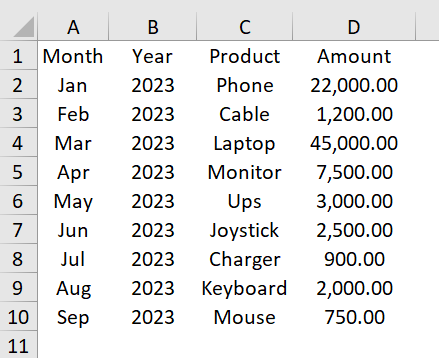
You want to highlight the header row by applying borders to make it stand out. Here’s how you can achieve this using the following VBA Borders around code:
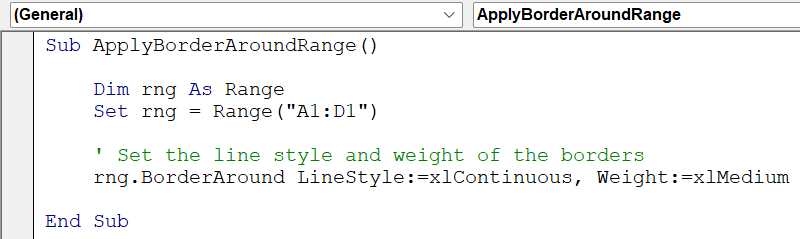
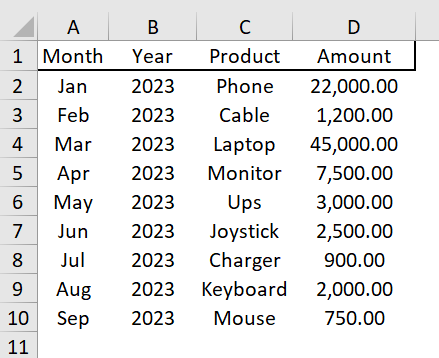
In this example, the BorderAround method is used to apply a continuous border with a medium weight to the specified range, which includes cells A1 to D1. Once executed, the header row will have borders around it, distinguishing it from the rest of the data. Borders in VBA Excel allow you to enhance the visual appearance of your worksheets, draw attention to important information, and create professional-looking reports or documents.
Key Takeaways
- The VBA Borders All property allows you to easily set consistent border styles for all cells within the selected range, such as line type, weight, and color.
- The Borders property and the BorderAround method are commonly used methods to insert borders in VBA Excel.
- The VBA Borders LineStyle property enables you to control the appearance of borders in Excel. By setting the LineStyle property, you can define the type of line used for borders, such as continuous, dashed, dotted, or double, providing flexibility in customizing the border style for cells and ranges in your Excel worksheets.
- The VBA Borders Weight property allows you to adjust the thickness or weight of borders in Excel.
Methods to Insert Borders in VBA Excel
There are several methods available in VBA to insert borders in Excel. Here are four commonly used methods:
- Using the Borders Property:
You can use the Borders property of a range to apply borders. This method lets you control various border properties, including line style, weight, and color.
For example, you can set the “Borders.LineStyle” property to “xlContinuous” to apply continuous borders.
- Using the BorderAround Method:
The BorderAround method is convenient for applying a border around a range or object. This method allows you to specify the line style, weight, and color of the border.
For instance, to apply a continuous border with medium weight around a range, you can use
“Range.BorderAround LineStyle:=xlContinuous, Weight:=xlMedium”
- Using the DrawBorders Method:
The “DrawBorders” method is used to apply custom borders to a range or a group of cells. This method allows you to specify the individual borders to draw, including top, bottom, left, and right edges. In addition, you can control the line style, weight, and color of each border individually.
- Using Conditional Formatting:
Conditional formatting is another powerful method to insert borders in VBA Excel. You can define specific conditions or rules based on cell values and apply border formatting accordingly. For example, you can use conditional formatting to apply borders to cells that meet certain criteria, such as values greater than a specified threshold.
Examples of Borders in VBA
Let’s explore a few examples to understand how borders can be applied using VBA in different scenarios.
Example #1 – Apply VBA Borders with Coding
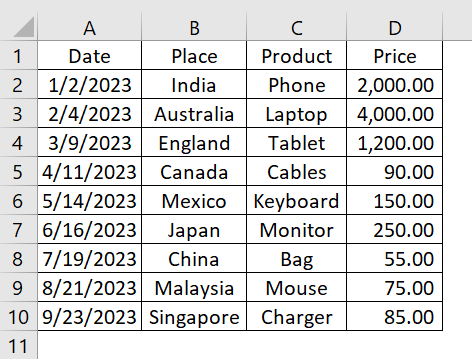
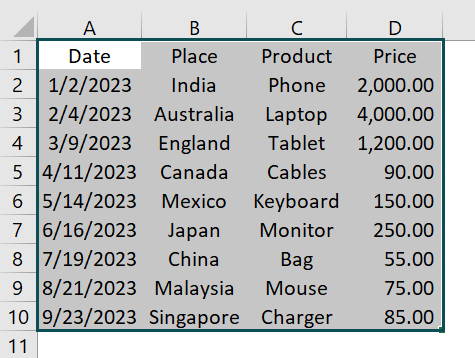
Suppose we have a dataset where we want to apply borders around the entire range.
We can achieve this using the Borders property. Here’s the step-by-step procedure to achieve this. Please refer to Module 1 of the “VBA Borders” workbook.
- Step 1: Open the Visual Basic Editor (VBE) by pressing the Alt + F11 keys in Excel, clicking on the Developer tab in the ribbon, and then clicking on the Visual Basic button. In the VBE, click the Insert menu and select Module to create a new module.

- Step 2: In the new module, start a subroutine “ApplyBordersWithCoding()” and specify the range of cells to which you want to apply borders.
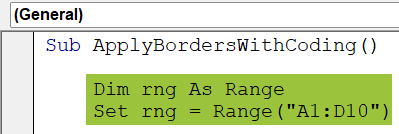
The above lines declare a variable named “rng” of type Range. Variables are used to store and manipulate data in VBA. In this case, we’re creating a variable representing a range of cells.
The “Set” keyword assigns a value to the “rng” variable. In this case, we’re assigning a range of cells from A1 to D10 to the “rng” variable. The “Range” function is used to specify the range of cells.
Note: You can modify the range to match your specific requirements. Replace “A1:D10” with the desired range reference, such as “B3:F12” or “Sheet1!A1:C10.”
- Step 3: Set the line style of the borders to be applied. In this example, we will apply continuous borders to the range A1:D10.

- The code “rng.Borders.LineStyle = xlContinuous” applies a continuous border style to the range specified by the “rng” variable.
- “rng.Borders” refers to the “Borders” property of the range object “rng.” The “Borders” property allows you to access and modify the border settings of a range.
- “.LineStyle” is a property of the “Borders” object that determines the style of the border. In this case, we set it to “xlContinuous,” representing a continuous line style.
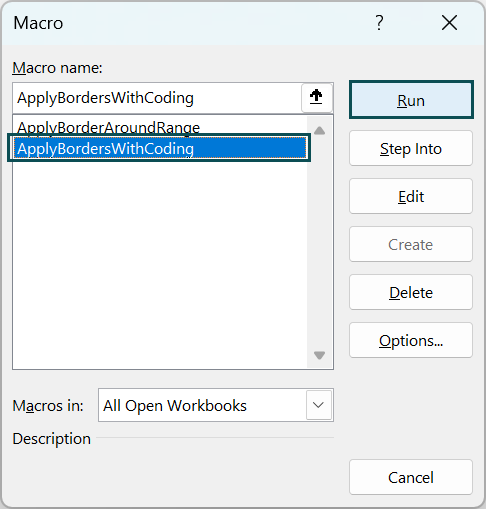
- Step 4: Now save the module and exit the VBE. Press Alt + F8 to open the Macro menu, select “ApplyBordersWithCoding” and click Run.
- Step 5: By executing this VBA code, the specified range will have continuous borders applied to it. The borders will be drawn around the outer edges of the range, creating a clear boundary.
Here is the complete code:
Sub ApplyBordersWithCoding()
Dim rng As Range
Set rng = Range(“A1:D10”)
‘ Apply continuous borders to the range
rng.Borders.LineStyle = xlContinuous
End Sub
Example #2 – Change the Border Using VBA Borders Around Method
In this example, let’s assume we have a selected range and want to apply a border around it using the “BorderAround” method. Here’s how we can do it.
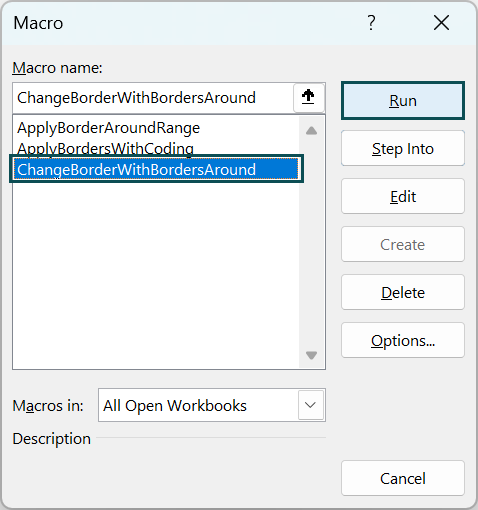
- Step 1: Create a subroutine “ChangeBorderWithBordersAround()” in the new module and declare a range.
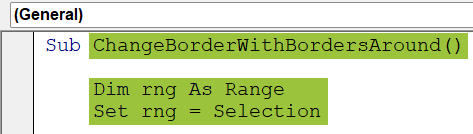
“Set rng = Selection” assigns the currently selected range in Excel to the rng variable.
- Step 2: Now, set the line style, weight, and color of the border.

- “rng.BorderAround” is a method that applies a border around the range represented by the “rng” variable.
- “LineStyle:=xlDot” sets the line style of the border to “Dot.” You can modify this to line styles such as “xlContinuous” or “xlDouble.”
- “Weight:=xlThick” sets the weight of the border to “Thick.” You can adjust this to weights such as “xlThin” or “xlMedium.”
- “Color:=RGB(0, 0, 255)” sets the color of the border to RGB in VBA(0, 0, 255), which represents blue. You can change the RGB values to specify the desired color.
- Step 3: Now save the module and exit the VBE.
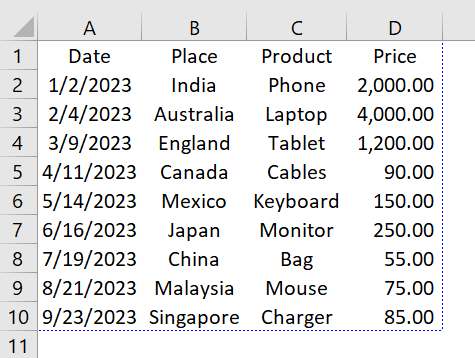
- Step 4: In the Excel Worksheet, select the range for which you wish to have borders. Here we have selected the range A1 to D10.
- Step 5: Now press Alt + F8 to open the Macro menu, select “ChangeBorderWithBordersAround” and click Run.
- Step 6: By executing this code, the specified range will apply continuous dotted borders. The borders will be drawn around the outer edges of the range, creating a blue-dotted boundary.
Here is the complete code:
Sub ChangeBorderWithBordersAround()
Dim rng As Range
Set rng = Selection
‘ Apply a border around the range with specific properties
rng.BorderAround LineStyle:=xlDot, Weight:=xlThick, Color:=RGB(0, 0, 255)
End Sub
Important Things to Note
- When applying borders using VBA, ensure that you select the correct range. The range should cover the cells or objects where you want the borders to be applied.
- VBA provides various border styles such as continuous, dashed, dotted, double, and more. Choose the appropriate line style that suits your desired visual effect. Experiment with different styles to find the one that best meets your requirements.
- Borders can be applied to various elements, including cells, ranges, charts, and shapes. Ensure you apply borders to the correct objects based on your intended design. Be mindful of the impact on readability and visual clarity.
- Applying borders to a large number of cells or objects may impact performance. Consider limiting the range selection and using efficient coding practices to optimize the execution speed of your VBA macro.
Frequently Asked Questions (FAQs)
To clear a border in Excel VBA, you can use the Borders property of a range and set its line style to “xlNone.” Here’s an example code that demonstrates how to clear borders:
Range(“A1:D10”).Borders.LineStyle = xlNone
To paste all except borders in Excel VBA, you can utilize the “PasteSpecial” method with the “xlPasteFormats” option. Here’s an example code that demonstrates how to achieve this:
• Step 1: Copy the desired range with borders.
Range(“A1:D10”).Copy
• Step 2: Paste only the values without the borders.
Range(“E1”).PasteSpecial xlPasteValues
This code will paste only the values without the borders to cell E1.
Borders in Excel VBA serve multiple purposes, including:
1) Enhancing Readability and Organization: Borders help structure the information and make it more organized.
2) Emphasizing Important Information: Borders allow you to highlight specific areas or draw attention to important data points.
3) Creating Professional-Looking Reports: Borders are essential for creating professional-looking reports, invoices, or other documents. They give a polished and structured appearance, making the document visually appealing and easy to understand.
There could be several reasons why borders in Excel VBA may not work:
1) Incorrect Range References: Ensure you reference the correct range of cells or objects when applying borders.
2) Improper Border Properties: Verify that the border properties, such as line style, weight, or color, are set correctly. Incorrect property settings can lead to unexpected border behavior or no borders being displayed.
3) Conflicting Formatting: VBA Borders may not appear with conflicting formatting settings. For example, if the Cell Fill color overlaps the Border color, the borders may not be visible.
4) Worksheet Protection: If the worksheet is protected, certain actions, including applying borders, may be restricted.
5) Compatibility Issues: VBA Borders may only work if you use compatible Excel or VBA versions.
Use this VBA Borders Template to follow along with the examples in this article.
Download Excel Template