
What is VBA Transpose in Excel?
VBA Transpose is a method used in Excel to switch the position of rows and columns in a data table. It is a data manipulation technique that is commonly used in Excel. The Transpose function in Excel changes the position of rows and columns, i.e., rows become columns, and columns become rows in a data table. In VBA, the Transpose function is used with the Application.Worksheet method.
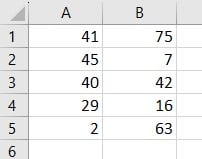
Consider the following example where we perform VBA Transpose 2D array given below:
Use this VBA Transpose Template to follow along with the examples in this article.
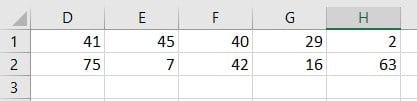
Download Excel TemplateHere we transpose a 2D array and interchange its rows and columns. This example transposes the above 2D array and prints the transposed array from cell “D1.” You can observe the result below the code.

Key Takeaways
- The VBA Transpose function facilitates switching rows and columns in Excel through code.
- It uses the PasteSpecial method with the Transpose option for this purpose.
- Automation via VBA enables more control and customization compared to manual transposition.
- VBA code allows for efficient data manipulation and reorganization.
- Data can be transposed between different ranges and sheets using this approach.
How to Transpose in VBA?
To transpose the given data in an Excel file, we perform the following steps as shown below:
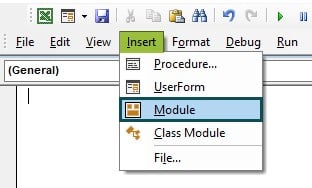
Step 1: Go to the “Developer” section in the toolbar and click the “Visual Basic” option. Now, the VBA Editor opens to add functions and Sub procedures. Then, click the “Insert” and “Module” buttons to create a new module or blank page.

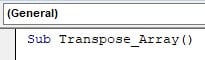
Step 2: Get into forming a subroutine to VBA Transpose Array.
Step 3: Define two variables of the variant datatype. One is to create an array, and the other is to store the transposed array.

Step 4: Declare a 2D array using the Array function. It will look like
[1 2 3
4 5 6]

Now, the Transpose function is called with the Application.Worksheet method.
Step 5: Paste the transposed array onto cell “A1.”

Using the Resize function, we define the two columns by defining the upper bound using the VBA UBound function and pasting its values onto the Excel sheet.
Code:
Sub Transpose_Array()
Dim MyArray As Variant
Dim TransposedArray As Variant
MyArray = Array(Array(1, 2, 3), Array(4, 5, 6))
TransposedArray = Application.WorksheetFunction.Transpose(MyArray)
Range(“A1”).Resize(UBound(TransposedArray, 1), UBound(TransposedArray, 2)).Value = TransposedArray
End Sub
Step 6: Run the code, and go to the Excel Sheet where you left your active cursor in.
VBA Transpose Using Transpose Formula
One method to transpose in VBA is by using the TRANSPOSE formula. The TRANSPOSE function is present in the library ‘Application.Worksheet’. Hence, while calling the TRANSPOSE formula, we call it along with the Application.Worksheet function. Here are the steps to transpose an array using the TRANSPOSE formula in VBA:
- Create a 2-dimensional array.
- Use the TRANSPOSE formula to transpose the array.
- Output the transposed array.
Let us see an example using the VBA Transpose Array:

This example performs the VBA Transpose 2D array and pastes it into cell “C5.”
Code:
Sub Transpose_Ex()
Dim MyArray As Variant
Dim TransposedArray As Variant
MyArray = Array(Array(2, 4, 6), Array(1, 3, 5))
TransposedArray = Application.WorksheetFunction.Transpose(MyArray)
Range(“C5”).Resize(UBound(TransposedArray, 1), UBound(TransposedArray, 2)).Value = TransposedArray
End Sub
The output of the above code can be viewed in the sheet you’ve left your cursor on active.
VBA Transpose Using Paste Special Method
Another method to transpose in VBA is by using the Paste Special method. Here are the steps to transpose a range using the Paste Special method in VBA:
- Copy the range to be transposed.
- Select the destination cell where the transposed range will be pasted.
- Use the Paste Special method and select the Transpose option (set the Transpose option as ‘True’).
- Clear the original range.
Let us see an example of how the VBA Transpose Paste Special method is used.
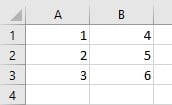
Consider a table:
Now, we need to transpose the given data into another sheet. This can be made possible using the VBA Transpose Paste Special method.
Here, we modify the Transpose element in the PasteSpecial method to transpose the array.
Code:
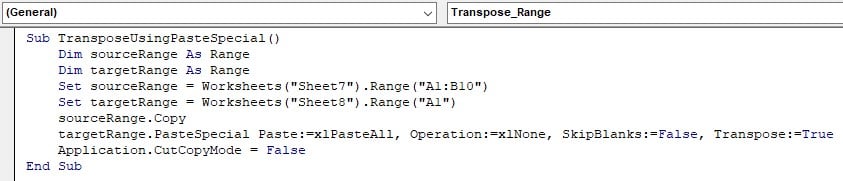
Sub TransposeUsingPasteSpecial()
Dim sourceRange As Range
Dim targetRange As Range
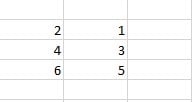
Set sourceRange = Worksheets(“Sheet7”).Range(“A1:B10”)
Set targetRange = Worksheets(“Sheet8”).Range(“A1”)
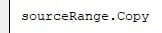
sourceRange.Copy
targetRange.PasteSpecial Paste:=xlPasteAll, Operation:=xlNone, SkipBlanks:=False, Transpose:=True
Application.CutCopyMode = False
End Sub
It prints the output in “Sheet8,” where the Paste range starts from cell “A1.”

Now that we know both ways let us see some examples below.
Examples
Let us look at examples on implementing the TRANSPOSE function in different scenarios.
Example #1
Let’s say we have a table depicting a company’s sales of different products. It is easier to view it when transposed and see where to make necessary changes. Hence, the employer implements the VBA Transpose Array function to transpose the data given below:
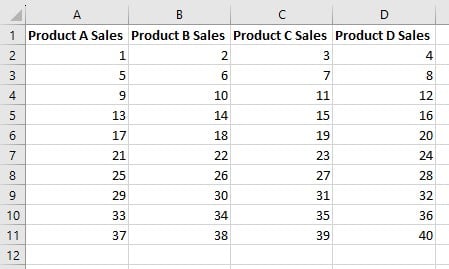
Step 1: Define a sub-procedure that performs VBA Replace string in Range from cells A1-A5.
Step 2: Define two variables of the range datatype. One is to store the range value of the given table, and the other is to store the range of the transposed array.

Step 3: Set the range of the table.

Step 4: Declare the Upper Bound and Lower Bound for the rows and columns.
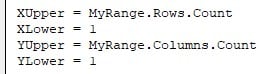
Define the Upper bound for the number of rows and columns. And declare their lower bounds as 1. It is because the Lower Bound depicts the smallest value of the number of rows and columns, 1.
Step 5: Paste the Transposed values onto cell “F1” using the Resize function.

By finding the difference between the upper and lower bounds and adding them to 1, we get the values of each transposed data and paste it into cell “F1.”
Code:
Sub Transpose_Data()
Dim MyRange As Range
Dim TransposedRange As Range
Set MyRange = Range(“A1:D11”)
XUpper = MyRange.Rows.Count
XLower = 1
YUpper = MyRange.Columns.Count
YLower = 1
Range(“F1”).Resize(YUpper – YLower + 1, XUpper – XLower + 1).Value = _
WorksheetFunction.Transpose(MyRange)
End Sub
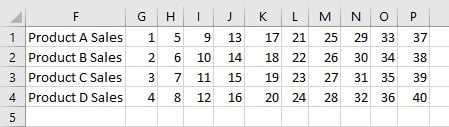
Step 6: Run the code for the above table. The output is shown below:
Example #2
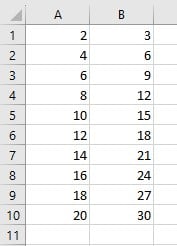
Consider an example where you need to transpose a given product table for a company. The data is shown below:
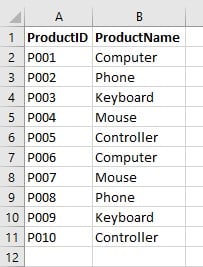
Step 1: Initialize a sub-procedure to transpose the product data given above.

Step 2: Declare two range variables. One is to find the range of the Product table, and the other variable is used to store the range of the transposed table.

Step 3: Set the source range and the target range.

Step 4: Copy the source range.
Step 5: Using VBA Transpose Paste Special, we utilize the Transpose module in the method, declare it valid, and paste it in the target range defined above.

This snippet of code uses VBA PasteSpecial to transpose a table.
Step 6: Declare the Cut and Copy mode as false since we do not want to delete the original data accidentally.

Code:
Sub TransposeProductData()
Dim sourceRange As Range
Dim targetRange As Range
Set sourceRange = Worksheets(“Sheet11”).Range(“A1:B11”)
Set targetRange = Worksheets(“Sheet10”).Range(“F1”)
sourceRange.Copy
targetRange.PasteSpecial Paste:=xlPasteAll, Operation:=xlNone, SkipBlanks:=False, Transpose:=True
Application.CutCopyMode = False
End Sub
Step 7: Print the above code. The output is printed in cell “F1” in “Sheet10”.

Important Things To Note
- The recommended way to transpose data using VBA is using the PasteSpecial method with the Transpose option. This method is straightforward and efficient.
- Ensure that the source and target ranges are valid and correctly defined. Always specify the worksheet and range accurately to avoid errors.
- Ensure that the size of the target range matches the transposed data size. Transposing data from a larger range to a smaller target range can cause data truncation.
- While the TRANSPOSE function can be used directly as a VBA Transpose array formula in Excel, it’s not directly usable in VBA code. Stick to the PasteSpecial method for transposition within VBA.
- Always use fully qualified references for worksheets and ranges. Avoid relying on the “active” sheet or selecting ranges.
- Avoid hardcoding values like worksheet names or cell addresses directly in your code. Instead, use variables or constants for flexibility and ease of maintenance.
Frequently Asked Questions (FAQs)
In Excel VBA, the size limit for transposing data using the PasteSpecial method is constrained by available memory and the row and column limits of Excel (1,048,576 rows and 16,384 columns in Excel 2016 onwards). Exceeding these limits can result in performance issues or errors.
• Invalid source or target ranges defined.
• Mismatched sizes of source and target ranges.
• Worksheet references or protection causing issues.
• Unreleased clipboard or memory conflicts.
• Incompatible data types or non-numeric data.
• Insufficient memory for larger datasets.
• Missing or inadequate error handling.
• Execution during active external application.
• Excel’s macro security settings block macros.
• Syntax or logical errors in the code.
• Define source range.
• Transpose using PasteSpecial.
• Use formulas with linked references.
• Set formulas in transposed cells.
• Handle cell referencing carefully.
Yes, VBA transpose rows and columns in Excel VBA switch rows and columns.
Use this VBA Transpose Template to follow along with the examples in this article.
Download Excel Template