What is Power BI Workspace?
A Power BI Workspace is a container that holds various Power BI assets, such as reports, dashboards, datasets, and dataflows. Power BI Workspaces are used for collaboration, organization, and managing access to Power BI content. They allow users and teams to work together on creating, sharing, and maintaining reports and other data-related assets.
Table of contents
Key Takeaways
- Power BI Workspaces are containers for organizing and collaborating on reports and datasets.
- Reports can be published to the Power BI Workspace app from Power BI Desktop.
- Access Power BI Services through a web browser to work with your reports and dashboards.
- Workspaces can be created to facilitate collaboration among team members.
- You can define Power BI Workspace roles to control the access to people or user groups to the workspace content.
- You can provision Power BI Workspace Permissions and configure access to manage its activities
📊 Unlock Advanced DAX Skills in Power BI!
Take your Power BI skills to the next level with our Advanced DAX in Power BI Training Course. Dive deep into advanced DAX functions, complex calculations, and optimization techniques to enhance your data analysis and reporting capabilities.
Publish Dashboard to My Workspace
To publish a dashboard to your workspace in Power BI, follow these steps:
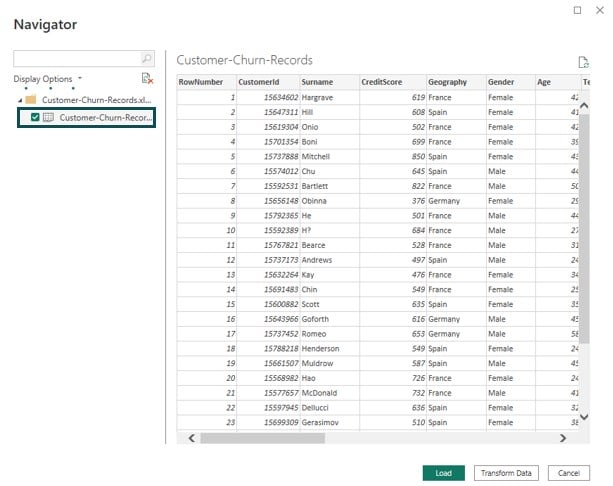
Step 1: Open Power BI Desktop, import the dataset using Data Connection and Load the file to the Power BI. Apply Transformation option to perform any data cleaning in Power BI or scraping or Transformation.
Step 2: Navigate to the Visualizations, select the visual, and drag and drop the data fields from the Fields pane to report canvas to create the desired visualization.

Step 3: Apply formatting to the visual as per the reporting requirements by navigating to the Format your visuals tab in the Visualizations pane.
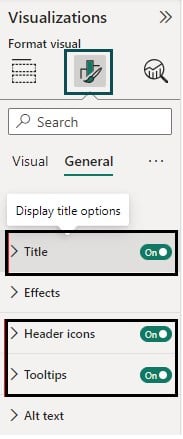
Alternatively, you can also choose an existing Power BI visual in Power BI Desktop to publish to My Workspace.
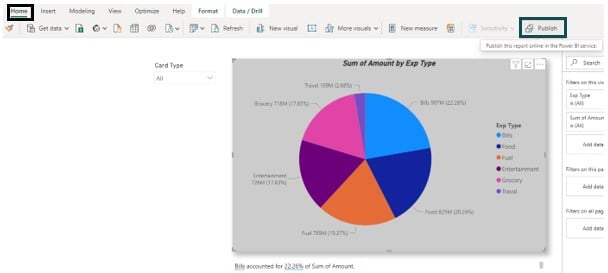
Step 4: Select the visual you want to publish as Dashboard, navigate to the Home tab, and then click on Publish button.
Step 5: Once you click on Publish button, a pop-up window will open where you can provide the destination of the file to be published.
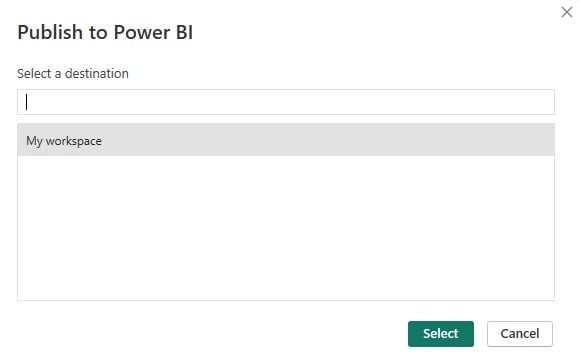
Step 6: Once you have selected the destination, click on Select. This would publish the dashboard to My Workspace.
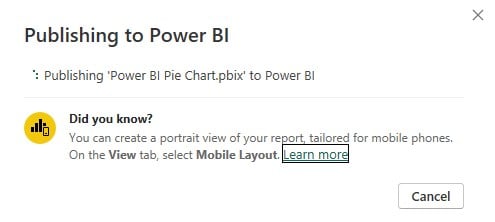
Once the publish is completed successfully, you will see a success confirmation message on the screen.
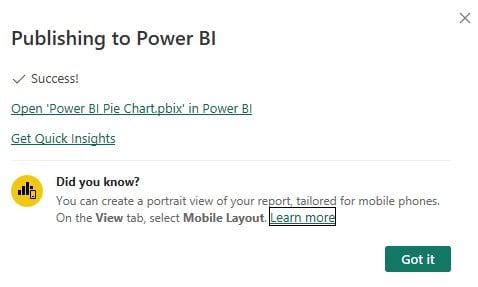
Now, you will be able to see the report and its associated visuals will be available in your workspace by logging into the Power BI Services.
Before you publish reports to the Power BI Workspace app, ensure that you have the right Power BI Service license. If you don’t have Power BI Pro or Premium Per User (PPU) license, you won’t be able to publish any Dashboard or reports to the Power BI Workspace app.
In the next section, we will cover how to log in to the Power BI Services.
Log in to Power BI Services
To log in to Power BI Services (Power BI online), follow these steps:
- Open a web browser.
- Go to the Power BI Service website.

- Enter your email address. If you have an existing account, the system will prompt you to enter your password and click on the Sign in button.

However, if you don’t have an existing account, then you have to create a new account.
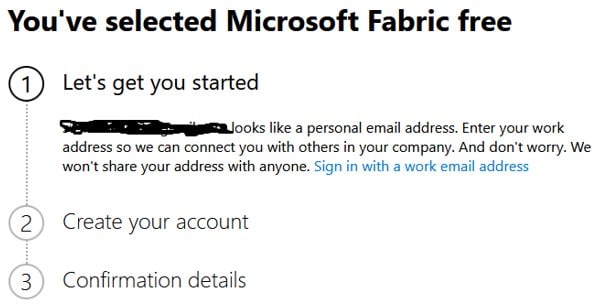
Once you have created a new account, try logging in using the credentials. Post validation, you would be able to access the Power BI Service.
- Once you have logged in to the Power BI service, navigate to My Workspace to view the dashboard you have published.

In the next section, we will learn how to create a new Power BI Workspace in Power BI Service with a step-by-step process.
How to Create a New Power BI Workspace?
Workspace provides an excellent means of creating collections assets such as dashboards, reports, and paginated reports in Power BI. You can bundle them into the Power BI workspace app for distribution across broader stakeholders.
To create a new Power BI Workspace, follow the steps highlighted below:
Step 1: Log into the Power BI Services with valid credentials.
Step 2: Navigate to Workspaces and click on the New workspace button.

Step 3: Fill out the details, such as providing a name to the workspace, description, domain, etc. You can also fill in the Advanced details and click on Apply.
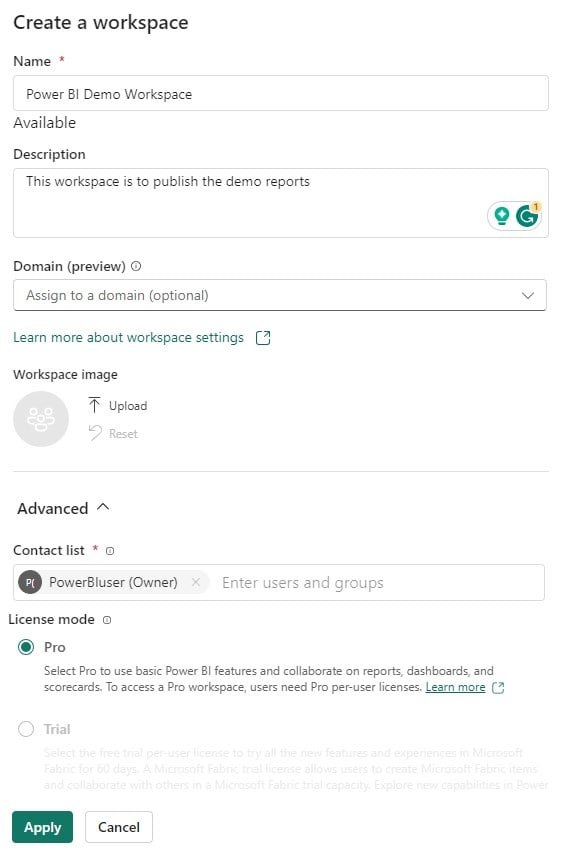
Once the workspace is created, you should be able to view it and start publishing the content to this workspace.

Step 4: Once the workspace is created, you can create new Power BI assets, such as Report, Paginated Report, Scorecard, Dashboard, and other details as shown below.
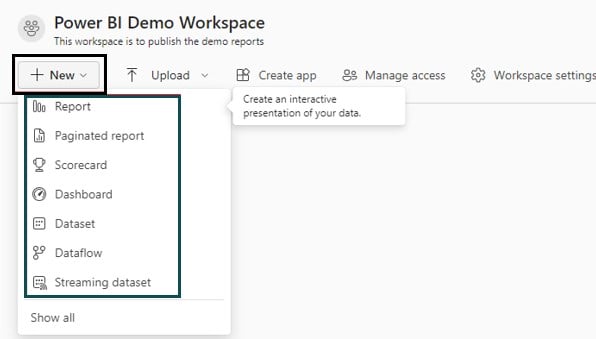
Step 5: Navigate to the Upload option in the Power BI Workspace app. You can upload the files from OneDrive for Business or Sharepoint or Browse the files from your system to upload them to the Workspace.
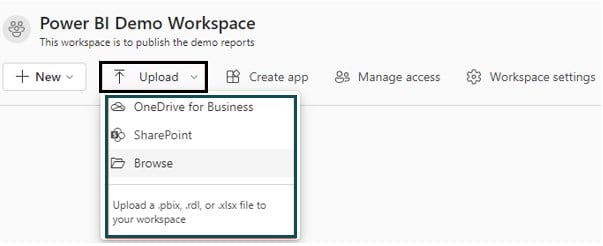
Step 6: Click on the Manage access option to provide the Power BI Workspace access to the intended audience.

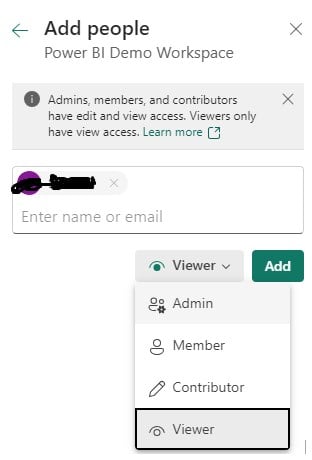
To provide the Power BI Workspace access to people or groups, and click on the Add people or groups button. You can also view the people or user groups already included in the Workspace.
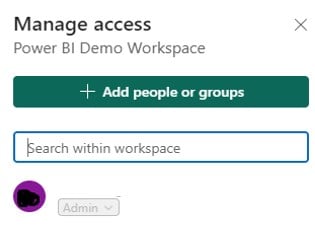
Add the name or email address of the people you want to provision the Power BI Workspace access.
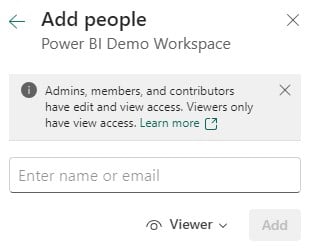
Once you have added the individual or group, choose the role access as per the dropdown values such as Admin, Viewer, Member, or Contributor, and click on Add button.
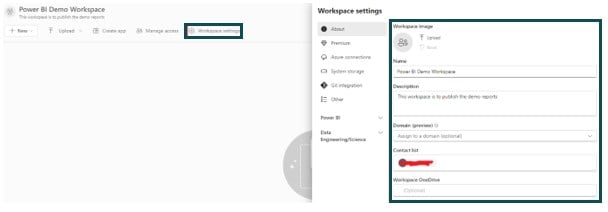
Step 7: Click on the Workspace settings to control the Power BI Workspace permissions and configurations.
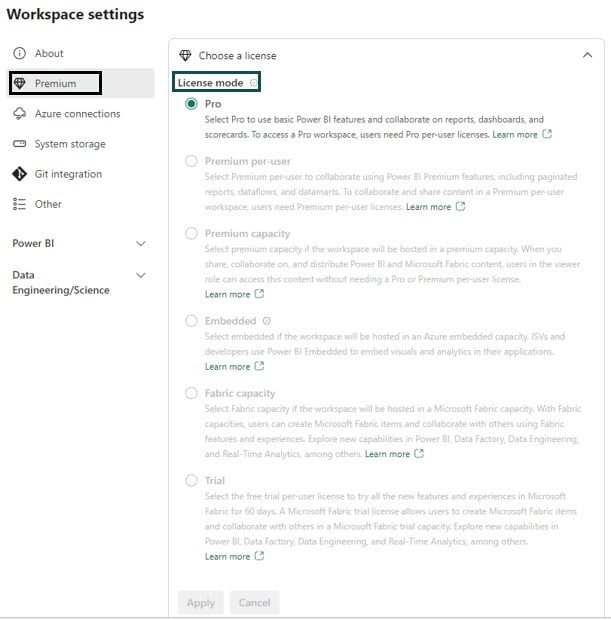
You can specify the license options. Note that you need to have a Pro license to create a Workspace. You can use a Trial per-user license to use the workspace on a trial basis for 60 days.
You can also view the system storage by navigating to the System storage tab.

If applicable, define the Git integration configuration as well as the Azure connections in Power BI.

If you don’t want to retain this Power BI Workspace, remove it by clicking the Remove this Workspace button.

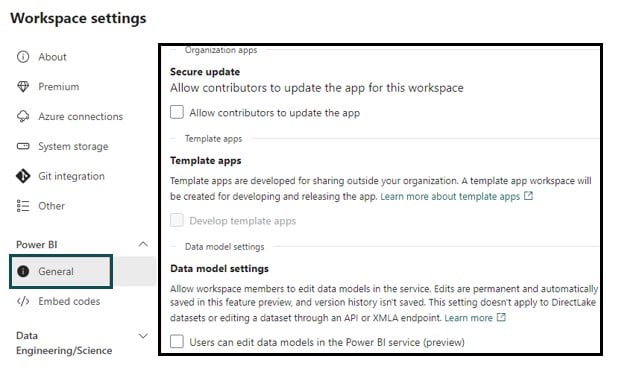
Ensure that you configure the details around the secure update, template apps, and data model settings for your workspace.
Step 8: Click on the Lineage view icon to see the data models available in your Power BI Workspace.

You can see the data lineage in Power BI across the various reports available in your workspace.
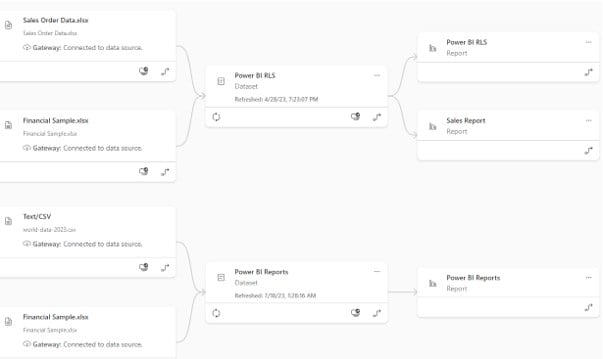
Using the steps above, you will be able to create a New Power BI Workspace in Power BI Service.
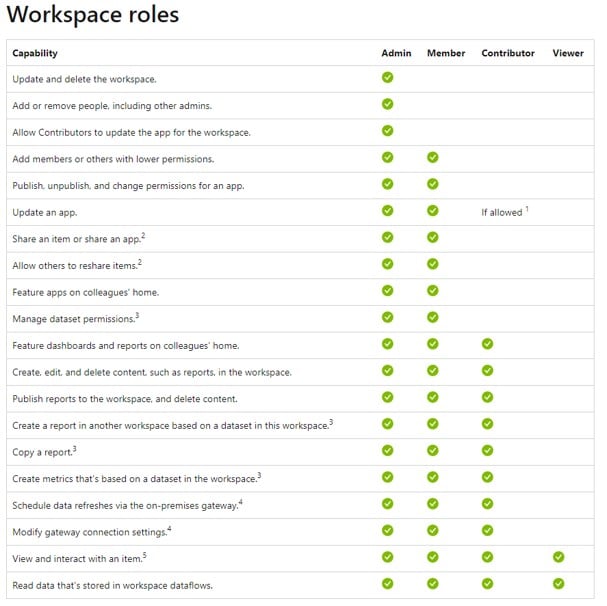
One critical aspect of the Power BI Workspace is the Roles. It lets you assign roles to individual users or user groups and help you manage their activities in the Power BI Workplace. You can assign the roles of Admin, Member, Contributor, or Viewer to individuals or user groups. All users get relevant access when you assign the roles to a user group.
Microsoft Power BI Documentation provides a comprehensive role matrix for Power BI Workspace as provided below:

Important Things to Note
- Power BI Workspaces are used to organize and collaborate on Power BI content.
- You can define the Workspace roles through the Manage access functionality and control the activities using the Power BI Workspace permissions.
- Datasets and reports can be shared within a workspace.
- Datasets can be reused across multiple reports in a workspace.
- Power BI Apps can be created to distribute content outside your organization.
If you have a Power BI Pro license, you can be a member of a maximum of 1000 workspaces.
Frequently Asked Questions (FAQs)
• Organize Content: Structure your workspace logically by grouping related reports, dashboards, datasets, and other assets together. Consider using folders to maintain a clear hierarchy.
• Permissions and Security: Assign appropriate roles and permissions to users and groups within the workspace. Follow the principle of least privilege to ensure data security.
• Use Dedicated Workspaces: Create separate workspaces for different projects, teams, or departments. This helps maintain separation and avoid clutter.
• Dataset Management: Centralize your datasets and promote the use of shared datasets to ensure data consistency and reduce duplication.
• Naming Conventions: Implement consistent naming conventions for reports, dashboards, datasets, and other objects. This makes it easier to locate and understand assets.
• Version Control: Utilize the “Manage versions” feature to keep track of changes to reports and datasets. It is especially important for collaborative development.
• Scheduled Refresh: Configure scheduled data refresh for datasets to ensure that reports stay up-to-date with the latest data.
• Use Power BI Apps: Consider creating Power BI apps to distribute content to external users. They allow controlled distribution of reports and dashboards to non-Power BI users.
Power BI Service doesn’t have a built-in feature to copy a dashboard from one workspace to another directly. However, you can recreate the dashboard in the target workspace by replicating its elements (reports, visuals, tiles) and configuring the same layouts. Another option is to copy the reports that are part of the dashboard and create a new dashboard.
Power BI Workspaces are primarily used to collaborate with internal team members. To share a workspace with others, follow these steps:
• Open the Power BI Service page and navigate to the Power BI Workspace tab you want to share.
• On the Power BI Workspace page, click on the Manage access option
• Add people or groups by entering their email addresses or names.
• Assign appropriate roles (Member, Contributor, Admin, Viewer) based on the level of access required.
• Users will receive an invitation to join the workspace and can access its content once you share the content.
Currently, Power BI doesn’t provide a direct way to hide a report within a workspace. If you want to restrict access to certain reports, you can do the following:
• Adjust permissions: Remove or restrict access to the report by adjusting the roles and permissions of users or groups.
• Use Power BI Apps: If the report is meant for specific audiences, create a Power BI app that includes only the desired reports and dashboards. Users will access the app rather than the workspace directly.
Recommended Articles
This has been a guide to Power BI Workspace. Here we look how to create a new Workspace, Log In and publish dashboard in Power BI with examples. You can learn more from the following articles –

Leave a Reply