
What Is Track Changes In Google Sheets?
Track changes in Google Sheets is a functionality that enables us to view the changes made in a Google Sheets file, date and time-stamp-wise. Google Sheets will periodically save versions of the file every few minutes automatically. So, we do not have to save the changes as a separate file every time we make an edit in the file.
Users can utilize the track changes methods in Google Sheets to trace the modifications other users make to the shared file. It helps them to work interactively with other users and manage their contribution to the Sheet data.
Use this Track Changes In Google Sheets Template to follow along with the examples in this article.
Download Excel TemplateFor example, we have a dataset updated in a Google Sheets file.

The requirement is to trace the edits made to the specific Google Sheets file.
Then, aligning with the definition of track changes in Google Sheets explained earlier we can use the option Version history to track the changes made to the Sheets file.

In this example, we utilize one of the track changes in Google Sheets options, Version history from the File tab. The Version history option shows two more options, out of which we should select the second option, See version history.
The above action opens the Version history pane, listing the various versions of the file, date and time stamp-wise, from the latest or current to the oldest version.
When a specific version includes multiple changes by one or more users, it shows a drop-down arrow against the corresponding version name. We can click the arrow to expand and view the changes made, date and time stamp-wise.
Next, if we want, we can click a specific version to view the updates in the workspace made in that version.
Key Takeaways
- Track changes in Google Sheets is an option to determine the edits made in a file, date and time-stamp-wise.
- Users can utilize the track changes methods in Google Sheets to identify the edits other users update in the shared file.
- There are four methods to track the changes in Google Sheets:
- Using the Version history option from the File tab.
- Using the Show edit history from the drop-down menu which appears on right-clicking a specific cell.
- Using the Notification settings option from the Tools tab.
- Using the Conditional formatting option from the Format tab.
Understanding Track Changes In Google Sheets
The options to track changes aid us in collaborating on a project with other users. These techniques help us see who has edited the file, what changes they made and when they made the changes.
So, using track changes in Google Sheets methods, we can trace each user’s offering to the file, and we can directly message them to discuss the modifications.
Thus, with the changes made to a Google Sheets file getting saved automatically and the track changes in Google Sheets options, we can use these files for remote and interactive work mode.
How To Track Changes In Google Sheets Using Version History?
The steps for using track changes in Google Sheets with the help of the Version history option are as follows:
- Select the File tab à The Version history right arrow à The See version history option.
- The Version history pane will appear on the right of the workspace, where we can view all the previous versions of the current file. We can also see the users who made the changes, along with the dates and times of the edits. Please note that the version names are the dates and times of the changes.
- In the case when we want a full view of all the versions, we must click on the drop-down arrow on the left of the specific version’s time stamp to expand its history details.
- Typically, Google Sheets names each version by the date and time stamp. However, we can save the required version by renaming it. For that, we must double-click the concerned version name and rename it.
- When we choose a previous version of the file, Google Sheets will permit us to restore it, name it or make a copy of the file. For that, we must click the “⁝” icon on the right of the specific version’s date and time. Next, we can click on the required option out of the three options to complete the required action.
Example
For example, we have a dataset holding the monthly inventory level data of a store.

The aim is to show track changes in Google Sheets using the Version history option.
Step 1: Select File – Version history – See version history.

The Version history pane opens showing the different versions of the file, from the current to the oldest.

Step 2: Click the drop-down arrow against the current version name to expand and view the version details.

The first entry in the current version is chosen. So, we can see that a change was made on May 20, at 3:48 PM, with the cell where the edit was made highlighted in the workspace.
Next, assume we select the next entry, which represents the file’s previous version. It shows the previous version’s date and time stamp in the Version history pane. And, the workspace shows the content before the changes made to the cell highlighted in the previous step.
Furthermore, we can see an option to restore this version above the workspace. We can use it if we need to save the file with the data right before the changes are made to the file.

Step 3: Click the “⁝” icon against the version name we aim to manage. We will see three options that enable us to restore or name the version or make a copy of the specific version.

How To Track Changes In Google Sheets Using Cell History?
The steps to trace changes using the Cell history option, in line with the meaning of track changes in Google Sheets explained earlier, are as follows:
- Right-click the cell we aim to trace the changes on and choose the option Show edit history from the pop-up menu.
- The Edit history pane will appear adjacent to the concerned cell. When we wish to scan through the changes made to the specific cell, click on the left and right arrows in the Edit history pane to navigate back and forth.
For instance, the dataset contains the date-wise website visitor data of a firm.

Assume we have made changes to cell B3, and we must show track changes in Google Sheets based on the specific cell.

Then, the steps are as follows:
Step 1: Right-click cell B3 and choose the Show edit history option from the pop-up menu.

The Edit history message appears, displaying the recent change made in the chosen cell. We can also view the user who made the edit, along with the date and time of the change.

Next, keep clicking the left arrow in the message box to view the previous changes.


Thus, we can use the left and right arrows to view all the changes made in a specific cell in the latest to oldest order of changes.
How To Set Up Notification Rules To Track Changes In Google Sheets?
The steps to track changes using the Notification Rules option in Google Sheets are as follows:
- Choose the Tools tab – The Notification settings option right arrow – The Edit notifications option.
- The Set notification rules window will appear. Here, we will see two notification options. We can choose the Any changes are made option as the first setting to track the edits in Google Sheets. The next setting enables us to choose how to notify the changes to us by email. In other words, we can choose notification frequency. Next, click Save.
- Once we save the rule, Google Sheets will show the Edit and Delete options to manage the rule we set in the previous step. We can also add additional rules using the Add another notification rule option. Click Done to complete the action.
For example, we have a dataset holding the invoice data at a firm.

Assume we must track the changes in Google Sheets using the Notification rulesoption. Then the method is as follows:
Step 1: Select Tools – Notification settings – Edit notifications.

Step 2: The Set notification rules window opens, where we update the required notification rules, as depicted below.

Click Save to view the Edit and Delete options to manage the notification rule.

Clicking Edit will take us back to the notification rule settings.
However, if we select Delete, we will see the below warning message box.

Click OK to proceed with the notification rule deletion process and view the below window.

Click Done to complete the action.
Furthermore, we can choose the Comment notifications option under the Notification settings option.

Choosing the option will open the Notification settings window, where we can set the required notification comments settings.

Click OK to complete the action.
How To Track Changes In Google Sheets Using Conditional Formatting?
The steps to track changes using Conditional formatting in Google Sheets, which is similar to Conditional Formatting in Excel, are as follows:
- Choose the cells we want to format and select the Format tab – The Conditional formatting option.
- The Default formatting rules settings will enable us to locate the changes made in cells. So, we shall retain the default settings.
- In the Formatting style settings option, choose the required cell background color or font settings. Click Done to implement the conditional formatting rules for the chosen cells.
Now, when a user deletes the data in a specific cell, the concerned cell color formatting disappears, denoting a change.
In contrast, if we edit the cell value instead of deleting the cell data, we may have to opt for other alternate methods to trace the change. The reason is that, in such a scenario, the concerned cell formatting will not disappear.
For example, the following dataset shows the stock details of the top ten companies in the US.

Assume that we must track the changes made in the cell range D1:G11. Then the method is as follows:
Step 1: Select the cell range D1:G11 and choose Format – Conditional formatting.

The Conditional format rules window opens.

Step 2: Let the Formatting style be Default. Next, choose the required cell background color using the Fill color option.


Finally, click Done to view and apply the conditional formatting rule.

Close the Conditional format rules pane.

Now, assume we delete the cell E5 content. Once we do that, the specific cell formatting disappears, as depicted below.

Thus, we can now track the changes in the conditionally formatted cell range.
How To Turn Off Track Changes In Google Sheets ?
The steps to turn off track the changes settings in Google Sheets are as follows:
- Select the Format tab – The Conditional formatting option to view the Conditional format rules window.


- Place the mouse cursor over the conditional formatting rule we aim to remove to view the bin icon against the rule in the Conditional format rules window. Click the bin icon to remove the rule.

The conditional formatting rule will not be visible in the Conditional format rules window, indicating that the track changes feature is turned off.

Finally, close the Conditional format rules window.
Important Things To Note
- Google Sheets regularly saves the changes made to the file automatically. So, we can directly use the options to track changes in Google Sheets based on the time, date, and the user who edited the file.
- If we must know who edited the Google Sheets file while tracking the changes, we can use the Version history option. Otherwise, we can employ the Show edit history option that shows the chosen cell edit history.
Frequently Asked Questions (FAQs)
We can track changes in Google Sheets with Email notifications using the following method explained with an illustration.
The source dataset contains a list of clients and contact numbers.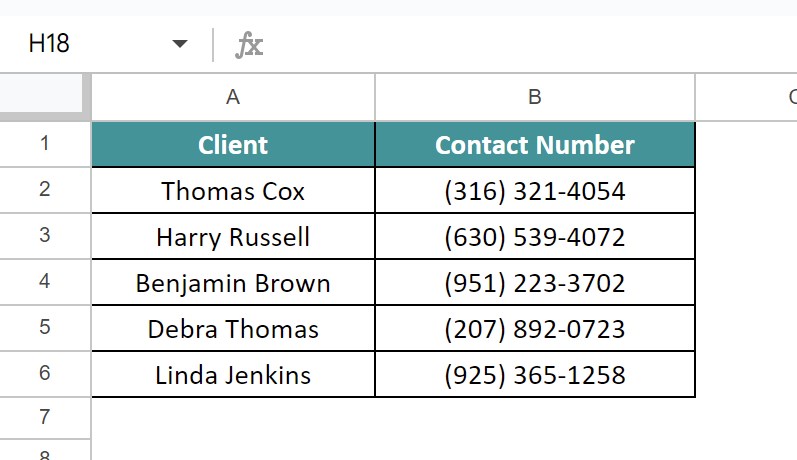
The aim is to track the changes in the Google Sheets with Email notifications.
Step 1: Choose the Tools tab – The Notification settings option right arrow – The Edit notifications option.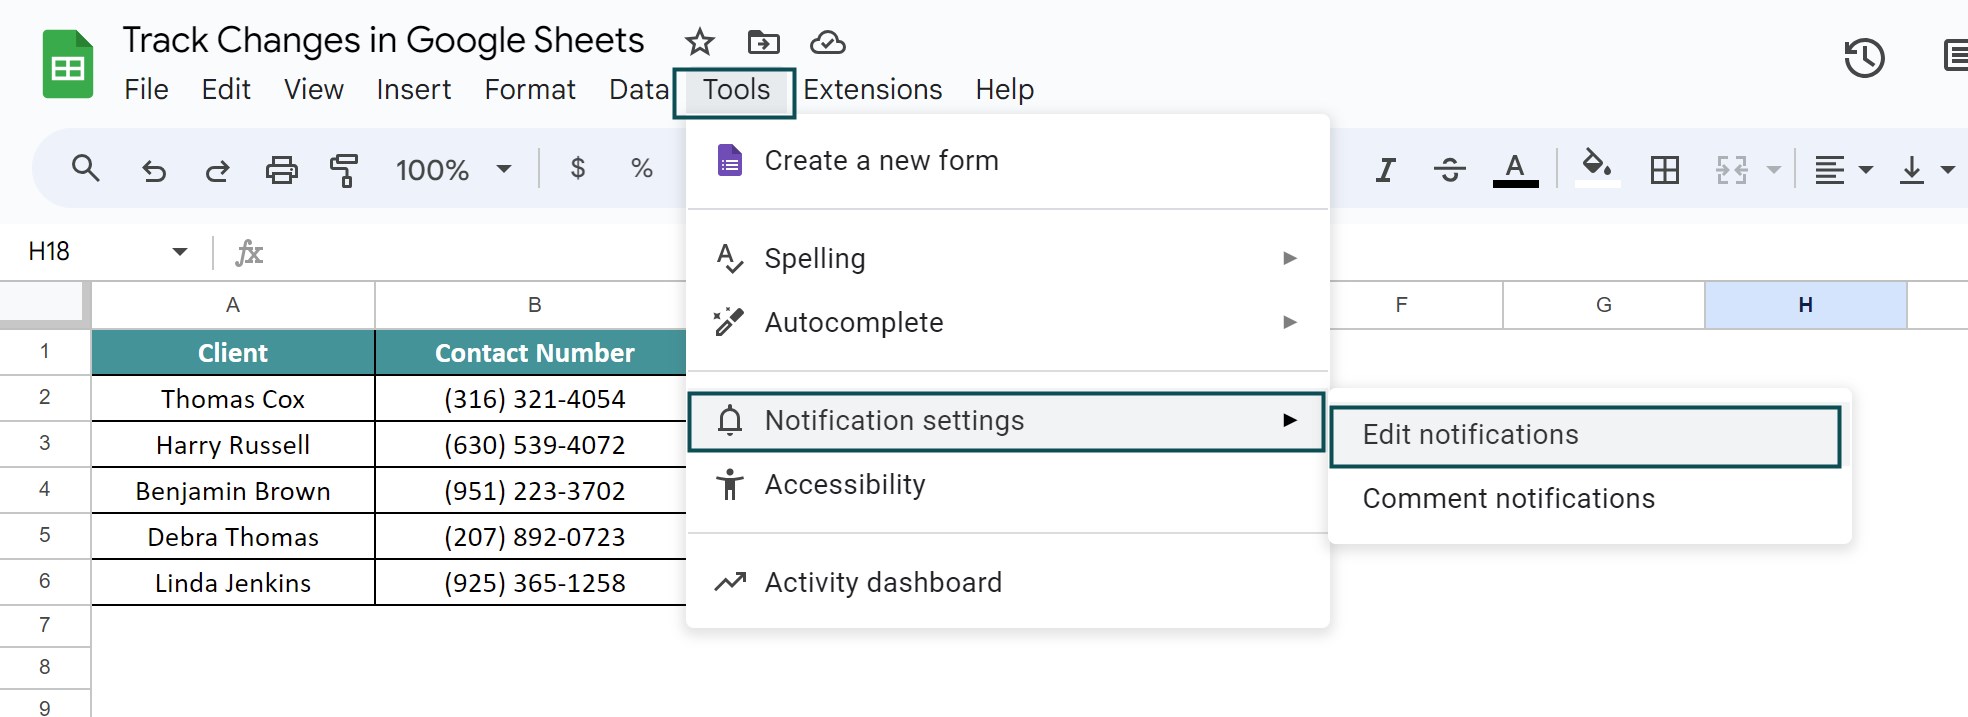
Step 2: The Set notification rules pane will open. We shall choose Any changes are made option as the Notify me at setting.
Next, we shall set the Email – daily digest option as the Notify me with setting.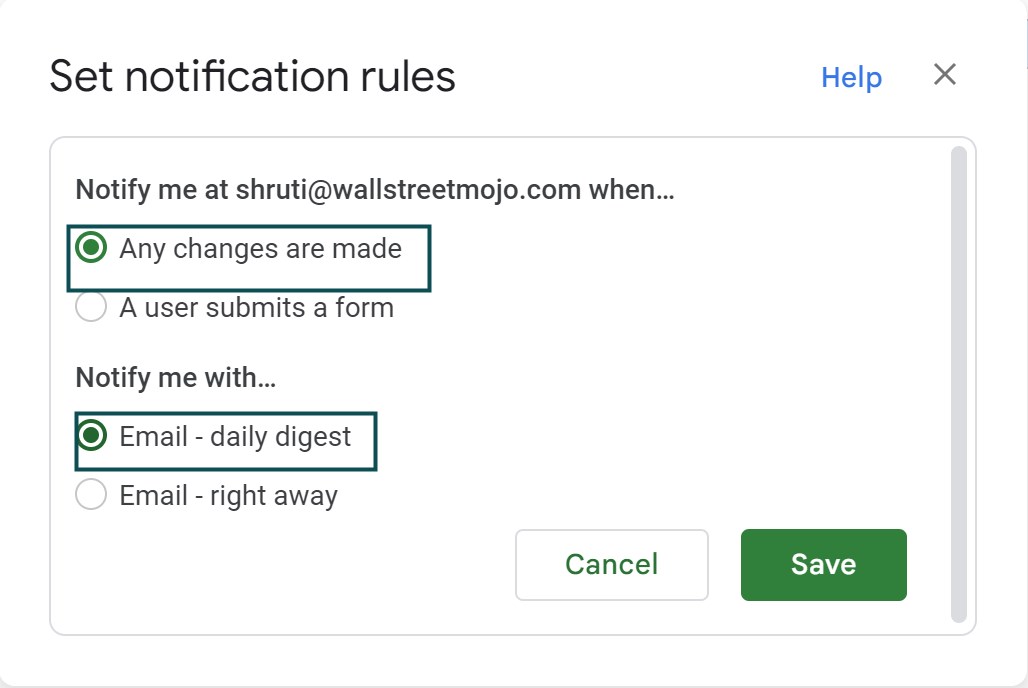
Click Save to apply the notification rule.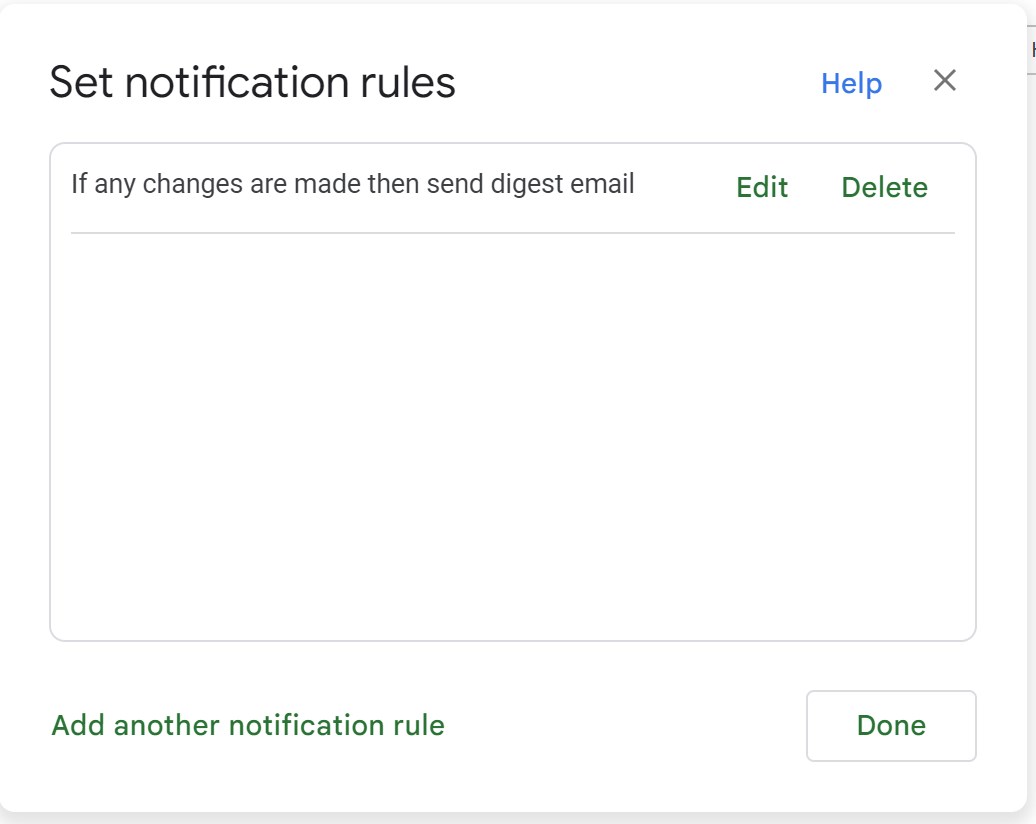
Finally, click Done to complete the action.
You can track who made changes in Google Sheets by clicking the File tab – The Version history option – The See version history option.
The above step will open the Version history window on the right of the workspace. The pane will show the different versions of the file, marked with the users’ names who made the edits.
The keyboard shortcuts to access the edit history for tracking changes in Google Sheets are as follows:
Windows: Ctrl + Alt + Shift + H
Mac: Cmd + Alt + Shift + H
The shortcuts will open the Version history pane, where we can check the various file versions to track the changes.
Use this Track Changes In Google Sheets Template to follow along with the examples in this article.
Download Excel TemplateRecommended Articles
Continue with these related resources when you want the next practical step in this topic.
- Data Validation In Google Sheets
- Format Cells in Google Sheets
- Conditional Formatting In Google Sheets
- Filter Function In Google Sheets
- SORT in Google Sheets
Explore the full Google Sheets Data Cleaning Validation and Formatting guide or browse Google Sheets Resources.