What Is Excel VBA PowerPoint?
Excel VBA PowerPoint refers to using VBA programming language in Microsoft Excel to automate tasks or perform operations related to Microsoft PowerPoint. With Excel VBA PowerPoint, you can create macros and scripts that interact with PowerPoint to automate tasks such as:
- Creating new PowerPoint presentations, adding slides, setting slide layouts, and populating slides with data from Excel.
- Data transfer between Excel and PowerPoint. It could involve copying charts, tables, or other information from Excel and pasting it into PowerPoint slides.
- Formatting and styling of PowerPoint slides. You can customize fonts, colors, shapes, and other elements to achieve a consistent look across your presentations.
- You can use VBA to control the PowerPoint slideshow, including starting, stopping, etc.
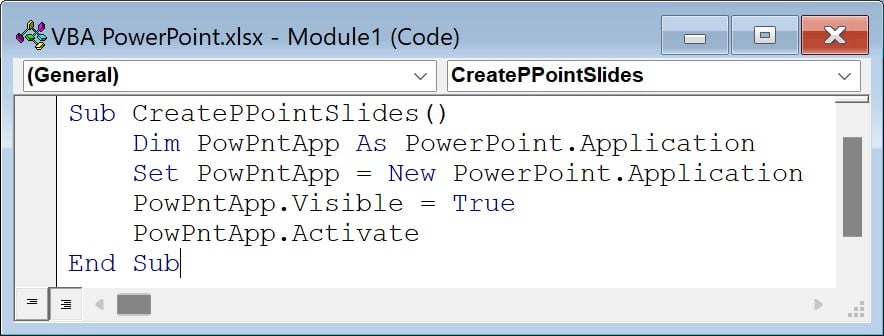
To use VBA in Excel for PowerPoint automation, you typically open the Excel VBA editor, write your VBA code, and execute it within Excel. It can then manipulate PowerPoint through the PowerPoint Object Model, which is a set of objects and methods that allow programmatic control over VBA PowerPoint Online. For example, below, we create a subroutine to open a PowerPoint application.


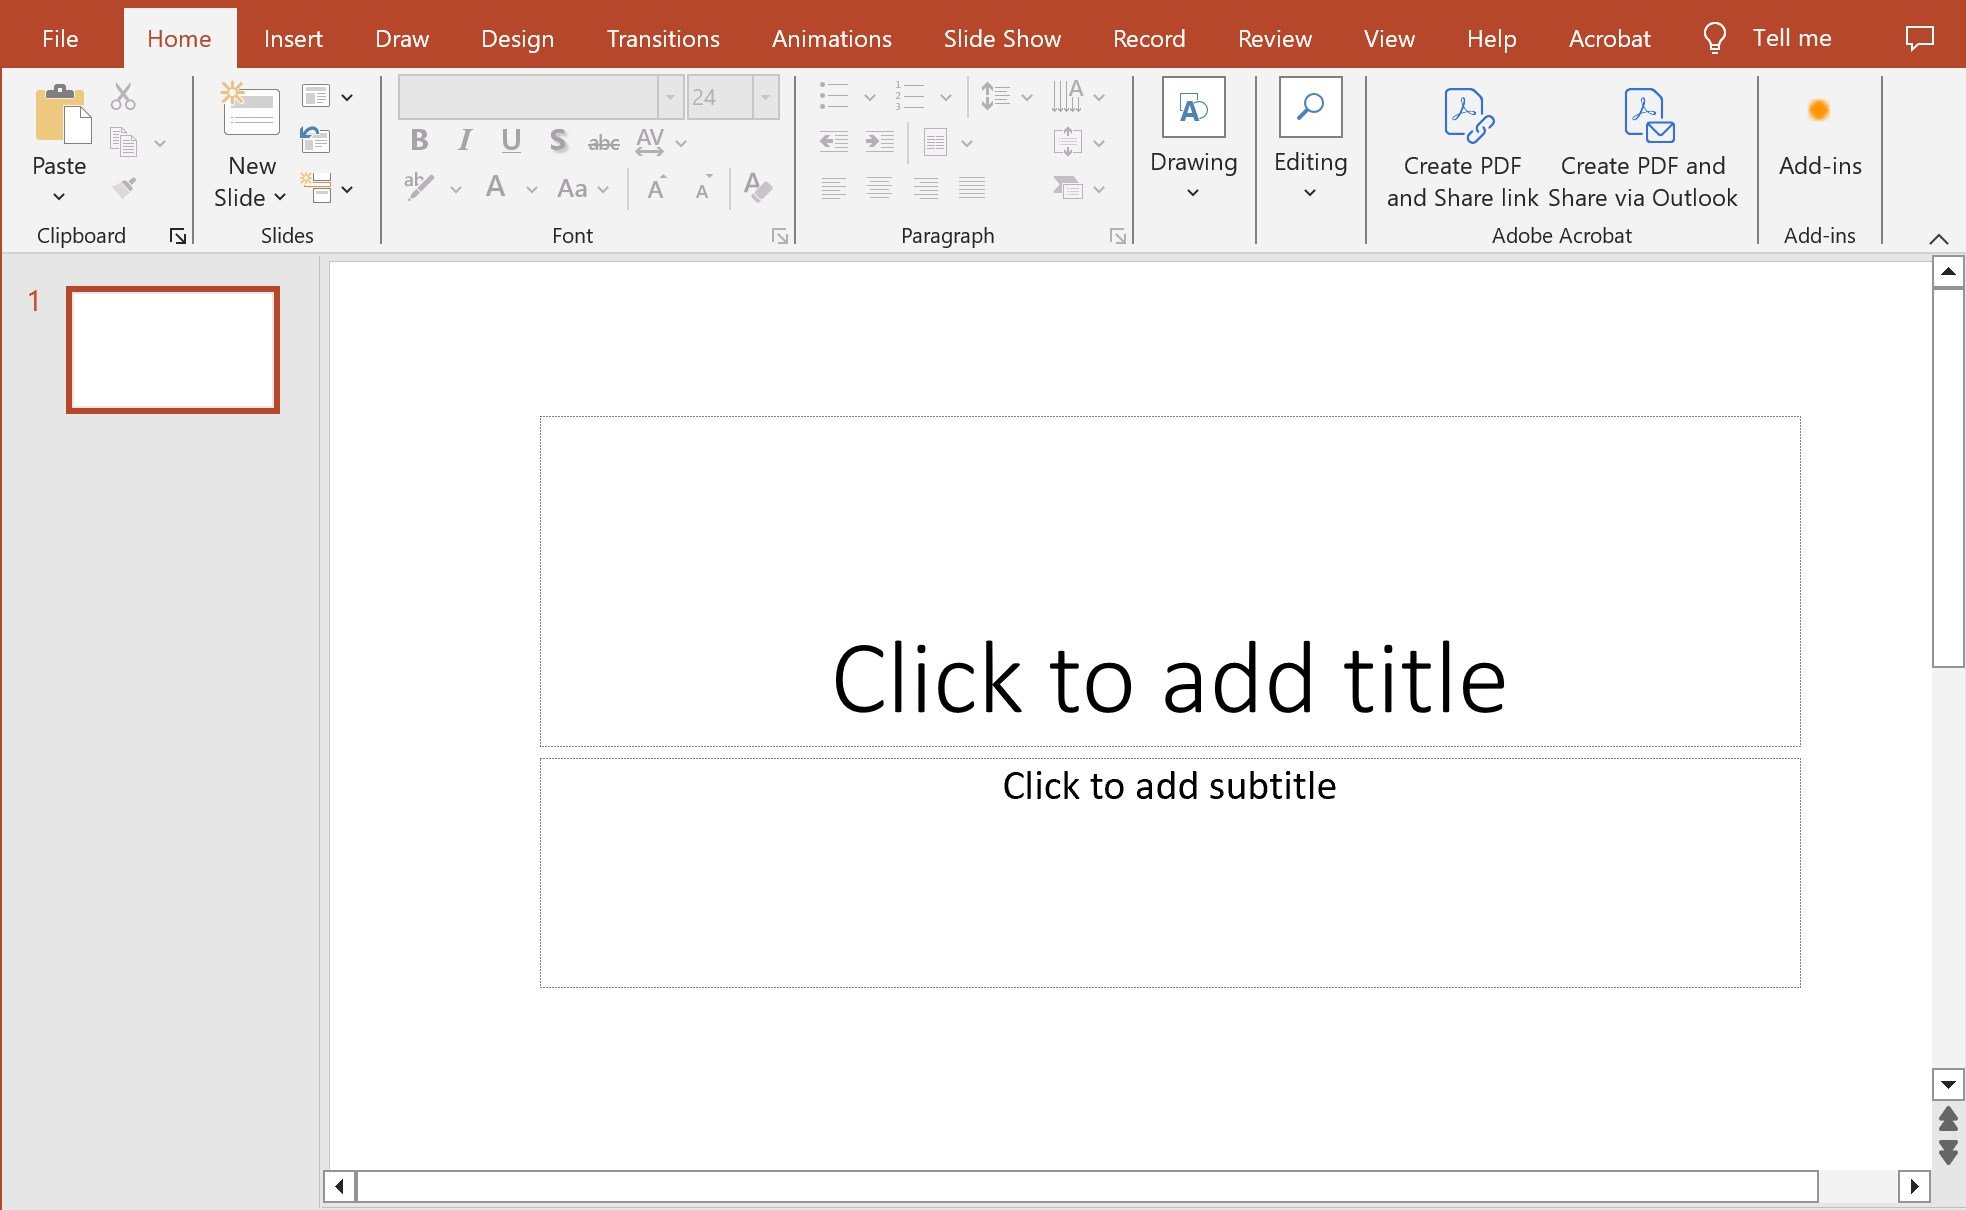
The PowerPoint app is opened in your system.
Table of contents
Key Takeaways
- The PowerPoint Object Model is a set of objects and methods that allows programmatic control over PowerPoint.
- It provides a way to manipulate PowerPoint elements (slides, shapes, etc.) through code.
- It allows users to add slides, set layouts, and populate slides with data or content.
- VBA enables seamless data transfer between Excel and PowerPoint.
- Users can copy charts, tables, or other information from Excel and paste it into PowerPoint slides.
- Users can write VBA code to perform specific tasks, such as creating a new presentation, adding slides, and manipulating PowerPoint objects programmatically.
Excel VBA 5-in-1 Course Bundle – (30+ Hours of Expert-Led Training)
If you want to learn Excel and VBA professionally, then the Excel VBA 5-in-1 Course Bundle (30+ hours) is the perfect solution. Whether you’re a beginner or an experienced user, this bundle covers it all – from Basic Excel VBA to Event Automation, Error Handling, Email Automation, and real-world applications with downloadable templates.
How to Enable Powerpoint Object Model?
Step 1: Open the Excel WorkBook and click on “Developer tab” on the toolbar.

Select “Visual Basic” in the Workbook. It will open the Excel VBA Editor.

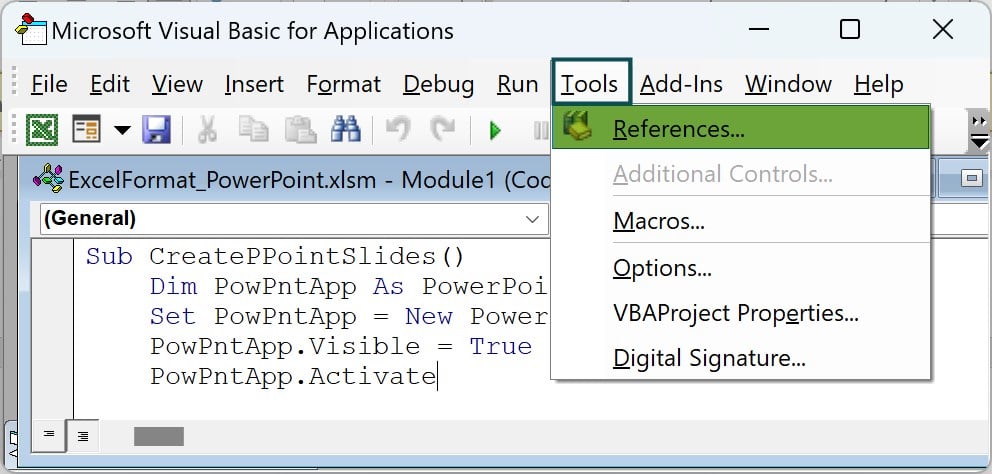
Step 2: On opening the VBA Editor and Module, go to “Tools” > “References.”

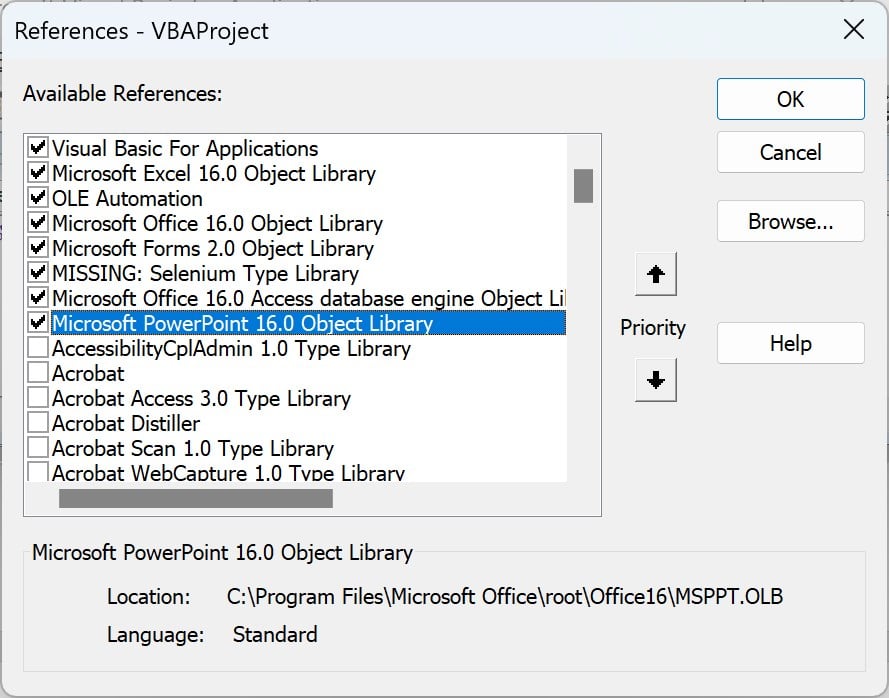
It will open a Window.
Step 3: Select “Microsoft Office 16.0 Access Database Engine Object” from the References.

Step 4: Also select “Microsoft PowerPoint 16.0 Object Library.”

Step 5: Click “OK” and close the “References” tab. Now you’ve enabled the PowerPoint Object Model in your Excel Workbook.
How to Create PowerPoint Presentation?
See how to create a PowerPoint presentation as shown.
- In the Excel WorkBook, select “Developer”. If it isn’t there in your workbook, go to “File” > “Customize Ribbon” to enable it.

Under “Developer,” select “Visual Basic.” It opens the VBA Editor.
In the VBA Editor, select “Insert” from the toolbar, and then click on “Module” to code in the module.
- Define a sub-procedure for creating a PowerPoint presentation.

- Create a PowerPoint application using the VBA Object variable.

- Set its visibility as TRUE. You need to be able to see the PowerPoint.

- Create a new presentation in PowerPoint using the application object defined earlier.

- Define the slide number of the PowerPoint to be selected. There is only one page in this PPT. Hence, the index is 1.

- Add the index of the slide into the VBA PowerPoint Active Slide with the type of Layout you want it to be. In this case, it is the Standard Layout text.

Code:
Sub CreatePowerPointPresentation()
Dim pptApp As Object
Set pptApp = CreateObject(“PowerPoint.Application”)
pptApp.Visible = True
Dim pptPres As Object
Set pptPres = pptApp.Presentations.Add
Dim slideIndex As Integer
slideIndex = 1
pptPres.Slides.Add slideIndex, ppLayoutText
End Sub
8. Run the sub-procedure by either pressing “F5” or the green arrow button on the VBA Editor toolbar to run the sub-procedure.

Examples
See some interesting examples of how to create a PowerPoint presentation using Excel VBA.
Example #1
Suppose you want to create a Title page for your PowerPoint presentation via code. You can do that by using VBA PowerPoint online.
Step 1: Define the subroutine, which will create a PowerPoint Title page.

Step 2: Create a new PowerPont Application instance in VBA using a variable.

Step 3: Set the PowerPoint visibility to true and then Activate the PPT.

Step 4: Create a new PowerPoint presentation in the PowerPoint application.

Step 5: Add a slide to the PowerPoint presentation and set its layout as the Title.

There will be two text boxes on the Title page in which you can write the name.
Step 6: Add the content for the Title Box and the Subtitle Box with the VBA PowerPoint Shapes function.

The text boxes are defined as “Shapes”. So Shape(1) will be the Title Box in the Presentation slide, and Shape(2) will be the Subtitle Box in the PowerPoint presentation.
Step 7: Add another slide into the Presentation with index 2 and set the layout as blank. It will be so that there are no text boxes available.

Code:
Sub CreatePowPntShow()
Dim ppt As PowerPoint.Application
Set ppt = New PowerPoint.Application
ppt.Visible = True
ppt.Activate
Dim pptPres As PowerPoint.Presentation
Set pptPres = ppt.Presentations.Add
Dim pptSlide As PowerPoint.Slide
Set pptSlide = pptPres.Slides.Add(1, ppLayoutTitle)
pptSlide.Shapes(1).TextFrame.TextRange = “VBA PowerPoint Tutorial”
pptSlide.Shapes(2).TextFrame.TextRange = “by ExcelMojo”
Set pptSlide = pptPres.Slides.Add(2, ppLayoutBlank)
pptSlide.Select
End Sub
Step 8: Run the sub-procedure to create a 2-page PowerPoint presentation, as shown below.


Example #2
Here, you want to copy the tables from Excel and paste them into PowerPoint. Instead of manually doing it, you can use Excel VBA to copy from the Excel sheet and paste it into the PowerPoint presentation using VBA PowerPoint. This code might look long, but we will break it down into simple steps and explain each line so that understanding it is a breeze! Look at the table below.

Step 1: Name the subroutine that will copy and paste Excel tables into PowerPoint.

Step 2: Define a new PowerPoint Application instance and assign it to an instance variable.

Step 3: Set its visibility as TRUE and activate the instance.

Step 4: Add a new Presentation to which we will copy the table to the activated PowerPoint application.

Step 5: Now, we need a PowerPoint slide object to put the first slide into it. Let us set its layout as the PowerPoint title layout.

Step 6: Define a variable to store the Title textbox using VBA PowerPoint shapes.

Step 7: Write the title text and customize its font, font size, and color, as shown.

Using the VBA With Statement, you can neatly arrange the common functions with the same header to save space.
Step 8: Define a variable to store the subtitle box using the VBA PowerPoint Shapes function.

Step 9: Write the content required in the subtitle box and then customize its font.

Similarly, use the VBA With to group function names with common prefixes together to encourage code readability.
Step 10: Add a second slide to the presentation with the classic text layout of PowerPoint.

Step 11: Write the title and the required points on the slide using VBA PowerPoint shapes.

Step 12: Make slide 2 the active slide by using the VBA PowerPoint active slide.

Step 13: Copy the table from Excel and paste it into the current slide.

Using VBA CurrentRegion will select all non-empty cells at a stretch in an Excel worksheet. Here, it is copied and pasted into the PowerPoint side.
Code:
Sub CreatePPointPresentation()
Dim PowPntApp As PowerPoint.Application
Set PowPntApp = New PowerPoint.Application
PowPntApp.Visible = True
PowPntApp.Activate
Dim PowPntPrsnt As PowerPoint.Presentation
Set PowPntPrsnt = PowPntApp.Presentations.Add
Dim PowPntSlide As PowerPoint.Slide
Set PowPntSlide = PowPntPrsnt.Slides.Add(1, ppLayoutTitle)
‘ Content for title and its customization
Dim titleShape As PowerPoint.Shape
Set titleShape = PowPntSlide.Shapes(1)
titleShape.TextFrame.TextRange.Text = “Information on Employees”
With titleShape.TextFrame.TextRange.Font
.name = “Montserrat”
.Size = 40
.Bold = True
.Color.RGB = RGB(240, 0, 120) ‘ Set font color to pink
End With
‘ Content for subtitle box and its customization
Dim subtitleShape As PowerPoint.Shape
Set subtitleShape = PowPntSlide.Shapes(2)
subtitleShape.TextFrame.TextRange.Text = “by VBATutorials”
With subtitleShape.TextFrame.TextRange.Font
.name = “Calibri Bold”
.Size = 30
.Color.RGB = RGB(128, 0, 200)
End With
‘ Add a blank slide
Set PowPntSlide = PowPntPrsnt.Slides.Add(2, ppLayoutText)
PowPntSlide.Shapes(1).TextFrame.TextRange.Text = “EMPLOYEES IN TUTORIAL”
PowPntSlide.Shapes(2).TextFrame.TextRange.Text = “Information on Employees”
PowPntSlide.Select
‘ Copy data from Excel and paste it as a table
Range(“A1”).CurrentRegion.Copy
PowPntSlide.Shapes.Paste
End Sub
Step 14: Run the subroutine to see the PowerPoint presentation.


Important Things To Note
- Explicitly close and release PowerPoint objects (e.g., presentations, slides) when you’re done using them to free up system resources.
- Minimize the use of Select and Activate in your code.
- Avoid hardcoding values when possible. Use variables or constants to make your code more flexible and easier to update.
- Avoid suppressing warnings without a good reason. Disabling warnings can hide potential issues that need attention.

Frequently Asked Questions (FAQs)
Yes, it’s possible to interact with Excel from PowerPoint using VBA. Use the CreateObject function to create an Excel Application object. You can then manipulate Excel objects, transfer data, and perform tasks. Remember to release the Excel object when done as shown.
Dim slideIndex As Integer
For slideIndex = 1 To ActivePresentation.Slides.Count
‘ Your code here
Next slideIndex
Yes, it’s possible to interact with Excel from PowerPoint using VBA. Use the CreateObject function to create an Excel Application object. You can then manipulate Excel objects, transfer data, and perform tasks.
Dim xlApp As Object
Set xlApp = CreateObject(“Excel.Application”)
‘ Your code to interact with Excel here
Set xlApp = Nothing
By declaring the following code, you can assign a macro to a button or shape.
ActiveSheet.Shapes(“YourButtonName”).ActionSettings(ppMouseClick).Action = “YourMacroName”
Using VBA On Error Resume Next and On Error GoTo 0, you can disable potential errors that may come out of a few lines of code.
On Error Resume Next
‘ Your code that might cause an error
On Error GoTo 0 ‘ Reset error handling to default
‘ Check for errors using Err object: If Err.Number <> 0 Then
‘ Your error-handling code here
End If
Download Template
This article must help us understand the VBA PowerPoint formula and examples. You can download the template here to use it instantly.
Recommended Articles
Guide to VBA PowerPoint in Excel & its meaning. Here we explain how to use the VBA PowerPoint with its properties, adding module, examples & downloadable excel template. You can learn more from the following articles –


Leave a Reply